Increase productivity by automating your repetitive keystrokes with an Arduino and a button!
People all around the world use Arduino to control motors, solenoids, and pumps, but did you know that an Arduino can also be used to control your computer?
Using some simple code, an Arduino can present itself to your computer as a keyboard, capable of typing text, holding keys and triggering keyboard shortcuts. You can even code your Arduino to act as a mouse, or a media controller – the possibilities are vast!
A Powerful Productivity Tool
What I find most exciting is that you can program your Arduino to send a series of keystrokes to your computer. Therefore, if you wire up a button to your Arduino, you can use a single button press to trigger multiple automated keystrokes.
If you often find yourself typing repetitive text or using the same keyboard shortcuts, it's time for you to turn your Arduino into a powerful productivity tool that removes a lot of the key-clacking!
Say Hello to the ATmega32u4
Before you reach for your Arduino Uno, you should know that this capability is limited to Arduino boards based upon the ATmega32u4 microchip.
Unlike most Arduino boards (which have a separate microchip to handle serial communication over USB), the ATmega32u4 does everything in one chip, allowing it to directly present itself as a keyboard.
The boards that will support this capability are the Arduino Leonardo, the Arduino Micro, and the Arduino-compatible Pro Micro.
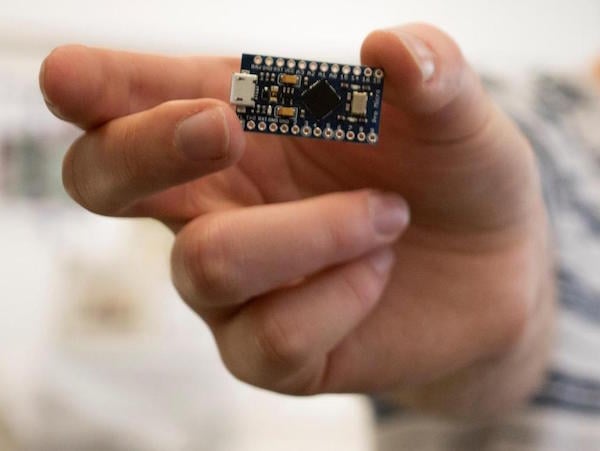
For this tutorial, I will be using an Arduino-compatible Pro Micro. You can get them really cheap from Ebay, just make sure you don’t mix it up with the Pro Mini, it’s a completely different board!
An Arduino-compatible Pro Micro.
The Hardware
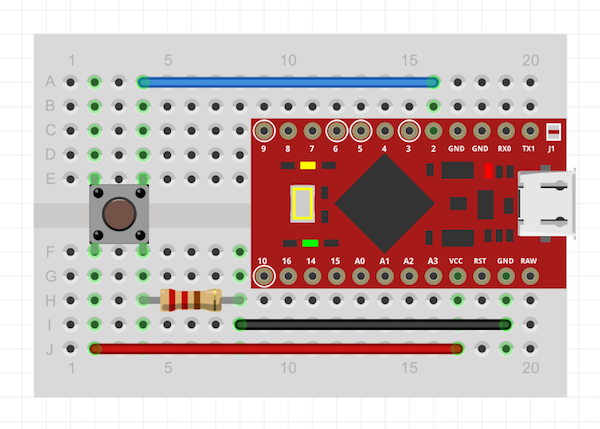
Placing my Arduino-compatible Pro Micro into a breadboard and wiring up a button gives a physical input for triggering our automated keystrokes. It’s quite a simple wiring diagram – the input for the button is on pin 2 of the Arduino-compatible Pro Micro.
Here’s a schematic of the wiring diagram:
And if you’re playing along at home (like I am, as I write), then here is a photo of the physical board:
The actual build. Don't mind my (rather wiggly) circuit wiring.
Keystroke Automation Software
The software is fairly simple – it uses the built-in Keyboard.h library to send the keystrokes and has a basic loop that listens out for the button press on pin 2.
#include <Keyboard.h> // The main library for sending keystrokes.

void setup()
{
 Keyboard.begin();  // Initialise the library.
}

// Loop around waiting for a button press on pin 2.
// When the button is pressed, go to the function triggerAutomation.
void loop()
{
  if(digitalRead(2) == HIGH)
  {
    triggerAutomation();
  }
}

void triggerAutomation()
{
  Keyboard.press(KEY_LEFT_GUI);     // Press and hold the Windows key.
  Keyboard.press('r');              // Press and hold the 'r' key.
  delay(100);                       // Wait for the computer to register the press.
  Keyboard.releaseAll();            // Release both of the above keys.
  delay(1000);                      // Wait for the Windows Run Dialog to open.
  Keyboard.print("Notepad");        // Type "Notepad".
  Keyboard.press(KEY_RETURN);       // Press the Enter key.
  delay(100);                       // Wait for the computer to register the press.
  Keyboard.releaseAll();            // Release the Enter key.
}
As a fun example, I’ve made this Arduino sketch open up the application Notepad on Windows computers. It does this by triggering the keyboard shortcut “Windows Key + R” to open the Windows Run Dialog. It then types out the name of the application “Notepad” and presses the Enter key.
This combination of keystrokes will cause the application Notepad to joyfully popup on your screen, all triggered from a single physical button linked to your Arduino.
If you’re on Linux or OSX don’t despair, the code can very easily be tweaked to achieve automation in your preferred operating system – the same principles of keypresses and shortcuts still apply.
Next Steps
Want to open a different application instead of Notepad? Easy! Just replace the string “notepad” with “winword” in the Arduino sketch and see what happens… you’ll probably be very familiar with the application that popups up!
Don't Forget the Delays...
One thing that may not be immediately obvious is the requirement for delays in the code. I put these in because your Arduino can send keystrokes much faster than your computer can read them. Therefore, you have to put in delays of between 100 and 1000 milliseconds to allow your computer to catch up.
How Far Can you Go?
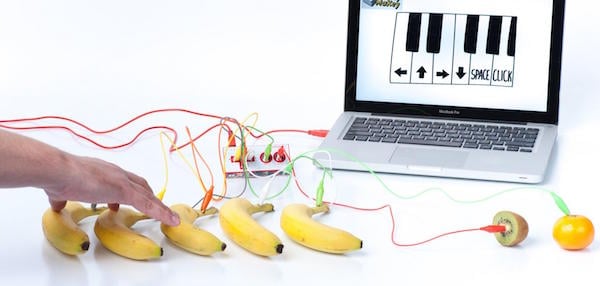
If you’re looking for some inspiration on what can be achieved using this Arduino-as-a-keyboard technology, then take a peek at the Makey Makey.
It uses the ATmega32u4 chip on a clever little board that is designed to be hooked up (through crocodile clips) to bananas, carrots, gummy bears and, well, anything you like!
A banana piano with the Makey Makey. Image courtesy of Makey Makey.
You create a connection between two contacts via something fun (like a banana) and this will cause the Makey Makey to send a keystroke to your computer. Just open up an online piano app and release your inner banana musician.