Hi all,
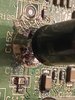
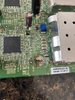
I'm just entering the electronics foray because my PVR stopped booting up. Watched a good video on my problem & I found that I too, had a bunch of blown capacitors. I replaced them all, but I had a heck of a time removing C152 on the board. It seems quite black & some of the solder I cannot remove with a wick or a pump. I replaced this on x2 and before the 2nd attempt, the machine would at least go thru the motions on trying to get the signal, but now it won't even go past the 1st stage of the check switch-it did before #2 replacement. Is there any way to bridge that location, or is it maybe also another cap misbehaving. I have to confess that this is my 1st attempt at soldering, so maybe my contacts aren't good enough. Any advice would be greatly appreciated.
I'm just entering the electronics foray because my PVR stopped booting up. Watched a good video on my problem & I found that I too, had a bunch of blown capacitors. I replaced them all, but I had a heck of a time removing C152 on the board. It seems quite black & some of the solder I cannot remove with a wick or a pump. I replaced this on x2 and before the 2nd attempt, the machine would at least go thru the motions on trying to get the signal, but now it won't even go past the 1st stage of the check switch-it did before #2 replacement. Is there any way to bridge that location, or is it maybe also another cap misbehaving. I have to confess that this is my 1st attempt at soldering, so maybe my contacts aren't good enough. Any advice would be greatly appreciated.