Maker Pro
Maker Pro

help with simple picaxe problem and LED

JPU

May 19, 2012
282
Joined
May 19, 2012
Messages
282
Hi All

Thanks for looking. I have what is probably a simple problem to solve but I don't want to try and solve it with trial and error as I usually would due to the costs of the micro pucks I use which are blown easily.

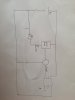
The circuit is very simple in that I use a PICAXE chip to switch on a N channel mosfet which in turn sinks a micro puck which then drives a high power LED. The problem is that the micro puck must be connected to the LED when powered otherwise they burn out. So if an LED blows or a wire is disconnected then the micropuck burns out at a significant cost.

I was hoping to overcome this by introducing some sort of feedback back to the picaxe from the LED. So if the circuit is broken in anyway then the pixace will immediately switch off the mosfet.

I have drawn a simplified version of the circuit and my question is what should I do to safely connect the feedback channel to the picaxe. Do I need a resistor in the feedback channel and or should I have a resistor and connect the leg of the chip to ground?

The circuit is powered by a 4.2V battery and the micro puck boast the voltage to 7V and holds the current to 500mah. The pic only works at 3V-5V.

I appreciate there is probably a very simple answer to this but any help would be appreciated as my electronics knowledge is very basic.

Thanks for your help.

JPU
 

Attachments

  • IMG_5691.JPG
    IMG_5691.JPG
    25.8 KB · Views: 94

Harald Kapp

Moderator
Moderator
Nov 17, 2011
13,725
Joined
Nov 17, 2011
Messages
13,725
For starters:
  1. What's a micro puck? Google shows several hits, but none of them seems to be the right one with respect to this project.
  2. Where's the MOSFET in yyour circuit diagram? Is it the circle in the center with teh three wires going to it? Help us by using the correct symbol so we know how it si connected.
  3. What are the current rquirements for LED and micro puck?
 

JPU

May 19, 2012
282
Joined
May 19, 2012
Messages
282
For starters:
  1. What's a micro puck? Google shows several hits, but none of them seems to be the right one with respect to this project.
  2. Where's the MOSFET in yyour circuit diagram? Is it the circle in the center with teh three wires going to it? Help us by using the correct symbol so we know how it si connected.
  3. What are the current rquirements for LED and micro puck?


Hi

Thanks for looking and helping.

1) Here is a link to the micro puck technical file. I have the puck arranged as buck/boost driver as described on page 4.

2) Sorry for the simplified drawing, it was a very rough sketch and I drew it up just to try and explain my requirements as best I could. My technical skills are limited and although this circuit works I do not have the knowledge to draw the schematics properly. Yes the circle is the MOSFET and its a N channel and used to sink the the micro puck.

3) I am using two of these LEDs in series, I am using the single LED version.

I believe the buck/boost limits the current to 500mah. As I have the SHO micro puck.

Thank you for your time. I hope this helps explain a little better.

JPU
 

Harald Kapp

Moderator
Moderator
Nov 17, 2011
13,725
Joined
Nov 17, 2011
Messages
13,725
With the setup from the datasheet the circuit should look like this:
upload_2015-12-24_12-6-56.png
I assume the µ-controller's Vcc (+ supply) is connected to the same as the LED driver, but I haven't shown it in the diagram as I wasn't completely sure. If yes, that means an additional connection from the microcontroller's Vcc to the positive supply.
You will need an NMOS transistor which is suitable to be controlled by the µ-controller's output voltage. These are called logic level gate FETS or similar. Or use an NPN transistor, in which case you will need a series resistor in the base connection to limit base current. See also our resource.

Regards,
Harald
 

JPU

May 19, 2012
282
Joined
May 19, 2012
Messages
282
With the setup from the datasheet the circuit should look like this:
View attachment 23963
I assume the µ-controller's Vcc (+ supply) is connected to the same as the LED driver, but I haven't shown it in the diagram as I wasn't completely sure. If yes, that means an additional connection from the microcontroller's Vcc to the positive supply.
You will need an NMOS transistor which is suitable to be controlled by the µ-controller's output voltage. These are called logic level gate FETS or similar. Or use an NPN transistor, in which case you will need a series resistor in the base connection to limit base current. See also our resource.

Regards,
Harald


Dear Harold

Thank you for taking the time to draw this schematic.

I have setup the circuit in the way you have described (or very similar) I am using a this transistor to sink the micropuck and the gate of the transistor is controlled by a picaxe (PIC) chip.

The circuit works very well and I do not have any problems with it. However, the problem occurs if a LED blows (not very often) or a wire to the LED becomes broken. Then the circuit breaks down as the micropuck will remain powered and as a result the micropuck either burns out or simply fries itself as there is effectively no LED to complete the circuit.

I was hoping there would be a way to add a wire to the LED negative side and then run this to a free input on the PICAXE micro controller. If there was then a break in the circuit or the LED fails I could use software to switch off the transistor and thus limit damage. My problem is how do I connect the wire from the LED to the leg on picaxe. Do I need to included a resistor or perhaps ground the leg etc.

I hope this helps explain my problem.

Thanks again for your help.
 

Bluejets

Oct 5, 2014
6,927
Joined
Oct 5, 2014
Messages
6,927
Didn't see any minimum current in the chart so perhaps a series diode and a high value resistor across your existing LED?
 

JPU

May 19, 2012
282
Joined
May 19, 2012
Messages
282
Didn't see any minimum current in the chart so perhaps a series diode and a high value resistor across your existing LED?

Hi Thanks for your post.

Please can you elaborate on this. Do you mean I should put a diode and large resistor in parallel to the LED? If so what is the purpose of the diode and what size resistor would I need? I believe the puck maintains a current of 500mah.
I have little electronics skill but Am I current to assume that this setup would sustain the needed Load on the Puck should the LED fail?

Thanks for your help.
 

Bluejets

Oct 5, 2014
6,927
Joined
Oct 5, 2014
Messages
6,927
That was the idea and the reason for the diode was no one really knows what is going on inside of the "puck" except that it drives an LED which is esentially a diode and I was trying to copy this loading.
Didn't notice the constant current bit though so maybe my idea is not applicable.
The chart does say though that allowable LEDs(configured as in #4) are a 1W or a 2W so anyones guess what happens with current regulation there.
I see with the configuration shown in #4 above though that the maximum current is 300mA not the 500mA you say.
Perhaps one needs to adjust the input voltage for whatever loading is used.

Seems strange you are blowing LEDs...they normally last for yonks given correct current/voltage
 
Last edited:

GPG

Sep 18, 2015
452
Joined
Sep 18, 2015
Messages
452
The trouble stems from the lack of information/characteristics for the 'puck'
 

Harald Kapp

Moderator
Moderator
Nov 17, 2011
13,725
Joined
Nov 17, 2011
Messages
13,725
The "datasheet" is not very detailed. It has one warning, however:

NOTE: LED(s) must always be connected whenever power is applied!

The makers of the puck seem to be aware of that flaw (puck blowing without LED). To supervise the LED here's an idea:
upload_2015-12-26_10-2-20.png

D1 is the original power LED. In normal operation current flows through D1 only, The photocoupler is off, the output to the µC is high.
When D1 fails open, the current flows through the photocoupler instead, turning it on and the output to the µC is low.

I assume LED D1 is driven by max. 300mA current and has a forward voltage of 3V.
All numbers in the following equations/explanations need to be adapted to match the real values used in your design.

In case of an open failure of D1, the puck will drive current through D2, R1 and the CNY17 photocoupler. The current is divided between R1 and the photocoupler. Let's set the photocoupler's current to 10mA (up to 60mA are allowed), that leaves 300mA-10mA=290mA through R1. At 10mA the forward voltage over the CNY17's LED is 1.2V. This same voltage is present across R1. Therefore R1=V/I=1.2V/290mA=4.2Ω. The power dissipated in R1 is P=V*I=1.2V*0.29A=0.35W, therefore use a 1/2W resistor.
To avoid current through the photocoupler in normal operation, the zener diode D2 blocks current flow as long as the voltage across D1 is smaller than the zener voltage. With the above assumption use e.g. a 3.6v zener diode. The power dissipated in D2 in the fault case is P=3.6V*0.3A=1W, so a 3.6V/1W power zener diode is required.
 
Top