Maker Pro
Maker Pro

Monitor Won't Power On - LG Flatron L1751S-BN

hotmaildotcom1

Apr 27, 2017
11
Joined
Apr 27, 2017
Messages
11
First I would just like to state that this isn't one of those "please help me I desperately need you to fix this for me" posts. This is my first post on this forum and I am just trying to fix this monitor in my spare time as it recently stopped working. Probably picking up a Craigslist replacement here in the near future so this is definitely just a post because I am interested in the the issue.

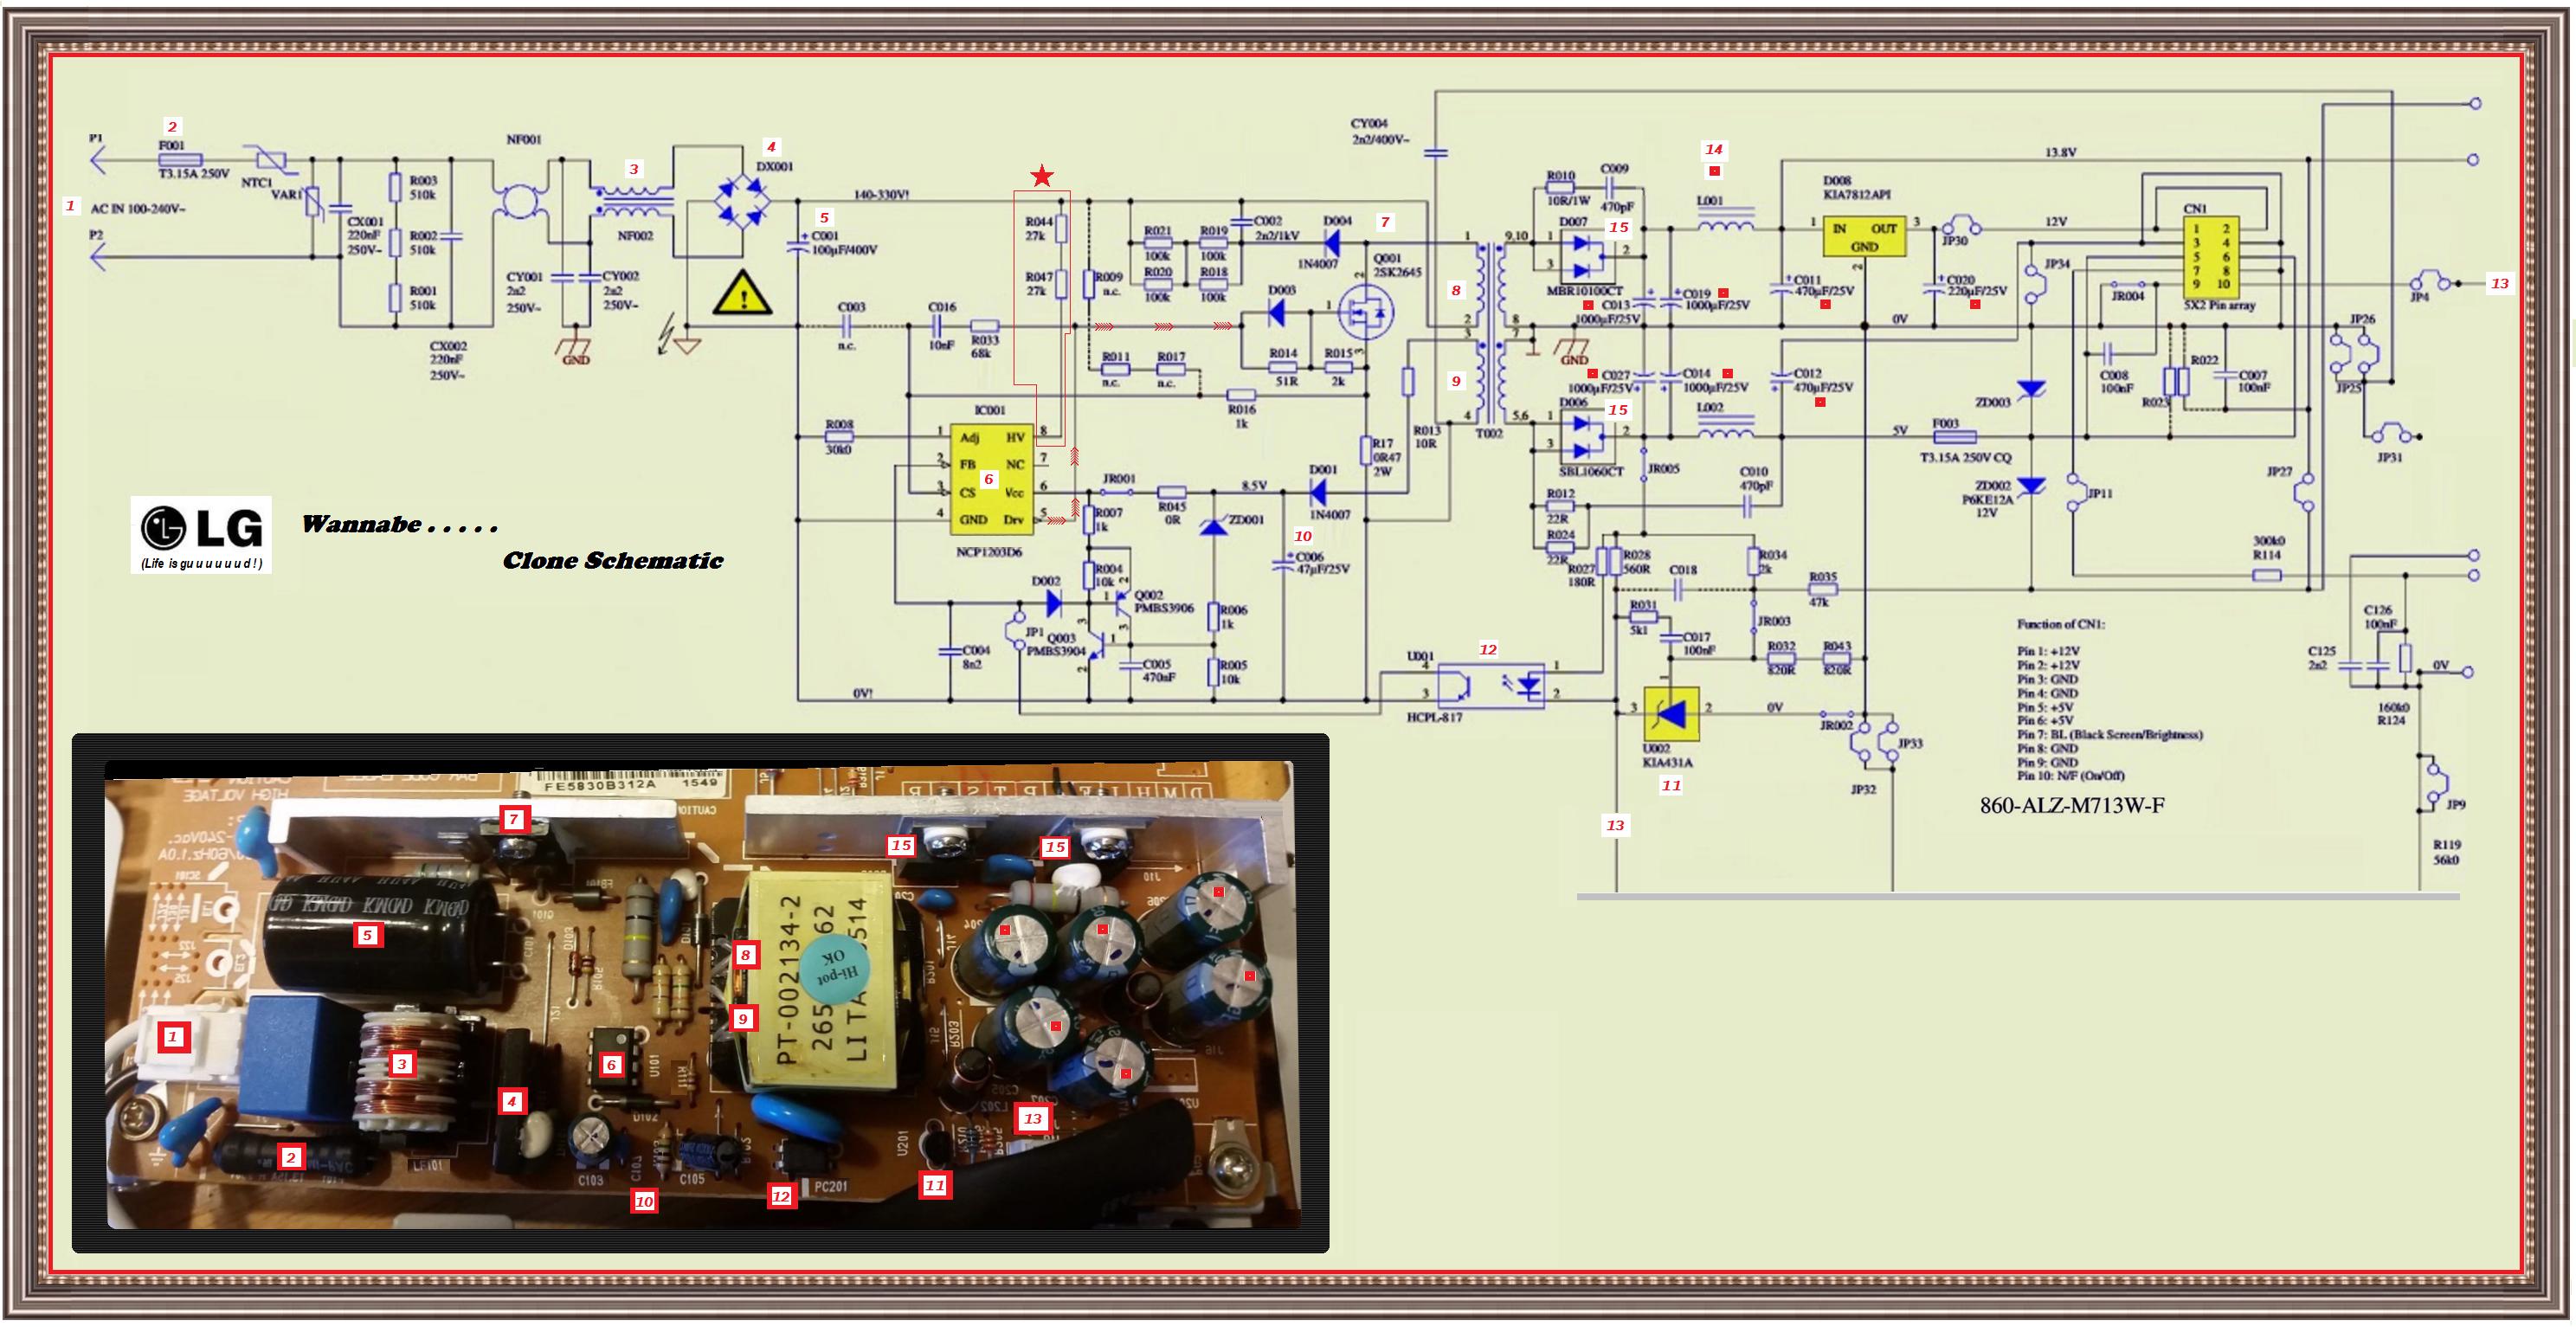
Alright with that said I am working on a LG Flatron L1751S-BN monitor that recently developed a pretty interesting little quirk. The power light will not come on and it simply won't turn on. That is until it warms up and decides that it wants to work. Once it powers on it will keep going until it either goes into sleep mode or is turned off for about 5 minutes. This problem was originally circumnavigated by simply just going without it for five to ten minutes until it was good and ready. I disabled my screensaver and would just let the image run on it until it decided to wake up. It now goes an entire day without turning on though so it's pretty much unusable unless I'm working at my computer all day, in which case it might come on some of the way through it.

Into the troubleshooting. After many youtube videos and a great deal of forum reading I found that it was likely a capacitor issue. I tore into the thing after doing some safety related reading and determined that I couldn't see any capacitors that were really toasted or burst. Being careful not to make any contacts, I gave it some power in it's dissected state. I can here a very slight clicking noise coming from an internal component. It's the connector that powers the actual monitor after all of the fancy magic has been done on the actual printed circuit board [CircutBoard(1)].

I've included every picture I could of the current situation, but there's not much walking through the issue that I can do as I really don't know what's going on. CircutBoard(2) is a picture of the same component where the clicking is definitely coming from, just without the plug in it. When unplugged there is no clicking. CircutBoard(3) is an overview of the whole shebang, with the suspected component plugged in, but not in the frame.

Inspection of CircutBoard(6) shows some discoloration on the board near the two brass colored components at the top. However I imagine this is fine as those components are labeled "HS" which leads me to believe they are heat sinks, which would cause the board to be discolored there over time.

I have currently attributed the powering on to internal heat. During the winter whenever my house's heat would be on, and the vent is right above the monitor, the baby would start right up. Also the fact that it stays powered on when it finally does come on leads me to believe the heat coming from the screen keeps the dying component functioning.

Thank you again in advance for any input or even reading this. I appreciate any form of assistance, as once again I'm just trying to get into this to see what I can do with the product in its current state.
 

Attachments

  • CircutBoard (1).jpg
    CircutBoard (1).jpg
    114.1 KB · Views: 101
  • CircutBoard (2).jpg
    CircutBoard (2).jpg
    192.8 KB · Views: 125
  • CircutBoard (3).jpg
    CircutBoard (3).jpg
    205.9 KB · Views: 91
  • CircutBoard (4).jpg
    CircutBoard (4).jpg
    225.8 KB · Views: 123
  • CircutBoard (5).jpg
    CircutBoard (5).jpg
    236.1 KB · Views: 103
  • CircutBoard (6).jpg
    CircutBoard (6).jpg
    220.5 KB · Views: 104
  • CircutBoard (7).jpg
    CircutBoard (7).jpg
    118.6 KB · Views: 125
  • CircutBoard (8).jpg
    CircutBoard (8).jpg
    209.5 KB · Views: 150

73's de Edd

Aug 21, 2015
3,622
Joined
Aug 21, 2015
Messages
3,622
Sir hotmaildotcom1

In just doing a cursory very quick read, you have not experienced a HARD failure, but just a SOFT failure mode, wherein the unit can be sluggish about coming on . . . . IF AND WHEN . . . . the times that it even wants to .

Let's just face it, it just doesn’t care about what YOU want anymore, it responds to its own whims..

First, get it all connected together again so that it would be ready to run if plugged in and the power on switch was activated.

And then, correct me if wrong . . . . You would have a menu showing up on the screen, with even some morsel of displayed info . . . even if the unit is not being ’puter connected.

Then NORMALLY the unit should turn on if its power push button so demanded and turn off in the same manner.

PROCEDURAL:

At the side of your power supply board your C105 is leaning, straighten it up like C103 aside.

Then you commandeer Mama Cass’s hair blow drier and a toilet tissue tube, or fabricate your own creation from about that gauge of cardboard IN WHICH you can improve upon it.

That being in the respect of creating an intermediate taper between the size of the end of the dryer / heater and the spacing of the two caps . . . . . but I expect that they will almost be the same sizing. We just want to solely heat up those two caps , initially.

You then try the Monitor to confirm that it is still cantankerous, not coming on with the power switch.

THEN . . . . meanwhile . . . back in the jungle *** . . . . You start heating up those 2 capacitors and then use your dedicated fingertip sensors to determine the amount of heating sessions to bring up the tips of the cap cases to “ hot coffee “ temperature.

We’re NOT talking a temp threshold level, great enough to melt their plastic shrink covering.

THEN you touch the power on button to see if you get a working display response..

If no luck, then you discard the acquired / fabricated thermal director and use the heater by itself.

You work the heater nozzle this time equally around the cluster of 6 electrolytics to the left side of the power supply

You bring ALL of them up to that same “ hot coffee “ temperature, with evaluation by fingertip
thermal temp sensing.

Then you press the power button to see if the unit then comes on and displays.


Waiting for the results . . . . .

***
Acousti-reference:
http://eatandsleep.net/billboard/1956/195691.mp3


73’s de Edd
 
Last edited by a moderator:

hotmaildotcom1

Apr 27, 2017
11
Joined
Apr 27, 2017
Messages
11
Sir hotmaildotcom1

In just doing a cursory very quick read, you have not experienced a HARD failure, but just a SOFT failure mode, wherein the unit can be sluggish about coming on . . . . IF AND WHEN . . . . the times that it even wants to .

Let's just face it, it just doesn’t care about what YOU want anymore, it responds to its own whims..

First, get it all connected together again so that it would be ready to run if plugged in and the power on switch was activated.

And then, correct me if wrong . . . . You would have a menu showing up on the screen, with even some morsel of displayed info . . . even if the unit is not being ’puter connected.

Then NORMALLY the unit should turn on if its power push button so demanded and turn off in the same manner.

PROCEDURAL:

At the side of your power supply board your C105 is leaning, straighten it up like C103 aside.

Then you commandeer Mama Cass’s hair blow drier and a toilet tissue tube, or fabricate your own creation from about that gauge of cardboard IN WHICH you can improve upon it.

That being in the respect of creating an intermediate taper between the size of the end of the dryer / heater and the spacing of the two caps . . . . . but I expect that they will almost be the same sizing. We just want to solely heat up those two caps , initially.

You then try the Monitor to confirm that it is still cantankerous, not coming on with the power switch.

THEN . . . . meanwhile . . . back in the jungle *** . . . . You start heating up those 2 capacitors and then use your dedicated fingertip sensors to determine the amount of heating sessions to bring up the tips of the cap cases to “ hot coffee “ temperature.

We’re NOT talking a temp threshold level, great enough to melt their plastic shrink covering.

THEN you touch the power on button to see if you get a working display response..

If no luck, then you discard the acquired / fabricated thermal director and use the heater by itself.

You work the heater nozzle this time equally around the cluster of 6 electrolytics to the left side of the power supply

You bring ALL of them up to that same “ hot coffee “ temperature, with evaluation by fingertip
thermal temp sensing.

Then you press the power button to see if the unit then comes on and displays.


Waiting for the results . . . . .

***
Acousti-reference:
http://eatandsleep.net/billboard/1956/195691.mp3


73’s de Edd


.


I'll give this a shot when I get some time this weekend. However it seems that this solution would requireme using a hair drier to get my monitor fired up in the mornings, if I am not mistaken lol?

Also the capacitor that has the really bad lean is actually soldered in at that angle. It wasn't positioned perpendicular to the board when soldered in but rather at the seen angle. I would be hesitant to move it and shear the connections from the board just for the sake of looks. Would straightening it out provide any other function? Maybe reducing the chance of a short somewhere?
 

hotmaildotcom1

Apr 27, 2017
11
Joined
Apr 27, 2017
Messages
11
Nothing has changed in the monitor. The application of heat did turn it on but it's not really practical in any way to do this. Thank you however for your help.
 

73's de Edd

Aug 21, 2015
3,622
Joined
Aug 21, 2015
Messages
3,622
Sir hotmaildotcom1 . . . . .

Greetings . . . . . you're ba a a a a ck.

Oh ye of little faith . . . you haven't the SLIGHTEST idea . . . of the manner on which I am proceeding, in permitting you to perform an almost instrumentless "seat of the pants" analysis of your units problem .

OK you were able to get it to turn on . . . . did it operate normally and respond to video commands and text and not turn off on you?
Did the two sole capacitors located by themselves, get the initial turn on or was it taking the warming up the whole cluster of all of them that finally got it on ?
BTW that one leaning caps 2 leads, can move almost 45° in lateral movement but ZERO° in the front to back range in relationship to its two leads . . . . it was leaning laterally offset.
Next, you need to get the unit back in that same operational state and let it run about 2 hrs to have developed some of its OWN latent generated heat as is being produced by those caps.
Then you do a fingertip test to each of the metal end of each of the caps . . . no shockee-shockeee hazard is present.
Compare different heat levels and see if some specific ones might be cold, while, others somewhat warm and others even hot.
Update us on your new findings.

73’s de Edd
 

hotmaildotcom1

Apr 27, 2017
11
Joined
Apr 27, 2017
Messages
11
Thank you again for all your help. Upon more directed heating of the capacitors via hairdryer with a toilet paper tube attachment, I still cannot find which is more responsible for the issue. Heating of both the cluster and the independent two capacitors results in the monitor powering back on.

I have done the best that I can in determining which of the capacitors is the hottest but there doesn't seem to be an outlier present. The larger capacitors in the cluster certainly generate more heat than the two smaller ones but it doesn't seem to be unreasonable and I would imagine larger ones just generate more heat.

I did however quite a pretty good buzz upon contacting the C103 capacitor with my finger on one of the attempts to test temp. Woke me up for certain but no damage was done lol.

EDIT:
Upon working up the nerve to test the heat on the C103 capacitor again, I will say that it is about as hot if not slightly hotter than the larger capacitors down at the bottom in the cluster.
 

73's de Edd

Aug 21, 2015
3,622
Joined
Aug 21, 2015
Messages
3,622
Sir hotmaildotcom1 . . . . .

I believe that you are fully on track now . . . . thus . . . . . you now seeing our need to thermally PROD the lazy capacitors into enough action, to keep the set runnnnnnnnnnning for our then being able to evaluate them.
Will prep up some tech referencing for you tomorrow.
HOPING that you can unsolder and reinstall sone electrolytic capacitors skillfully .

73’s de Edd
 

hotmaildotcom1

Apr 27, 2017
11
Joined
Apr 27, 2017
Messages
11
Sir hotmaildotcom1 . . . . .

I believe that you are fully on track now . . . . thus . . . . . you now seeing our need to thermally PROD the lazy capacitors into enough action, to keep the set runnnnnnnnnnning for our then being able to evaluate them.
Will prep up some tech referencing for you tomorrow.
HOPING that you can unsolder and reinstall sone electrolytic capacitors skillfully .

73’s de Edd

I'll be waiting very anxiously for your materials. This has been a pretty good project so far.
 

73's de Edd

Aug 21, 2015
3,622
Joined
Aug 21, 2015
Messages
3,622
Sir hotmaildotcom1 . . . . .

Here is a basic run thru of this units concept of operation:

AC power enters [1] and passes thru an intact fuse [2] and into NTC Thermistor which cushions initial plug in power surge. Var001 clips any incoming short duration voltage spikes coming in from the power line.

CX001-CX002-FerriteToroid Noise Filter001 components are all related to cleaning up the incoming voltage from spikes, Radio Frequency Interference and Electromagnetic interferences. (BOTH incoming and outgoing from this equipment.) CY001&2 provide a safe grounding / bypassing to the chassis, for AC nature aspects of grounding, yet, they are also providing DC isolation.

Inductor NF002 [3] can take a healthy incoming voltage spike and initially decrease it
appreciably by just presenting a high impedance path to it, but also utilizes its contra wound coils to create opposing polarity magnetically induced fields to result in the nulling out of its initial level, considerably.

The AC power is then presented to the [4] Full Wave Bridge rectifier to transform it to DC voltage. Main DC filter capacitor [5] then receives that DC power to charge up and hold a temporary reservoir of DC power.

Since you are Amerikanski, expect in the order of 160-170 VDC being there, SHOULD you have been You-are-a-peein’ . . . . with their 230-40 VAC line supply level, they can expect upwards of ~340VDC or so . . . that could be a real hair raiser !

Now the magic comes in with the voltage conversion downwards to one rough 13VDC supply and one regulated 12VDC and one 5VDC supply.

This is accomplished by applying that 160VDC to the #2 terminal of winding [8] of the T002 power transformer. Its #1 terminal goes to the power switching FET [7] which makes its other connection down to R17 . . . (to use for sensing how much power is being passed) . . . and it finally connects to ground at the bottom.

The stage is now set for you to plug the unit into the AC power line.

At that instant DC power is on that FET circuitry and simultaneously DC power passes thru 2 series dropping resistors at the RED STAR and they go into pin 8 of IC001 [6], which is the units Power controller IC.

It goes into its startup mode by generating a burst stream of pulses which leave at its pin 5 and travel up the RED ARROW PATH to the gate of the [7] power FET and uses that [8] winding to pulse power activate the transformer.

At this instant the point of interest is being the [9] winding which takes the reduced voltage pulses and passes them out from its term 3 and on down to D001 where it presents DC to C006 storage cap [10].
You now have the normal ~8.5 VDC that this chip runs on, coming in on its pin 6.

The IC will be sampling that power level and as it declines with time,at a specified lower voltage threshold, it spits out a couple of bursts of drive to maintain that voltage. It is now in its standby power / keep alive / sleep mode.

It is JUST waiting for you to hit the power switch to then transition to its full power on function, with the passage of wider duration pulses to the power FET and the adjunct power transformer.
( Or narrower ones when it detects lesser loading . . . . . at any rate . . . it regulates to meet the units varying power demands.)

Move to the right half 2 windings of the power transformer and you will find heat sinked, high current, low voltage loss Schottky rectifier pairs being used at the two [15] positions.

They feed their reduced DC voltage outputs to the [14] RED SQUARE cluster of electrolytics . . . of which you already acquainted with . . . on a first name, pinky swear basis.

They sort of use the 5VDC on a “guinea pig “ basis , whereupon they take a voltage sample down to the TL431 precision Zener reference IC [11] it sends any need for correction to the optical isolator[12] which corrects via pin 2 of IC001 [6].
Its pulse streams widen their widths, to up the voltage or narrow them to decrease the voltage.

Your unit is just waiting for power on demand to come in on [13].

BUT if item[10] has taken a time related decrease of its capacitance, on down to 3-5 ufd capacitance . . . . . . it’s not gonna’ happen . . . .

BUT . . . . . . we know a little thermal aspect about marginal / borderline electrolytic capacitors . . . don’t we ?

Is your “ sarterin’ ” skillset adequate to nondestructively change out YOUR units two side by capacitors, C105 [12] and C103[10] .

This schematics winding 9 goes down to R111 then to D102 which dumps into C103 to power up the U101 [6]. That should have been your higher temperature of the two, with C1105 used as a minor part in the PC210 [12] optical isolator output to the regulator function.

Use the same capacitances and voltage ratings and DEFINITELY use the 105 ° deg temp ratings vs a common vanilla 85 ° deg rated unit.

Can you come back with all involved E-caps, voltage ratings and capacitances and confirm what specific IC number is being used at item [6] position on YOUR unit. ?

Identify-chart-mark-diagram-record-photogrph a capacitor and its installed polarity 3 times before pulling it.

And THEN and do 5 comparisons . . . is capvalue- voltage rating-polarity right ? RE-CHECK polarity . . .in identifying the new cap and putting it in its 2 holes and soldering it in.
( That degree of posible error correction, puts a master / journeyman carpenter to shame . . . doesn’t it ? )

The floor is now open for any soldering or installation questions?

Thasssssit . . . . .

RELATED TECHNO REFERENCING:


vIwXvlo.jpg


73’s de Edd
 
Last edited by a moderator:

hotmaildotcom1

Apr 27, 2017
11
Joined
Apr 27, 2017
Messages
11
I've never soldered any electronics before but I was certainly hoping that this is the direction that the project would take. I have the equipment purchased which I will verify with you when I get the time to attack the project. You will hear from me at that time.

My first real question is how necessary is it to tin my soldering iron before approaching the issue of resoldering the pieces? If so what is the practical way to do this?

The info from the two caps at position six:

Small black one: 0.47 microFarads and 50V 105F

Larger Green one: 33 microFarads and 50V 105F
 
Last edited:

davenn

Moderator
Sep 5, 2009
14,260
Joined
Sep 5, 2009
Messages
14,260
My first real question is how necessary is it to tin my soldering iron before approaching the issue of resoldering the pieces?

it is .... you can use fine steel wool to clean the hot tip

If so what is the practical way to do this?

applying a little solder to the hot tip and clean the tip before applying both solder and the tip to the joint to be soldered
 

hotmaildotcom1

Apr 27, 2017
11
Joined
Apr 27, 2017
Messages
11
So what all do I need to look for before I pull the capacitors? Is it a bad idea to pull them first in order to get some better pictures for everyone here? So far from my online reading it looks like I need to identify polarity, capacitance, and voltage.

This post and the linked video are the only learning I have on the subject other than a very basic physics course that covered them in about a day.
 
Last edited:

davenn

Moderator
Sep 5, 2009
14,260
Joined
Sep 5, 2009
Messages
14,260
So what all do I need to look for before I pull the capacitors?

note what way in the board they go --- polarity

initially only pull the bulging/ any split open ones


So far from my online reading it looks like I need to identify polarity, capacitance, and voltage.

and temperature rating
ESR can be considered, but not as important
 

hotmaildotcom1

Apr 27, 2017
11
Joined
Apr 27, 2017
Messages
11
note what way in the board they go --- polarity
initially only pull the bulging/ any split open ones

I think that most of what was discussed above was finding the problem capacitors due to the fact that there are no bulging or split ones. I am initially replacing the two standalone marked in region six as was discussed above. After that I will report back to de Edd if the monitor is still not working.

I have gone ahead and unsoldered the two capacitors from the board. It went pretty smoothly I think. I expected both replacement caps on Saturday, though the postage service decided to disagree with that statement. I am still awaiting the second one and will ensure they both get put on as properly as is possible by me at that point.
 

davenn

Moderator
Sep 5, 2009
14,260
Joined
Sep 5, 2009
Messages
14,260
I think that most of what was discussed above was finding the problem capacitors due to the fact that there are no bulging or split ones. I am initially replacing the two standalone marked in region six as was discussed above.

So what all do I need to look for before I pull the capacitors?

you asked and I answered !!!
if there are no bulging or split ones, then just replace all electros

you ALSO asked

So far from my online reading it looks like I need to identify polarity, capacitance, and voltage.

and I answered with other factors that needed to be considered

and temperature rating
ESR can be considered, but not as important


if you don't care about getting good info, then don't ask the group
not a good attitude you have displayed
 

hotmaildotcom1

Apr 27, 2017
11
Joined
Apr 27, 2017
Messages
11
I didn't at all intend to come off in a rude way. I realize now that it might have seemed rude in the way that it was phrased but I assure you I really did not mean to come off that way. I apologize for offending you but I sincerely did not mean to do so. I was just trying to clarify my questions. I appreciate all of the help that everyone has given me.
 

hotmaildotcom1

Apr 27, 2017
11
Joined
Apr 27, 2017
Messages
11
Also I would like to thank everyone again for all the help, as I just replaced those two capacitors and the monitor now works. I apologize once again if my messages were taken as rude as I never once meant for that to be the interpreted message.

I am wondering however how it was determined that those two capacitors were the issue and not the cluster. Or anything else on the motherboard for that matter. What in the diagnosis made this apparent?
 

73's de Edd

Aug 21, 2015
3,622
Joined
Aug 21, 2015
Messages
3,622
Sir hotmaildotcom1

CON-GRAN-U-LATIONS !


Small black one: 0.47 microFarads and 50V 105F
Larger Green one: 33 microFarads and 50V 105F

I am in total agreement on the PRINCIPAL 33 mike unit which you confirmed as being your units MAIN problem child.
But, can you confirm the decimal 47microfarad as I would expect that appreciably smaller value of capacitance to be housed in a case that would typically be two case sizes smaller . . . . but if its a .47 . . .it's a .47.

Now what you do next, to get another like amount of years of use from the unit again, is replace the cluster of 6 large electrolytics at the other end of the board.
And for the benefit of future readers, also confronting this unit, would you do a 2 hr warm up of the unit and see which of those capacitors are running the hottest by using the fingertip test - to case end cap.
Then replace the units and log down the same temperature evaluations final results after their replacements.


"
I am wondering however how it was determined that those two capacitors were the issue and not the cluster. Or anything else on the motherboard for that matter. What in the diagnosis made this apparent? "

You are going to find in the above testing, that other marginal units will also be involved in the cluster.

Your first info told me that no serious failure of major power handling parts or fuses were involved. Your unit was encountering a case of " gradiated
electronic atrophy onset "
With multi-multi-multi-multi-multi-multi decades of serious failure analysis experience, where I would be using an environmental test chamber to cycle operating temps up or down incrementlly.
Or be physically micro examining for causes or effects with a stereo zoom microsope up to the limits of optical magnification.
Then, at that stop-barrier, a quanttum shift over to a scanning electron microscope, to then further the hunt up to the point where I can see molecules wiggle.

I could have additionally had you getting the unit to that first initial warmed up state, where you were then being able to turn the set off and on at will.
Whereupon . . . I would have asked you to get some alcohol from the medicine cabinet, along with a wooden pencil.
THEN you put the pencil into the alcohol and transfer one drop to the cap end of the 33ufd unit and blow on it to thereby enact an onsetting chill of the cap case. Do that about 3 more times and THEN, confirm that you can no longer be able to get the unit to come on with the power switch.
Luckily, your unit was right at its magical conditional state where this analysis procedure could be utilized.
OTHERWISE, you would then be needing an Edd - u - cation on ESR and how it was involved and related with your predicament.


73's de Edd
.
 
Last edited by a moderator:

hotmaildotcom1

Apr 27, 2017
11
Joined
Apr 27, 2017
Messages
11
Sir hotmaildotcom1

CON-GRAN-U-LATIONS !


Small black one: 0.47 microFarads and 50V 105F
Larger Green one: 33 microFarads and 50V 105F

I am in total agreement on the PRINCIPAL 33 mike unit which you confirmed as being your units MAIN problem child.
But, can you confirm the decimal 47microfarad as I would expect that appreciably smaller value of capacitance to be housed in a case that would typically be two case sizes smaller . . . . but if its a .47 . . .it's a .47.

Now what you do next, to get another like amount of years of use from the unit again, is replace the cluster of 6 large electrolytics at the other end of the board.
And for the benefit of future readers, also confronting this unit, would you do a 2 hr warm up of the unit and see which of those capacitors are running the hottest by using the fingertip test - to case end cap.
Then replace the units and log down the same temperature evaluations final results after their replacements.


"
I am wondering however how it was determined that those two capacitors were the issue and not the cluster. Or anything else on the motherboard for that matter. What in the diagnosis made this apparent? "

You are going to find in the above testing, that other marginal units will also be involved in the cluster.

Your first info told me that no serious failure of major power handling parts or fuses were involved. Your unit was encountering a case of " gradiated
electronic atrophy onset "
With multi-multi-multi-multi-multi-multi decades of serious failure analysis experience, where I would be using an environmental test chamber to cycle operating temps up or down incrementlly.
Or be physically micro examining for causes or effects with a stereo zoom microsope up to the limits of optical magnification.
Then, at that stop-barrier, a quanttum shift over to a scanning electron microscope, to then further the hunt up to the point where I can see molecules wiggle.

I could have additionally had you getting the unit to that first initial warmed up state, where you were then being able to turn the set off and on at will.
Whereupon . . . I would have asked you to get some alcohol from the medicine cabinet, along with a wooden pencil.
THEN you put the pencil into the alcohol and transfer one drop to the cap end of the 33ufd unit and blow on it to thereby enact an onsetting chill of the cap case. Do that about 3 more times and THEN, confirm that you can no longer be able to get the unit to come on with the power switch.
Luckily, your unit was right at its magical conditional state where this analysis procedure could be utilized.
OTHERWISE, you would then be needing an Edd - u - cation on ESR and how it was involved and related with your predicament.


73's de Edd
.
But, can you confirm the decimal 47microfarad as I would expect that appreciably smaller value of capacitance to be housed in a case that would typically be two case sizes smaller . . . . but if its a .47 . . .it's a .47.
.[/QUOTE]

Both of those capacitors are confirmed. I did notice that the replacement capacitors for both were physically smaller, even though all of the values were exactly the same on both replacement units.

So the temperature sensitivity was the indication that something capacitor related was going on? After having determined it was not a complete power failure of course.
 
Last edited by a moderator:

Tinambrown71

Mar 15, 2022
1
Joined
Mar 15, 2022
Messages
1
Have you check to see if it could be your video card. Sometimes in moving around they can become loose. They do however, also go bad.
 
Top