Maker Pro
Maker Pro

Panasonic SA-HE200 AVR - "Overload" condition fix

Tesla

May 10, 2010
168
Joined
May 10, 2010
Messages
168
I went to the link referenced earlier on the Canadian website but did not find the parts. Are they still there or is there another place or part I can use to replace both MOSFETs?

Looks like they ran out. You could email them to be sure.

No, I wouldn't sub the part. It's fairly complex.

You can search in Google for RSN310R37A .

Back when I did this repair, I also email chatted with a knowledgeable person at:

http://multielectronicscity.com/product.php?productid=357&cat=0&page=1

Back then, he said he had some too. I forget why I ended up getting them at the other place ... I think I just had to choose one. I suggest you Contact them and make sure they really have one in stock (this part is getting rare I think).
 

herrkelm

Dec 4, 2010
3
Joined
Dec 4, 2010
Messages
3
Looks like they ran out. You could email them to be sure.

No, I wouldn't sub the part. It's fairly complex.

You can search in Google for RSN310R37A .

Back when I did this repair, I also email chatted with a knowledgeable person at:

http://multielectronicscity.com/product.php?productid=357&cat=0&page=1

Back then, he said he had some too. I forget why I ended up getting them at the other place ... I think I just had to choose one. I suggest you Contact them and make sure they really have one in stock (this part is getting rare I think).

Would I be able to use this part for both IC601 and IC602 MOSFETs if I want to replace both?
 

Tesla

May 10, 2010
168
Joined
May 10, 2010
Messages
168
Would I be able to use this part for both IC601 and IC602 MOSFETs if I want to replace both?

Yes, they are the same part and are interchangeable.

However, if they are both bad, you might have some other problem. Or, were you thinking of just replacing them both while you are in there (so you only have to take it apart once)?

Personally, I'm not sure I would spend more than $50 to fix this amp. While it was $300 new, a cheap new DD 5.1 amp is now only about $150. A pretty nice one (with HDMI) is $250.

But, if you are good with electronics repair and look at it like a challenge, it's a nice project. But if that's the case, isn't part of the fun trying to find the one bad part. :)
 

herrkelm

Dec 4, 2010
3
Joined
Dec 4, 2010
Messages
3
Yes, they are the same part and are interchangeable.

However, if they are both bad, you might have some other problem. Or, were you thinking of just replacing them both while you are in there (so you only have to take it apart once)?

Personally, I'm not sure I would spend more than $50 to fix this amp. While it was $300 new, a cheap new DD 5.1 amp is now only about $150. A pretty nice one (with HDMI) is $250.

But, if you are good with electronics repair and look at it like a challenge, it's a nice project. But if that's the case, isn't part of the fun trying to find the one bad part. :)

I guess this shows my limited electronics repair knowledge, but what would be the easiest way to determine which one is bad? First thought was to just let the amp run until overload comes on and feel which MOSFET is overheated, with the amp unplugged of course.

I'd love to get this thing working again. I know it still works and isn't fried. I miss my Blu Ray sounds blasting the neighbors.
 

Tesla

May 10, 2010
168
Joined
May 10, 2010
Messages
168
I guess this shows my limited electronics repair knowledge, but what would be the easiest way to determine which one is bad? First thought was to just let the amp run until overload comes on and feel which MOSFET is overheated, with the amp unplugged of course.

I'd love to get this thing working again. I know it still works and isn't fried. I miss my Blu Ray sounds blasting the neighbors.

Well, if you read the first post, it describes how to tell (reading the voltages with a volt-meter). If using temperature, I found (when in Overload condition), the good one is warmer (because it's still working). The bad one is cooler because it shut-down.

It's hard to imagine, but nice audio/video gear can become outdated. This amp is better suited for a DVD DolbyDigital 5.1 system, mainly because it's missing HDMI. I moved mine to our "work-out room" along with the old (but perfectly good) DVD player (circa 2003) plasma and (720p) DVR. Everything is connected via Component or Digital Optical/Coax.

To get the most from Blu-Ray, you should use HDMI (1.3 or higher). This enables getting:
Dolby Digital TrueHD
DTS Master Audio
... to the amp. Also, FullHD 1080p resolution to the display. If your display also has HDMI, you can use the Amp as the "central controller" and run just one HDMI cable to the display.

There are many entry level AVRs. I love my Onkyo 607. The 608 is the new model.
http://www.amazon.com/Onkyo-TX-SR60...FOL8/ref=sr_1_1?ie=UTF8&qid=1291578604&sr=8-1
New for 2010, even the 5-Series (508) is fairly full featured, but notice the power is lower.
http://www.amazon.com/Onkyo-TX-SR50...1?ie=UTF8&s=electronics&qid=1291578709&sr=8-1

Since Circuit City closed, Best Buy carrys Onkyo now. If you get a model without an internal fan, I suggest you add an "external component cooler fan" to the top.
 
Last edited:

scottmotron

Apr 5, 2011
1
Joined
Apr 5, 2011
Messages
1
I thought I'd take a moment to share my experiences with this amp. I received this from my father saying it was broken, but perhaps i'd like to try and fix it? Indeed I would, thanks to this thread.

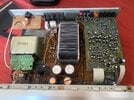
It was of course experiencing the dreaded overload problem. It would work for a little while (until it got warm), then start overloading almost immediately. A quick probe with the DMM showed that IC601 was popping for me. I ordered a replacement FET from that canadian supplier along with some new thermal compound from newegg.

After installing the new FET, unfortunately the AMP still went into overload, albeit much later and in more extreme circumstances. Now the amp only overloaded if played for an hour or so with a DVD player sitting directly on top (and thereby blocking the intake vent). I needed an amp that is good to go even in an entertainment center, so a little more investigation was necessary.

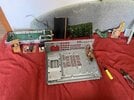
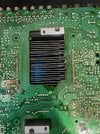
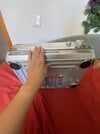
I thought perhaps I had been a little scant with the thermal compound, so I took the heat sink out and investigated. Indeed I had, but only because the mounting system for these FETs (one screw on either side) is not nearly robust enough to make good even contact with the heatsink. At least not by CPU heatsink standards. Anyway, I applied more thermal compound and that helped some, but I was still having some overload problems in extreme circumstances. My last step was to replace the fan with a permanently running stealth fan. Unfortunately, the fan driver circuit on the AMP mainboard does NOT like having the fan removed, and goes immediately into overload to protect the FETs from possible overheating. The final solution, cheesy enough, was to have a always-on fan mounted to the chassis, and the original fan mounted to the bottom of the case inside the amp and connected to the mainboard. Now the original fan turns on whenever the amp tells in to, although it doesn't do much.

After these improvements, the amp runs pretty cool all the time, and I haven't had another overload since. Yes, IC602 is probably on its way out the door, but my fan solution should buy at least a couple years of life before it goes.

Areas for improvement:
1) someone could look at the fan sense circuit and figure out how to trick it into turning on all the time. Probably a fairly simple mainboard mod, but I don't have the time to tinker that much
2) replace the original fan with a dummy load? I tried a resistor dummy load of 150 ohms (which is what the stock fan read with a DMM), but it didn't work for some reason. Perhaps a different resistor value or something would work better.
3) rig up some brackets or something to get those FETs pressed down onto the heatsink better for better thermal contact. The thermal compound is doing way too much of the heat transfer right now.

Tips to others:
1) careful not to over tighten the screws that mount the FETs to the heatsink. The heatsink is made of aluminum, and those bad boys will strip easily. I stripped one, and had to go with a bigger screw to get it mounted again.
2) use a dummy load when testing your mods. These FETs can pop when they're overheating, and you could damage your speakers. I like the DIY dummy load here (though i didn't need one as I had some crappy old speakers to use for testing)

For the electronics geek this really isn't a bad project, though you may have some fiddling to do to get everything dialed in.

Thanks for the info Tesla and others. My entertainment center and I thank you, though my wife, dog, and child might resent you a little bit.
 

Marpemim

Aug 12, 2015
1
Joined
Aug 12, 2015
Messages
1
Hello, i have overload problem in my SA-HE200

I have probe to desolder IC601and IC602. First, i only removed IC602 but overload continue. Then, i have removed IC601 too, and the device power up correctly.

I thougt mosfet in IC601 was damaged, but if i solder the mosfet "good" (IC602) in IC601 socket, the device show overload again.

Finally, i only solder mosfet IC602 and device opwer up correctly but it does not give sound for speakers.

I think mosfet is not the problem because i have changed one for other and i get the problem in IC601.

What do you think about this?

What can i probe?

Sorry for my bad english
 

Samuel

Jan 4, 2016
3
Joined
Jan 4, 2016
Messages
3
Hi, I registered to the forum just to post my experience, after reading this forum and working with my AVR unit.

I bought an used Panasonic SA-HE200 online, the seller sold it very cheap because it was already in the OVERLOAD condition; the RSN310R37A simply could not be found for sale anywhere in my country. I decided to try my luck anyway. I bought from aliexpress one RSN310R37A, and after the log wait (I live in Brazil) I could finally replace IC602, but after powering on the unit, it still went into OVERLOAD after some time turned on, and it didn't played anything in the speakers even before "overloading". I went online again and this time I went ahead and ordered 2 RSN310R37A again from the same store, and, after the long wait, I replaced the IC I haven't replaced last time (IC601 this time) and Voilà, the system played perfectly fine! While waiting for the second set of IC's, I digged online and bought 2 Sony full range speakers to use in the front channels and a Sony Muteki active subwoofer, and boy, this set sounds so f***ing good now. I'm amazed with the sound quality my set is giving. Just to make it clear, I replaced the thermal compound with a better one too.

This forum helped me a lot in having confidence in replacing those IC's, thanks.
 

Samuel

Jan 4, 2016
3
Joined
Jan 4, 2016
Messages
3
Hello, i have overload problem in my SA-HE200

I have probe to desolder IC601and IC602. First, i only removed IC602 but overload continue. Then, i have removed IC601 too, and the device power up correctly.

I thougt mosfet in IC601 was damaged, but if i solder the mosfet "good" (IC602) in IC601 socket, the device show overload again.

Finally, i only solder mosfet IC602 and device opwer up correctly but it does not give sound for speakers.

I think mosfet is not the problem because i have changed one for other and i get the problem in IC601.

What do you think about this?

What can i probe?

Sorry for my bad english

I would go ahead and replaced both, I don't know the details, but I believe this system works with a "balance" between all channels, depending on your set (impedance), it might not play anything with an IC removed. And most importantly, failure on those IC's is obviously a trend on those systems, so, if I was in your place I woulg go ahead and replace both. This fixed mine. I don't forged to replace thermal compound too.
 

Supersoberguy

Jun 30, 2023
4
Joined
Jun 30, 2023
Messages
4
Dear all,


I, too, have encountered a OVERLOAD problem few years back. It started with me stupidly blocking the vent on the top of the receiver with huge printer and the problems started off slowly, maybe it would go into Overload once a month which would be cured by turning off and on again after 5-10 minutes. After some time I decided to take out the original fan that did not do anything until Overload (which would be already too late) and put three fans instead, one into the original place at the back of the receiver and two on the top. The two at the top would blow air inside onto the heatsink directly and the one at the rear would blow out the hot air. I unified three fans' cords together and power it up via USB from my TV so that when the TV would turn on, it would power up three fans automatically.
That lasted me another 4-5 years with the periods between Overload slowly but steadily decreasing when ultimately it would just go into Overload as soon as I would turn the receiver on.


I searched online and found out that usually one of the MOS-FETs is the problem and I decided to disassemble the thing. Unfortunately, I learned that you could change the MOS-FETs without tearing the whole unit only later on, but it was interesting and painstaking experience in the end.


When I received two MOS-FETs from aliexpress I desoldered two original MOS-FETs and soldered in two “new” ones, but the Overload was still occurring when you would turn the receiver on. That didn’t make sense except for the fact that “new” MOS-FETs that came in were not new at all, but old ones, broken, or different model altogether.
I decided to desolder “new” ones one after another to troubleshoot the bad one. When I desoldered 602 first and had only 601, receiver would still Overload, which could mean that “new” 601 was faulty for sure. Then I desoldered the “new” 601 and soldered the original 601 back and the receiver would not have Overload error but would not play anything from any channel input. In addition I could not hear any relay click at the startup of the receiver.


If the single original 601 would not give Overload error, that could possibly mean that the original 602 was faulty and I decided to give “new” 602 a chance and soldered it. Unfortunately, receiver would now go straight into Overload at the startup.
Just for the troubleshoot test I decided to solder the original 602 back. I desoldered “new” 602 and soldered original 602 back. I did not get Overload at startup and I definitely could hear the main relay click which was a good sign. I would get sound from all 5 channels and subwoofer to play. I reassembled the unit back together and tested it a little bit for 1,5 hours of music/youtube playback and did not get any Overload.


I do not know why original MOS-FETs work after desoldering/soldering them back (the pins were ok and there were no burned marks or leads as well, soldering was perfect on the originals) or for how long it will work now, but I ordered second pair of MOS-FETs from another store just in case. If I will have another Overload I will solder second pair of “new” MOS-FETs and hope that another store would not try to scam me and that they would work.


Observations.


One capacitor would store 50V of charge near pin 3 of the 602 that scared bananas out of me when I was desoldering 602 and would short leads of pin 3 and little pin right next to it accidentally (refer to picture "03' in the attachment). When I was desoldering first time, receiver was off for some weeks at that moment and that capacitor would lose it’s charge storage, I guess, and nothing shorted during work. However, when I turned the receiver on and off for first testing, everything would charge up again and I was not expecting it (rookie mistake). Just be careful with it and discharge capacitor when you are about to solder/desolder. I used screwdriver at first but it was scary to discharge 50V that way with moderate bangs and shortages, so I the discharged it with a light bulb instead.


Another observation is to saw off the bottom bracket of the main frame right under the heatsink and put another fan there (refer to picture "04' in the attachment). Now the airflow should be as follows: one fan under the receiver would blow air in, one fan in the rear and two fans at the top would blow air out. Since cold air is always at a lower height that the warm air, I guess that this would be more effective way to cool two MOS-FETs. 80 mm fans will do perfectly.


TL;DR


I desoldered and soldered original MOS-FETs and the Overload error disappeared. Receiver plays everything normal but further testing needed. Only time will tell if it works well in the end.
 

Attachments

  • 01 no top cover.jpeg
    01 no top cover.jpeg
    139.2 KB · Views: 0
  • 02 bottom cover.jpeg
    02 bottom cover.jpeg
    142.7 KB · Views: 0
  • 03 bottom pcb.jpeg
    03 bottom pcb.jpeg
    326 KB · Views: 0
  • 04 idea for bottom fan.jpeg
    04 idea for bottom fan.jpeg
    106.8 KB · Views: 0
Last edited:

Tesla

May 10, 2010
168
Joined
May 10, 2010
Messages
168
Looks like your recent Forum Software migration went side-ways.

This thread is now missing several posts. They were made between 2016 and 2023. Oh well.
 

Tesla

May 10, 2010
168
Joined
May 10, 2010
Messages
168
Possibly.

But what I find troubling ... if this old random thread is now missing posts ... there is no telling what all is missing in various threads around the forum.
 

Supersoberguy

Jun 30, 2023
4
Joined
Jun 30, 2023
Messages
4
So, to follow up on my story: soldering back original MOS-FETs was never really a long-term option. It worked first time for an hour, maybe an hour and a half. Second time it worked 40 mins and then went into Overload. It just went on to decrease every time until eventually it would just work for 3-4 seconds and the the Overload message would appear.

My second batch of MOS-FETs came in yesterday (the first batch was not working, nt one of them). I soldered them and AV would go straight into Overload. It doesn't even click the main relay (you can clearly hear it when it functions properly) at the begining to indicate that these MOS-FETs and AV as a unit even work. I ordered third pair from third store on aliexpress hoping that it will be either success or final fail before I just buy a new AV.

While I was doing the second pair of MOS-FETs I took off the cover on the bottom of the main metal panel to install a 8mm fan right beneath the AV (see my second observation in post #31). If everything works out, it will be a good crappy looking modification.
 

Tesla

May 10, 2010
168
Joined
May 10, 2010
Messages
168
So, to follow up on my story: soldering back original MOS-FETs was never really a long-term option.

bottom of the main metal panel to install a 8mm fan right beneath the AV
Be sure you did not pull a PCB-trace apart.

Yes, it needs good air-flow from the bottom, but I like pc-case fan on top of AVR (closer to heatsinks).
 

Supersoberguy

Jun 30, 2023
4
Joined
Jun 30, 2023
Messages
4
Be sure you did not pull a PCB-trace apart.

Yes, it needs good air-flow from the bottom, but I like pc-case fan on top of AVR (closer to heatsinks).
Yes, I teared apart only the metal frame of the main case right under the heatsink (attachment 4 in my 31 post). Luckily, there was enough space to work with.

Yes, when first problems with overload appeared few years back, I had taken out original fan, which did not work until the Overload kicked in (which was already too late for anything) and put a 8mm fan there for the air outflow. And put two 8mm on top of the cover for the air inflow directly on to the heatsink. But that lasted only couple of years up until now.

Now, if the third batch will be of good quality, I will reverse two heatsinks on top for the air outflow and put another fan under the bottom of case for inflow. This option makes more sense since the hot air is always in the upper space and colder air is lower in space. Third batch will come in about 3-4 weeks so I will report only in September.

PS: this forum made me more confident with trying to fix the AV myself and pushed me to start soldering which I always wanted to but never had an opportunity to.
 

Supersoberguy

Jun 30, 2023
4
Joined
Jun 30, 2023
Messages
4
Third batch will come in about 3-4 weeks so I will report only in September.
So, the third batch of MOS-FETs came in and instantly you could tell, that they were "the ones" since they even had markings and engravings on the metal plate as well, not only on the grey exterior cover. The original ones also had these engravings. I soldered them in and AV worked right away. So, it also depends on the quality of the spare parts. Unfortunately, I had to go through 2 unsuccessful batches (30.40 [imath]and 35.34[/imath], total of 65.74 [imath]) and the third batch (37.44[/imath]) with the total budget of 103.18 $ that was spent on this repair (I exclude the cost of multimeter, soldering iron, flux, copper wires for desoldering and solder). But still, it is way cheaper than buying a new AV with comparable specifications. I just love this AV and want it to go on a little further.

PS: I installed a 8mm fan underneath the AV (attachment 4 in my 31 post) with the airflow going up. Right above it on the upper case I installed 8 mm fan also with airflow going up, so that I have a nice airflow from bottom to the top right through the heatsink. The third fan was installed right next to the second one with airflow going down, cooling the other side of the heatsink.
 

Samuel

Jan 4, 2016
3
Joined
Jan 4, 2016
Messages
3
Hello there,

I'm in a quest to revive my Panasonic SA HE200 from its last demise: I can confirm that the microprocessor is dead after a disastrous recap attempt. A long time ago I solved the overload problem, later my wonderful wife managed to plug it directly in a 220V and I managed to fix this too. This is the reason I decided for a recap despite it working perfectly fine again, but I made a mistake that killed the micro. So here I am now.

This device has long been replaced and this is more like a fun project, I don't now why but I like this device and would like to see it running again:)

So if someone has a spare front panel board (and maybe more parts...) that can be parted with, please reach to me via PM.

A very long time ago I bought a digital board for this receiver from a guy on Ebay, I managed to reach him again but unfortunately he got hid of the remaining parts, so, here I am.

Best regards everyone
 
Top