Maker Pro
Maker Pro

Trying to Attach Momentary Push Buttons (Rocker-Type) to a circuit board with Silicone Buttons.???

FrankTank

Aug 11, 2015
37
Joined
Aug 11, 2015
Messages
37
Is it possible to somehow attach wire leads for Momentary Push Buttons in place of the Silicone Contact Buttons? My circuit board has 3 silicone contact buttons similar to the photo attached.

I want to somehow run wire leads so I can easily place momentary push buttons. Basically like horn buttons.

Does this make sense? And is this possible?

Easy? Difficult?
 

Attachments

  • momentarybuttonscircuitboard.jpg
    momentarybuttonscircuitboard.jpg
    102.6 KB · Views: 162

shrtrnd

Jan 15, 2010
3,876
Joined
Jan 15, 2010
Messages
3,876
Certainly it's possible and not very difficult.
The problems I see are what we don't know about your circumstance.
Do you need the replacement to fit back into some specially constructed housing?
If so, you will have to search for a physically compatible size and shape of switch and actuator.
You want a momentary rocker switch, so that's what you'd have to look for, and considering the fact that your existing push-buttons appear to be small,
that may be difficult.
Anything else you can tell us about what you intend to do? Since you said you want to add wire leads to the push-buttons, I'm wondering if you intend to
relocate the replacement switches somewhere else, and not directly on the board where they're at now?
Anything specific about what you want to do will help us point you in the right direction.
 

FrankTank

Aug 11, 2015
37
Joined
Aug 11, 2015
Messages
37
Well basically, I am having difficulty placing and clean mounting a toy voice changer. My original thread is here:
https://www.electronicspoint.com/th...a-battery-run-on-12-volt.275022/#post-1661619

I am connecting it to and amplifier and installing it on a golf cart for the kids to play with through the speakers.
I don't really have any restrictions as far as space for the housing. I just wanted to see how to run lead wires to a 12 volt style rocker/toggle switch horn/momentary button.

I just want to install the rocker/momentary pushbuttons to the dash panel or somewhere around there...so the kids can just lean forward and press the button to hear the sounds...if that makes sense.
 

shrtrnd

Jan 15, 2010
3,876
Joined
Jan 15, 2010
Messages
3,876
Sounds simple enough. Since you're relocating the switches, physical room necessary is not much of an issue, so you can use normal-sized switches.
Do you have any experience using a soldering iron to add or replace electronic wiring?
From your picture, the round circuit board with the three switches is mounted to the white housing cover on 3 white plastic pegs, which were probably melted at the top to hold the circuit board in place.
I usually use an over-sized drill bit to remove the larger melted top of the white pegs, so that I can remove the board from the cover housing.
Once the circuit board is out, if you turn it over you will see the gray silicon switch covers have two soldered contacts (each) that are the switch contacts (for the actual switch underneath the silicon covers).
You only need to deal with the back-side of the board where the solder joints are, to remove the switch on the top of the board
All you need to do, is desolder the two contact points for each switch, solder a proper length wire to each point on the circuit board where the switch was, and replace the removed switches with
your replacements. One wire to each side of the switch. There is no polarity involved because the switch is either open or closed, single-pole operation.
That switch would be a 'Single-Pole, Single Throw, Normally-Open, Momentary Contact' replacement switch. Rocker, push-button or whatever you want it to be.
This is electronic work, but it's all basically mechanical in that you need to decide what kind of replacement switch actuator you want, and physically place it.
You sound a little leery because you probably haven't done something like this before, but it is not difficult and people here can answer any questions you might have.
 

Alec_t

Jul 7, 2015
3,590
Joined
Jul 7, 2015
Messages
3,590
Once the wires are soldered, anchor them in place physically, e.g. with some kind of clamp, or hot glue etc, so that vibration doesn't fracture the joints.
 

FrankTank

Aug 11, 2015
37
Joined
Aug 11, 2015
Messages
37
So I was able to take some actual photos. And I remembered NOT seeing soldering points on the backside. That's why I initially said "contact" buttons. Wasn't sure what they are called.contactbutton1.jpg contactbutton2.jpg contactbutton3.jpg

I have soldered only a handful of times and it was just soldering wires together.

Anyway 1st picture is front side with the 3 blue silicone buttons.2nd photo is the rear, and the 3rd photo I took one of the buttons off for you to see.

I don't think soldering is an option but I am inexperienced.

Any idea what I need to do with this now??

Thanks guys:) I appreciate the help:)
 

KeithM

Nov 3, 2015
41
Joined
Nov 3, 2015
Messages
41
So I was able to take some actual photos. And I remembered NOT seeing soldering points on the backside. That's why I initially said "contact" buttons. Wasn't sure what they are called.View attachment 25641 View attachment 25642 View attachment 25643

I have soldered only a handful of times and it was just soldering wires together.

Anyway 1st picture is front side with the 3 blue silicone buttons.2nd photo is the rear, and the 3rd photo I took one of the buttons off for you to see.

I don't think soldering is an option but I am inexperienced.

Any idea what I need to do with this now??

Thanks guys:) I appreciate the help:)

It's definitely possible, just really tricky, you'll need to solder one wire to one side of the pad, and the other wire to the other side. I'd recommend using (if you have it) a really small tip on your iron, and flux, as well as pre-tining the wires and pads (if you can) so as to make it easier
 

shrtrnd

Jan 15, 2010
3,876
Joined
Jan 15, 2010
Messages
3,876
Yep, KeithM has accurate advice.
Your switch uses the maze-like configuration on the top-side of the board as the switch contacts, and when you press down on the blue actuator, the carbon pad underneath it makes the actual contact across the maze-like
trace on the board. One side of the maze needs one wire soldered to it, and the other wire to other side. You can try to solder directly on the printed circuit board trace, or follow the trace from each side of the maze contacts to
a connected component elsewhere on the board and use that point as each side of the switch.
Don't let it scare you, you can do it.
 

Alec_t

Jul 7, 2015
3,590
Joined
Jul 7, 2015
Messages
3,590
It looks like the +ve leg of C21 is common to at least two of the buttons. That saves one solder joint ;).
 

73's de Edd

Aug 21, 2015
3,622
Joined
Aug 21, 2015
Messages
3,622
.


Sir Frank Tank . . . . . . .

Post Addenda . . . . . .Initially poked up on laptop, earlier, prior to 2 added comments . . . . just had to get back to civilization for my image generation and its add on to post.

GOOD JOB . . .on the photos ! . . .now I won't have to expound upon the fixed serpentine gold flashed grid switch contacts and the imbedded colloidal graphite pressure contact within the blue switch "buttton"

MARK UP :

yFRGYNP.png


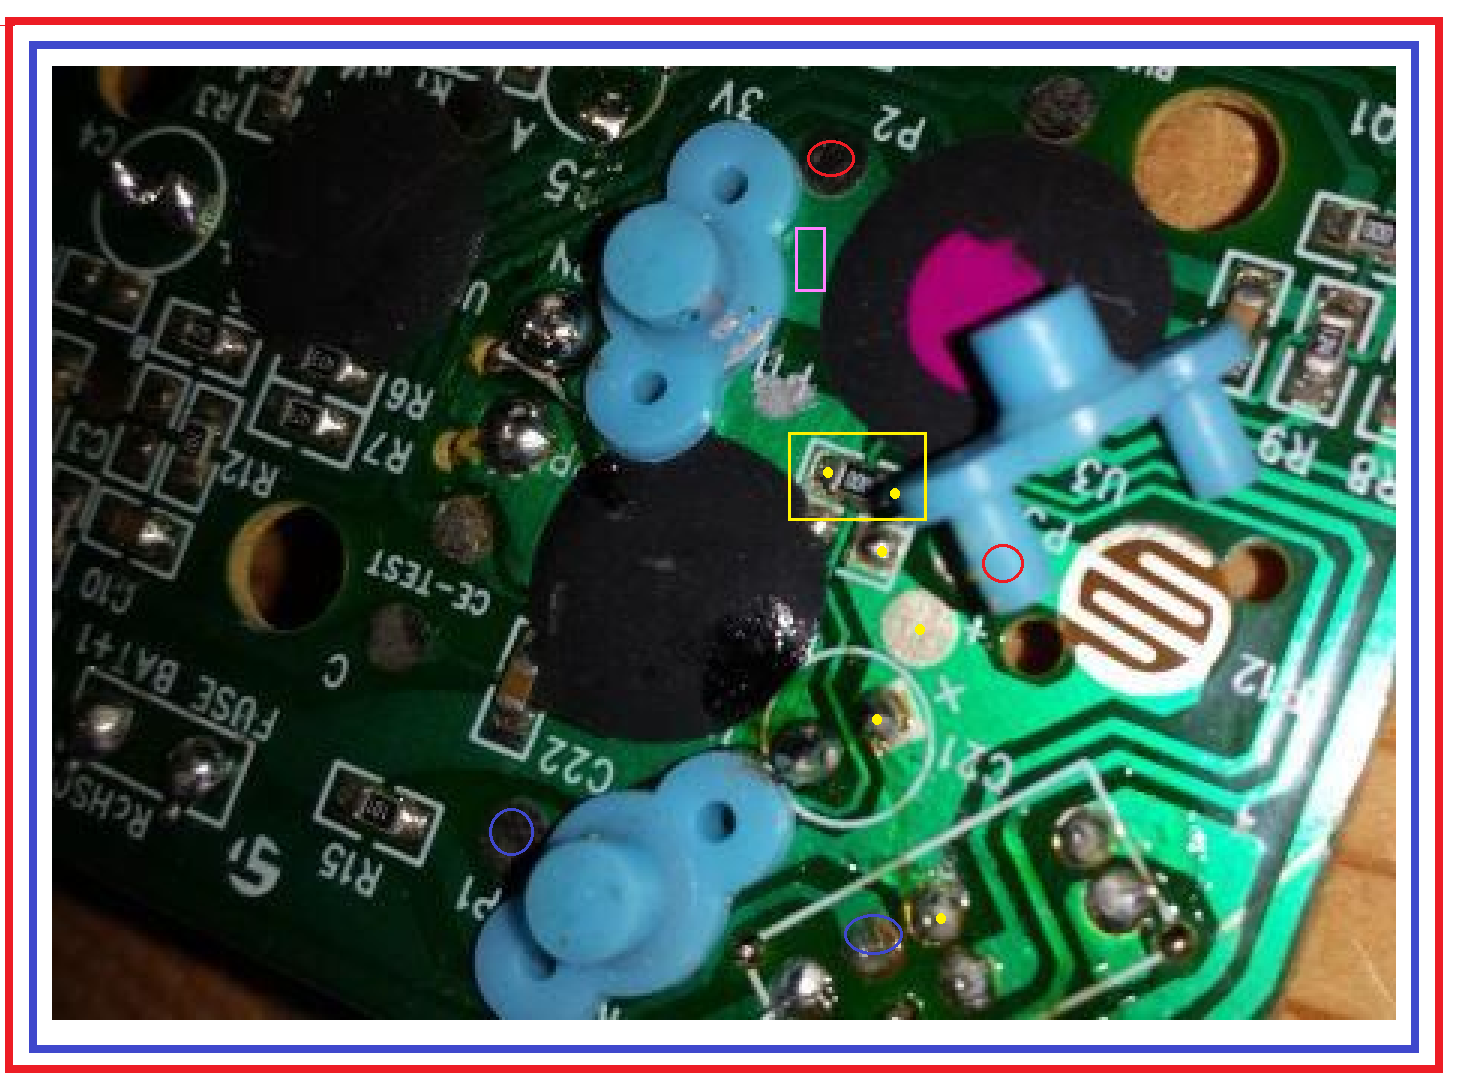
Look and you will see C21 electrolytic relevant to power supply filtering and its + terminal foil path goes right up to being 1 common connection of your now exposed switch.
ALSO it goes down and does the same thing to one of your bottom left PB switches.
Then move to the top left PB switch and see that they have opened that buss and made a path for a fine hairline trace to pass thru it (YELLOW rectangle position) HOWEVER they bridged that gap on the top with a
000 ohm resistor (jumper) .

Sooooooo that area will account for three common connections to that circuitry, which would only need one wire to remote then out to a different point and then branch out again..
That one connection could be made to any of the 5 YELLOW dots I have shown or even to the gold test pad just above the + marker of C21 , if you tin it..

On my RED circle, I believe that your PB switch top is hiding an existing solder blob that connects to the other contact of that switch.

On the top PB I believe that my RED circle there is noting an existing solder blob to that other PB switch contact point . If not the FUCSIA rectangle shows room to scrape down to bare copper and make a solder pad.

Bottom left PB, see if one of my BLUE circles . . .at solder blobs . . . . are connecting in to the other contact of that PB switch.

If all are confirmed . . .as same contacts . . .put a drop of rosin flux atop the involved solder blobs and then add a drop of new solder to reflow and "freshen" the joints.

Since the foil side of the board is to be re mounted and then becomes all covered up, my probable procedure, if this being my project , would be to use fine insulated "magnet" wire in the vicinity of 30 gauge..
You scrape a 1/8 inch end to bare copper and use rosin flux to pre tin it. Use a very pointy WELL TINNED soldering iron tip and place the tinned wire tip to the already prepped solder droplet joint and
melt to reflow the solder junction.
Repeat on all of the 3 other connection points and then selectively feed the wires to the other side of the board via the same closest 2 holes that each of the pushbuttons two side "tits" are using for their retention.
The small diameter of the wire along with the "tits" partial compression should accommodate both within the same hole .

Gather your now remoted 3 switch contacts wires, along with the one common of all 3, and interface to a connector and wiring to branch out and interface to the size and type of wiring that you are used to using.

Thassssit . . . . .

73's de Edd
 
Last edited:

FrankTank

Aug 11, 2015
37
Joined
Aug 11, 2015
Messages
37
I think I can do it....

I probably need to make a trip to the store to get some flux and I guess a new fine tip soldering iron. Do they sell "magnet" wire and flux at Lowes/Home Depot?

Would I feed/slice the magnet wire to the primary wire that connect to the rocker switches?

All I have ever used was the el cheapo orange handled one....but it is pretty beat up. I have used it more for welding ABS plastic than anything else.

This is all foreign to me but the explanations actually make some sense:)
 

FrankTank

Aug 11, 2015
37
Joined
Aug 11, 2015
Messages
37
Also, the actual off/demo/off switch on the circuit board wiggles....

Could I just solder the 2 blobs on the back side of the SW Block on the circuit board to permanently affix them to the On setting??
 

shrtrnd

Jan 15, 2010
3,876
Joined
Jan 15, 2010
Messages
3,876
'Magnet' wire has me stumped. Maybe you're referring to small gauge wire similar to the type we used to use with the old dry cell batteries to magnetize iron bearing implements?
Yes, you need smaller gauge wire simply because you're dealing with small circuit trace and low voltage.
I don't know what Home Depot and Lowe's stocks, but you should be looking for an electronics supply store in your area for this stuff (phone book maybe).
You just need a small tipped soldering iron, around 25W, and Rosin-core solder. The rosin-core solder has the flux in the center of it already. (El Cheapo on the iron is just fine)
Also not familiar with your wiggling switch, or the selections you mention. But a switch is just a switch. If you are sure of the contacts, soldering a permanent connection to bypass the 'demo' feature IS
just like leaving that wiggling switch in the permanently 'on' position.
 
Last edited:

73's de Edd

Aug 21, 2015
3,622
Joined
Aug 21, 2015
Messages
3,622
.
.


Sir Frank Tank . . . .et al . . . . . . .

Hmmmmmm . . . .let me take just a moment to check in my catalog here . . . . . .

sHpzvh7.jpg


Yep . . . .looks like it has always been called magnet wire . . . .or a proper variant might just possibly be . . . . . enamel insulated copper wire .


But with finding that rosin flux being hard enough of an initial task for you.
Instead of the magnet wire, let's just see if you can't use a short length of AC line cord . . . . . .POSJ cord . . . . . .ZIP wire.
You strip its insulative covering off, and . . . .BAMMMMM . . . .you will have yourself upwards of 30 -34 strands of fine # 30 bare copper wire .

Looking back at the magged up photo, and with you having all 3 of the vinyl /or/ silicone push button tops unplugged .

Taking the top left PB if the RED circle is a valid connection point, you tin the tip of one of those bare copper wires and reflow solder it to the solder blob near P2 and then route it over to that closest hole and feed it THRU and put a bend on the opposide side towards P2 direction to hold it in place. I think that if you check the path that the wire travels it could only short to that same foil. IF the integrity of the conformal coating on that foil underneath it failed.

Looking at the right top right PB if that RED circle is a valid solder blob then the same tip tinning of another wire and passing it thru that closest hole and its fold over on the other side towards P3 would retain it.

The last PB is at at bottom left and if the BLUE circle closest to P2 marking is its valid solder blob, taking another tip tinned wire and re flow soldering to that blob and then feeding it thru the closest hole at P1 would take care of that PB. This one I can't see . . . so if there is any possibility of touching other than that foil, cut a small rectangle or square of plastic electrical tape and slip the tab under the wire for insulation of that wire.

That now only leaves the wire that is serving in being a common connection for all 3 of the PB switches . Consult my YELLOW rectangle and tip tin the fourth wire and re flow solder it to the left YELLOW dot in that area and route over to and past past the "silver pookey" daub, that some klutz got / left on the board, and pass this last wire thru that nearest hole and fold back on the other side.
Confirm that all of your 4 wires placements could not develop a short, due to their wire positioning, and then plug in the three BLUE push button tops.

You now have 4 interface wires coming out on the other side of the board, move about a 1/4 in away from the wires for a clear spot and pencil on marks as to where you want a wire support for each of the 4.

Find the common wire lengths that will be used between this board and the MAN sized remoted push buttons.
Take one end of each wire and srtrip and pre tin about a half an inch length, bend the wire 90 degrees at the insulation / tinned junction and then clip off the tinned end to shorten it to about a 1/4 inch tinned length.

Disrupt . . .disrupt . . .DISRUPT . . . I am having to pick up a relative from the airport . . .so I will have to finish this tomorrow . . . .


73's de Edd


.
 
Top