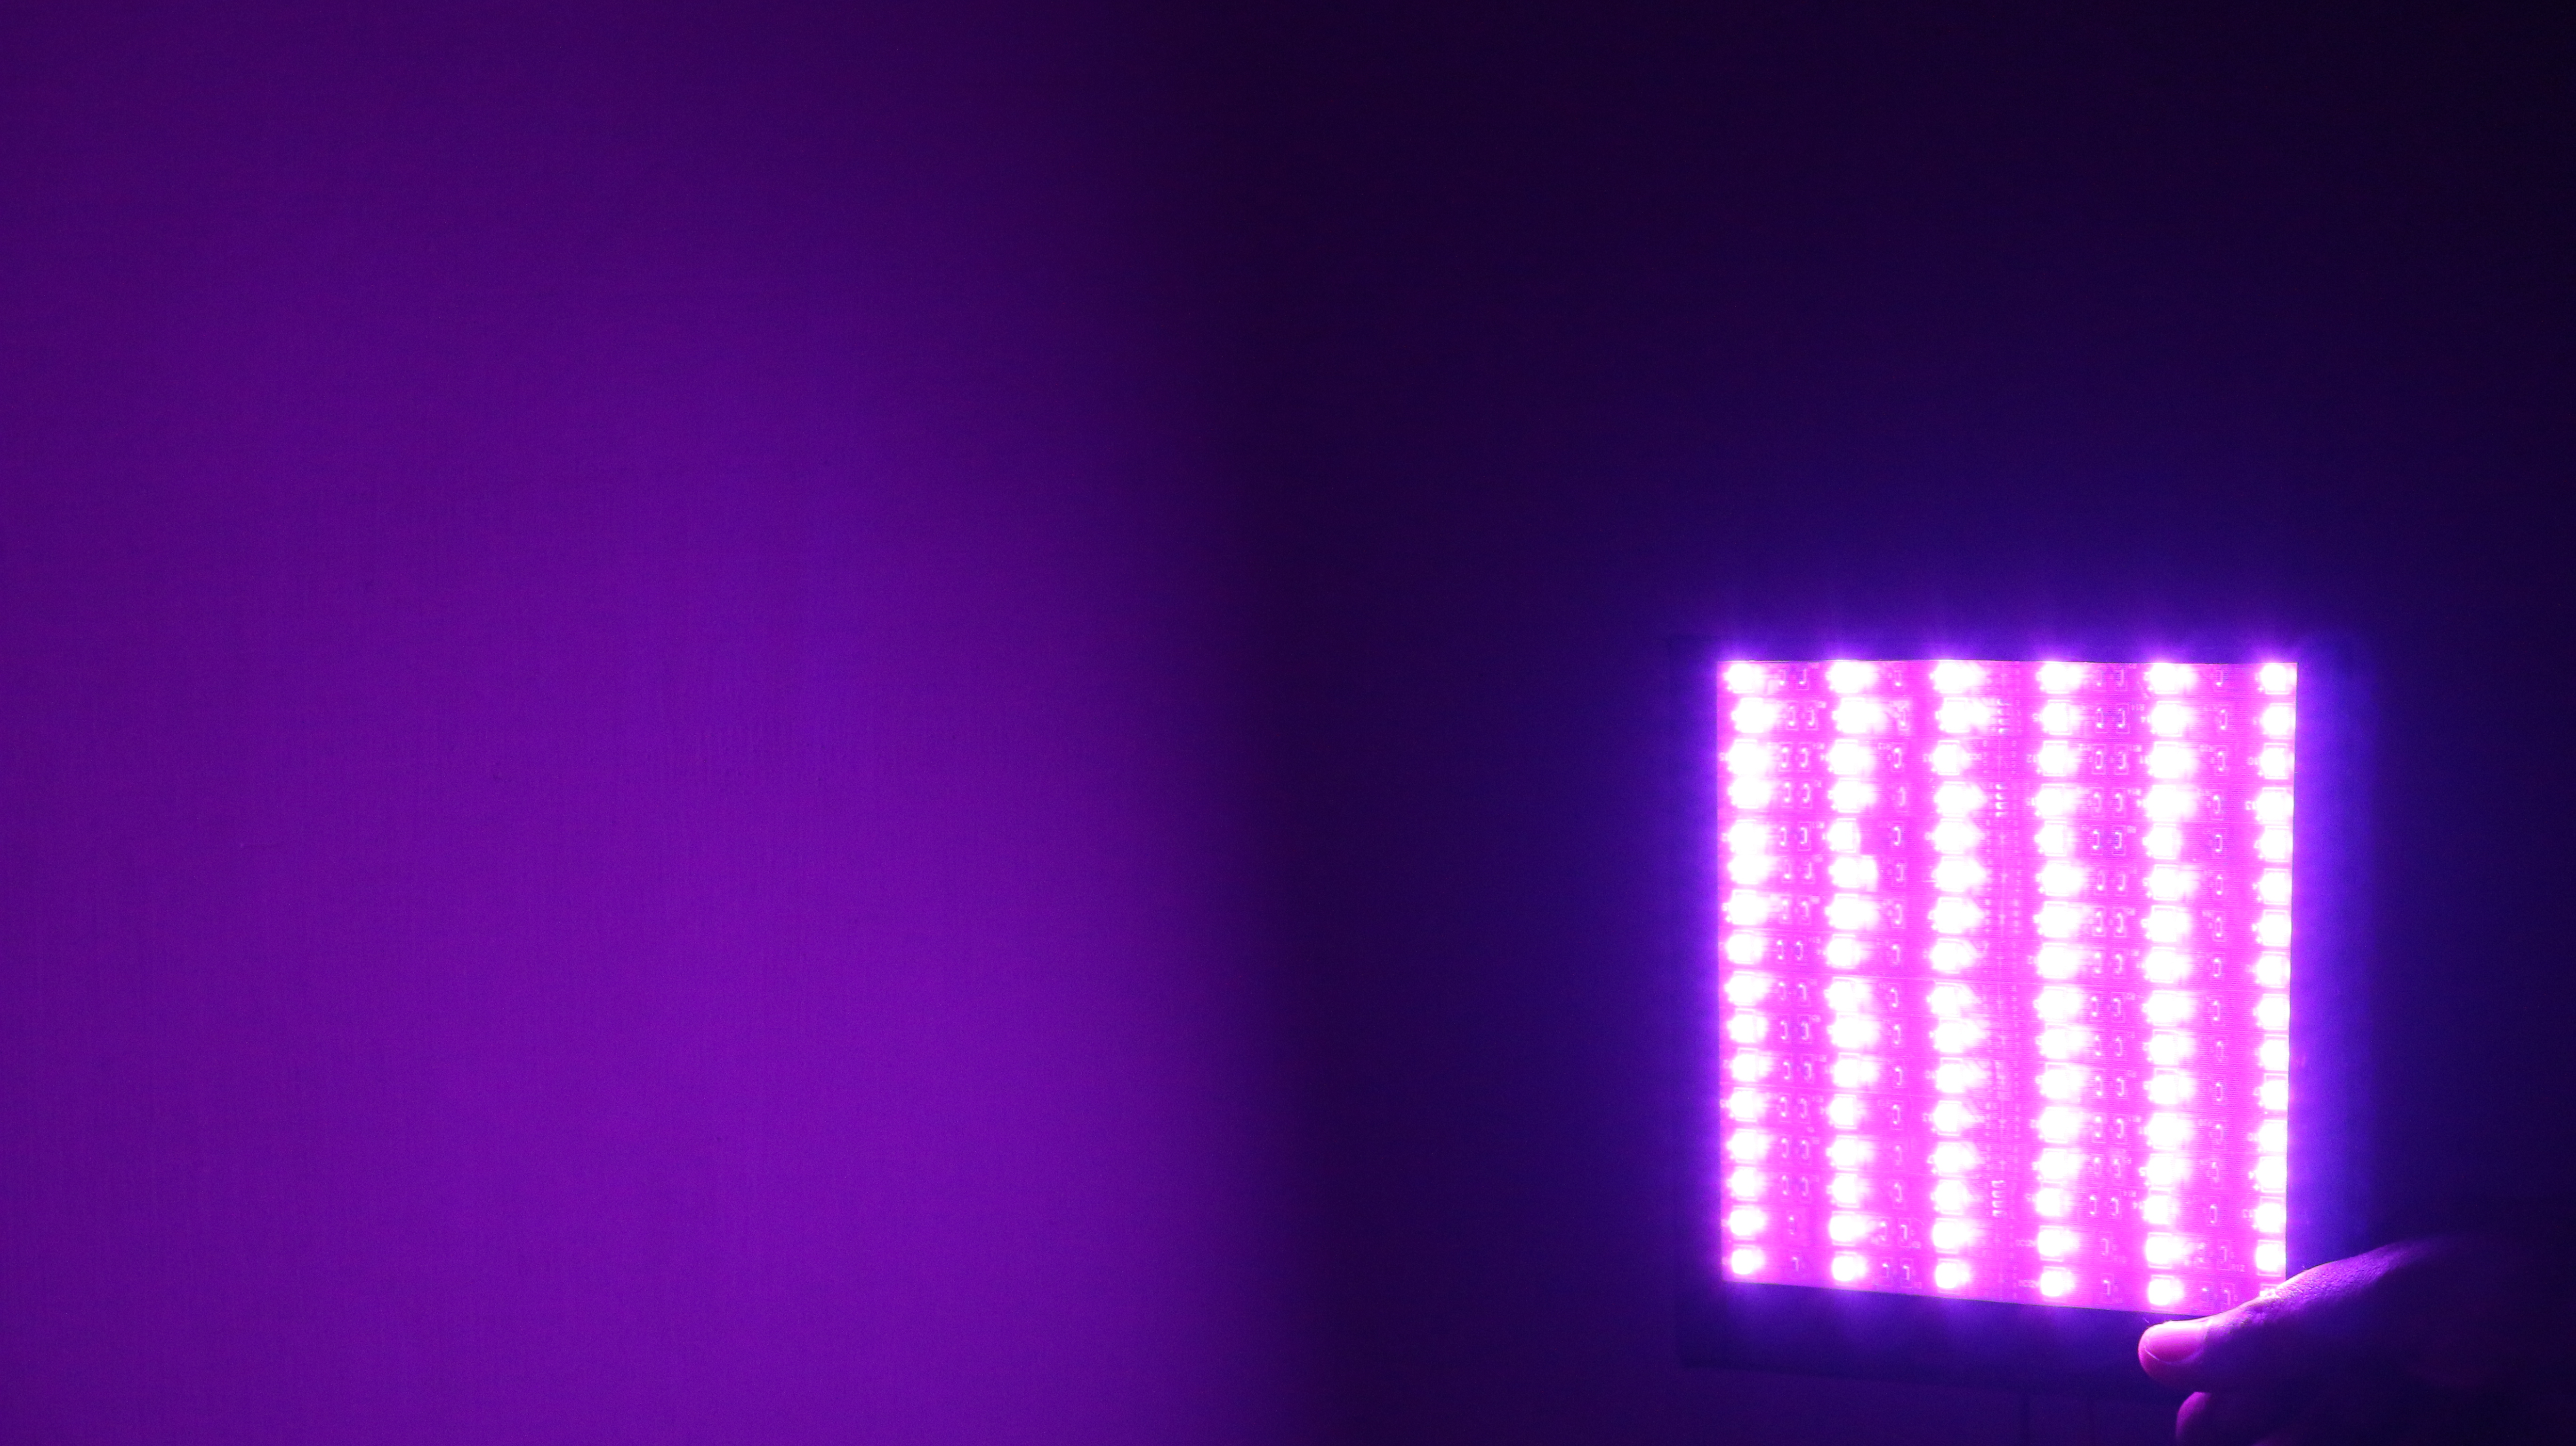
RGB Lights Compaing Three LED Lights Red,Green & Blue. We Adjusting the Brightness Of the LED it Create new Colour. So t
RGB Lights Compaing Three LED Lights Red,Green & Blue. We Adjusting the Brightness Of the LED it Create new Colour. So the LED Adjusting Brightness using Codes(0-255).
Mixing colors
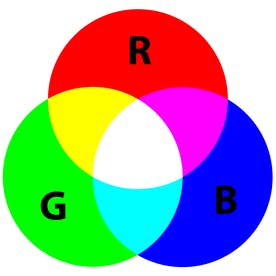
►To produce other colors, you can combine the three colors in different intensities. To generate different colors you can use PWM to adjust the brightness of each LED.
►As the LEDs are very close to each other, we can only see the final colors result rather than the three colors individually.
►To have an idea on how to combine the colors, take a look at the following chart. This is the simplest color mixing chart, there are more complex color charts on the web.
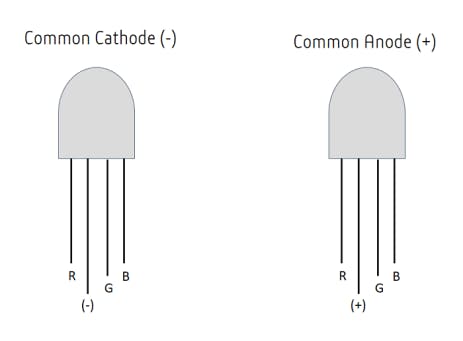
►RGB LEDs have 4 pins which can be distinguished by their length. The longest one is the ground (-) or voltage (+) depending if it is a common cathode or common anode LED, respectively.
RGB LED is acombination of 3 LEDs in just one package
· 1x Red LED
· 1x Green LED
· 1x Blue LED
The color produced bythe RGB LED is a combination of the colors of each one of these three LEDs.
Mixing colors
To produce other colors, you can combine the three colors in different intensities. To generate different colors you can use PWM to adjust the brightness of each LED. As the LEDs are very close to each other, we can only see the final colors result rather than the three colors individually.
R G B
(255,255,255)= White color
The 255 is full brightness of the led light
RGB LED Two Types:
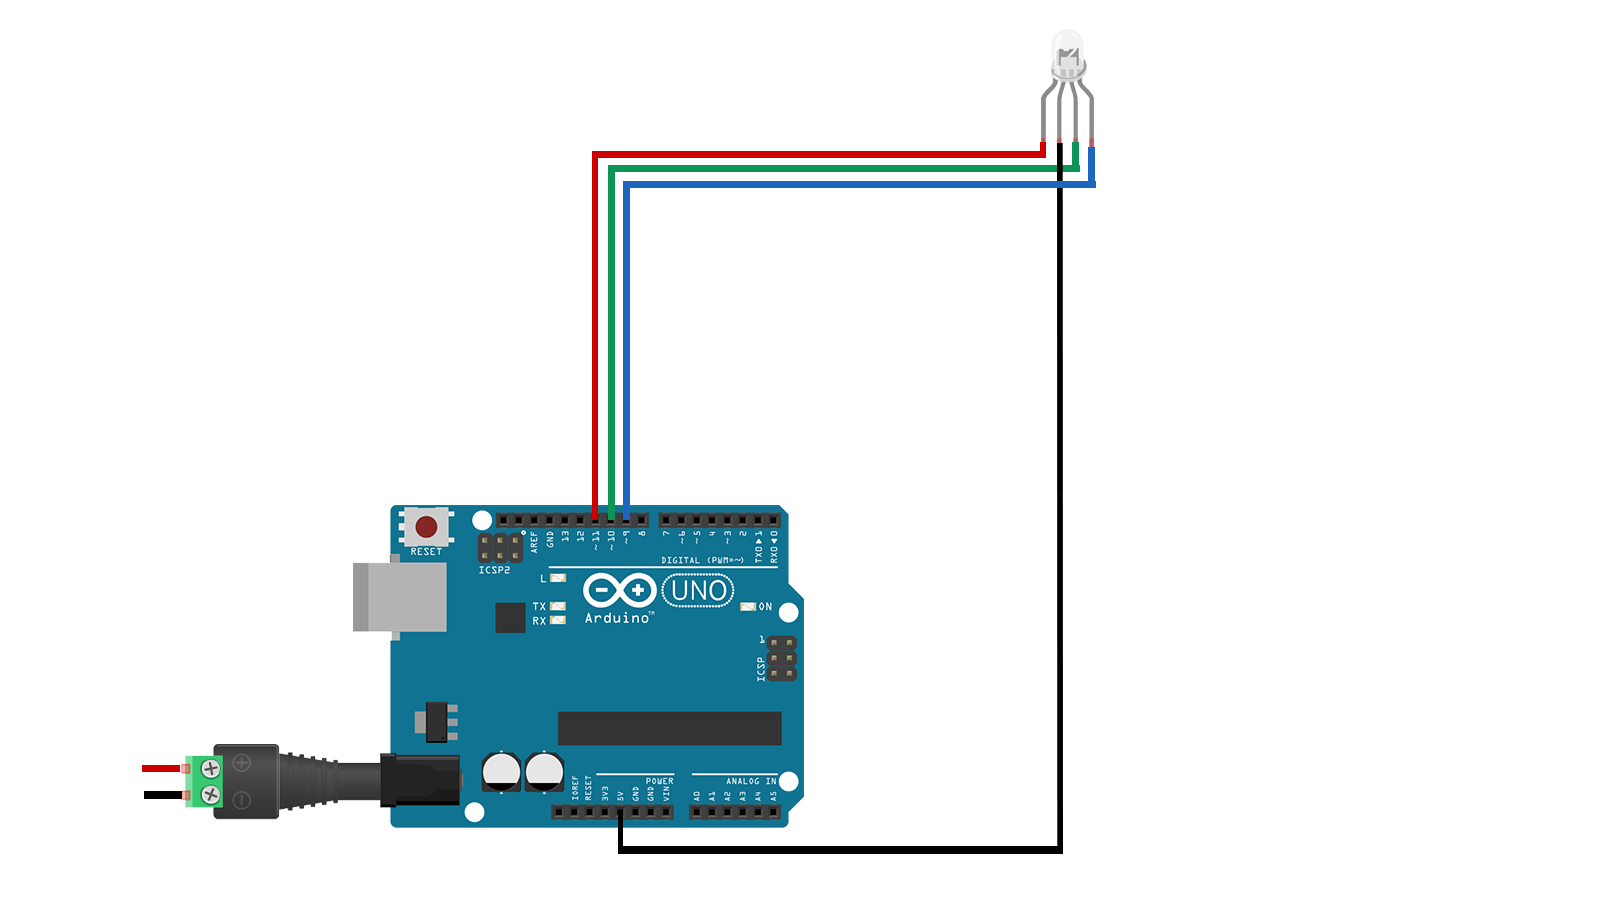
RGB LED BLINK:
int redPin = 11;
int greenPin = 10;
int bluePin = 9;


void setup()
{
  pinMode(redPin, OUTPUT);
  pinMode(greenPin, OUTPUT);
  pinMode(bluePin, OUTPUT);
}

void loop()
{
  setColor(255, 0, 0);  // red
  delay(1000);
  setColor(0, 255, 0);  // green
  delay(1000);
  setColor(0, 0, 255);  // blue
  delay(1000);
  setColor(255, 255, 0);  // yellow
  delay(1000);
  setColor(80, 0, 80);  // purple
  delay(1000);
  setColor(0, 255, 255);  // aqua
  delay(1000);
}

void setColor(int red, int green, int blue)
{
  #ifdef COMMON_ANODE
    red = 255 - red;
    green = 255 - green;
    blue = 255 - blue;
  #endif
  analogWrite(redPin, red);
  analogWrite(greenPin, green);
  analogWrite(bluePin, blue);
}
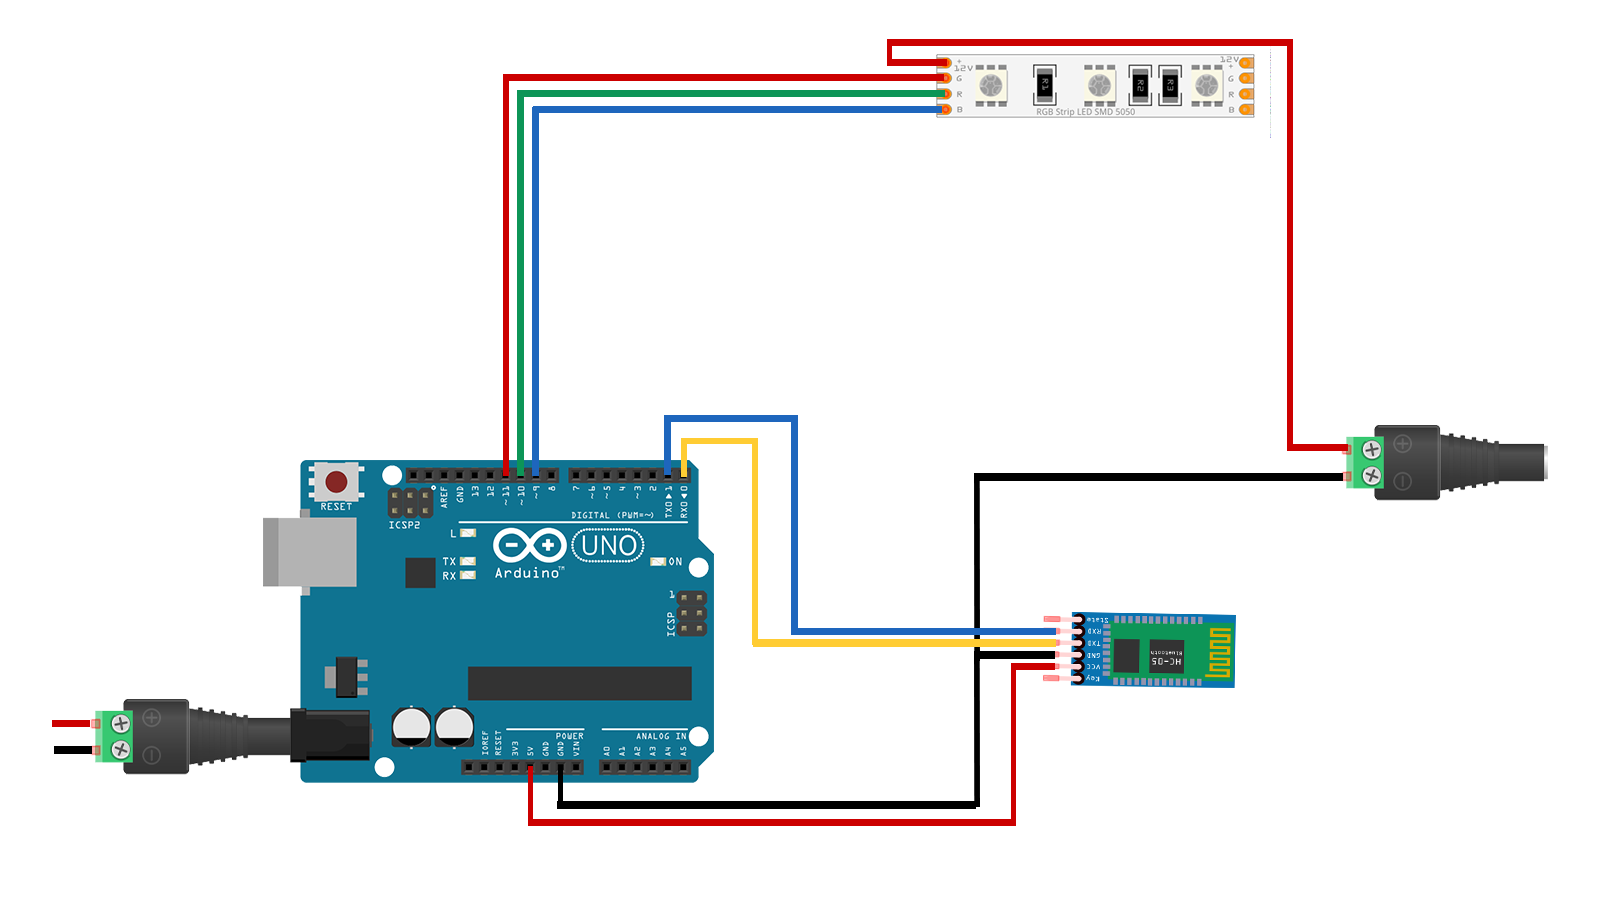
ARDUINO UNO USING BLUETOOTH RGB CONTROLLER:
int color =0;
int red = 12;
int green =11;
int blue =10;


char received;

void setup() {
  Serial.begin(9600);
  pinMode(red, OUTPUT);
  pinMode(green, OUTPUT);
  pinMode(blue, OUTPUT);


 analogWrite(red,0);
 analogWrite(green,0);
 analogWrite(blue,0);
}

void loop(){
    if(Serial.available()>0){
    color = Serial.read();
    char Rec = char(color);
    if (Rec != '0')
    {
    Serial.println(Rec);
    }
  }

  //Black
  if (color == 'B')
  {
    analogWrite(red,0);
    analogWrite(green,0);
    analogWrite(blue,0);
  }

   //WHITE
  if (color == 'W')
  {
    analogWrite(red,255);
    analogWrite(green,255);
    analogWrite(blue,255);
  }

   //RED
  if (color == 'R')
  {
    analogWrite(red,255);
    analogWrite(green,0);
    analogWrite(blue,0);
  }

   //LIME
  if (color == 'L')
  {
    analogWrite(red,0);
    analogWrite(green,255);
    analogWrite(blue,0);
  }

   //BlUE
  if (color == 'E')
  {
    analogWrite(red,0);
    analogWrite(green,0);
    analogWrite(blue,255);
  }

   //Yellow
  if (color == 'Y')
  {
    analogWrite(red,255);
    analogWrite(green,255);
    analogWrite(blue,0);
  }

   //Cyan/Aqua
  if (color == 'C')
  {
    analogWrite(red,0);
    analogWrite(green,255);
    analogWrite(blue,255);
  }

   //Magenta / Fuchsia
  if (color == 'M')
  {
    analogWrite(red,255);
    analogWrite(green,0);
    analogWrite(blue,255);
  }


   // Maroon
  if (color == 'F')
  {
    analogWrite(red,128);
    analogWrite(green,0);
    analogWrite(blue,0);
  }

   // Olive
  if (color == 'O')
  {
    analogWrite(red,128);
    analogWrite(green,128);
    analogWrite(blue,0);
  }

   //Green
  if (color == 'G')
  {
    analogWrite(red,0);
    analogWrite(green,128);
    analogWrite(blue,0);
  }

   // Purple
  if (color == 'P')
  {
    analogWrite(red,128);
    analogWrite(green,0);
    analogWrite(blue,128);
  }

   //  Navy
  if (color == 'N')
  {
    analogWrite(red,0);
    analogWrite(green,0);
    analogWrite(blue,128);
  }

   //light coral
  if (color == 'J')
  {
    analogWrite(red,240);
    analogWrite(green,128);
    analogWrite(blue,128);
  }

   //orange red
  if (color == 'X')
  {
    analogWrite(red,255);
    analogWrite(green,69);
    analogWrite(blue,0);
  }

   //green yellow
  if (color == 'G')
  {
    analogWrite(red,173);
    analogWrite(green,255);
    analogWrite(blue,47);
  }

   // spring green
  if (color == 'S')
  {
    analogWrite(red,0);
    analogWrite(green,255);
    analogWrite(blue,127);
  }

   //   aqua marine
  if (color == 'A')
  {
    analogWrite(red,127);
    analogWrite(green,255);
    analogWrite(blue,212);
  }

   //   hot pink
  if (color == 'H')
  {
    analogWrite(red,255);
    analogWrite(green,105);
    analogWrite(blue,180);
  }

   // honeydew
  if (color == 'D')
  {
    analogWrite(red,240);
    analogWrite(green,255);
    analogWrite(blue,240);
  }

   // light gray / light grey
  if (color == 'U')
  {
    analogWrite(red,211);
    analogWrite(green,211);
    analogWrite(blue,211);
  }
}
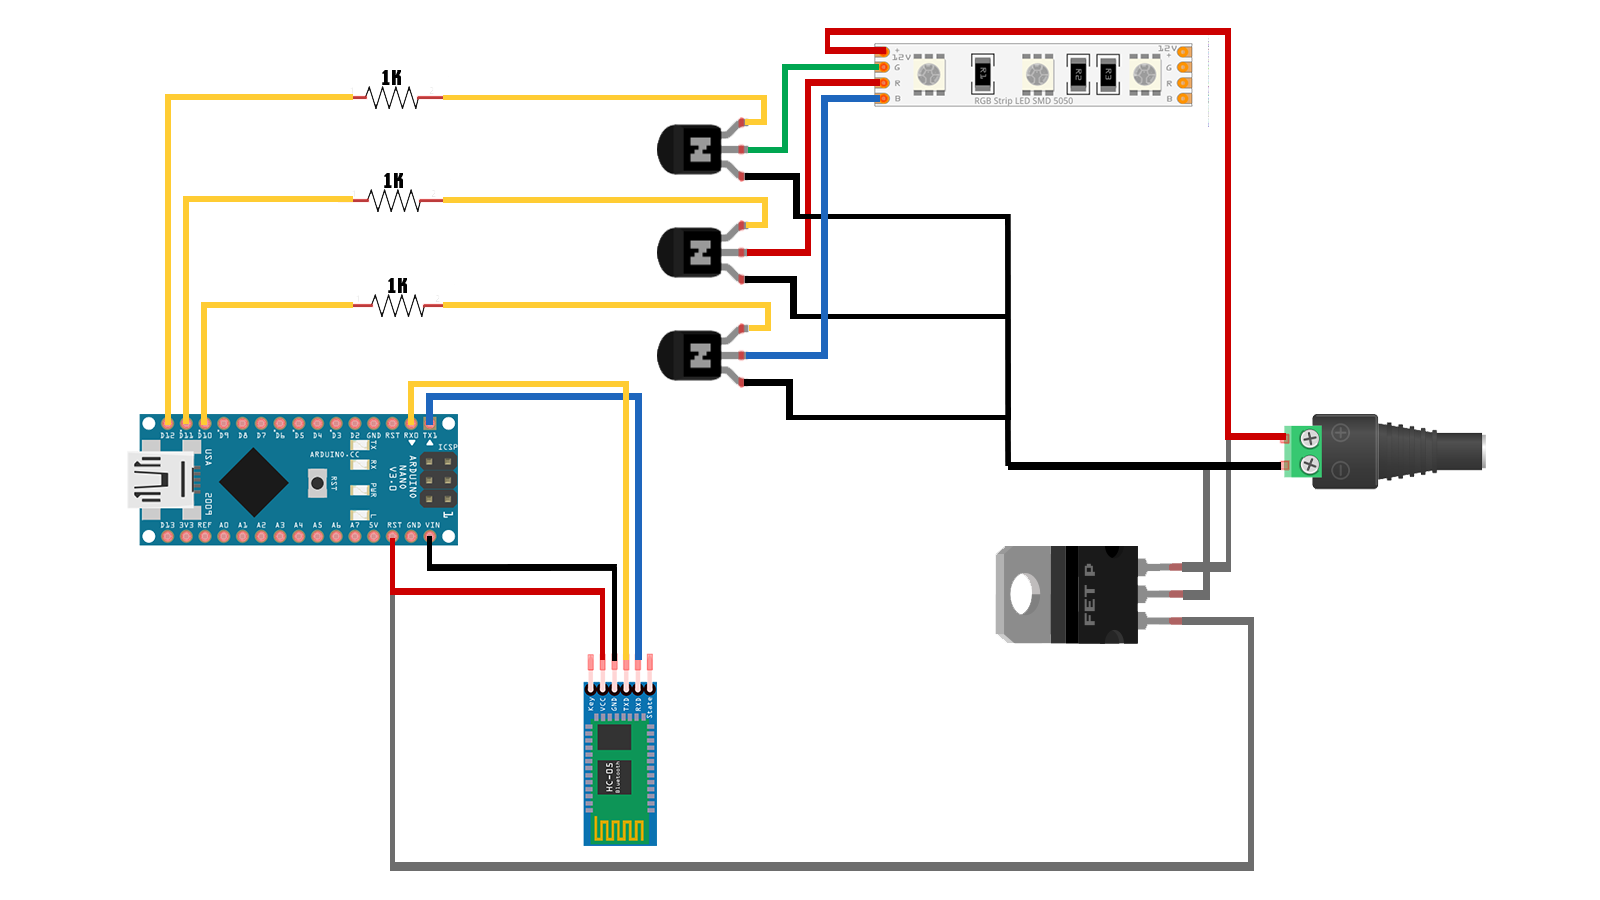
ARDUINO NANO USING BLUETOOTH RGB CONTROLLER:
DOWNLOAD : Arduino Code & android app
http://gestyy.com/wvr2kw