This moisture sensor can measure the moisture level of a plant's soil and notify you when it needs more water.
So far, this has been a very hot summer, but I forget to water my plants when I'm busy. That's where my Debra 2 moisture sensor comes in. Welcome to the Little Shop of Moisture Sensors!
Why?
Ever since the summer came around, my plant, Debra 2, has been extra hungry! With my busy schedule, I couldn't keep her as well-fed as I should have. To help, I built a moisture sensor that can measure the moisture level of her soil and notify me anytime she needs more water. She tends to get a little hangry from time to time, so this helps!
How Does the Moisture Sensor Work?
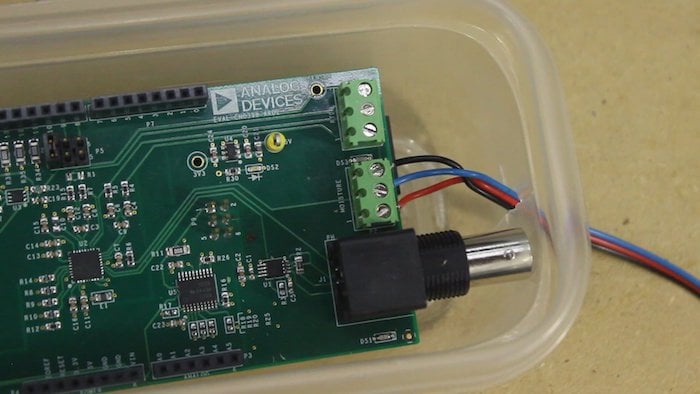
Using an Analog Devices microcontroller and an AD moisture shield, I can plug a capacitive moisture sensor into the shield and receive data from my plant. Capacitive moisture sensors measure moisture with capacitive sensing rather than resistive sensing. This means they are resistant to corrosion and will last longer in wet environments, like our soil!
The sensor's
analog voltage and sensor outputs are inversely related to the moisture level. This means that the more moisture, the less voltage. Because of this inverse relationship, we can use our sensor with any microcontroller or accessory that supports analog inputs, like our moisture shield. The CN0398 shield interprets the analog data from the sensors via the shield's
ADC and transmits this to the microcontroller via SPI communication. Lucky for us, this project was created from some
example code, so all the hard work was done.
The sensors wires plugged in accordingly
The sensor's output ranges from 0-3.3V. I divided this range within the code into three separate segments that correspond to the three moisture categories: "Feed me", "A little more", and "Satisfied". In other words, "dry", "moist", and "wet". When the analog voltage is between any range of specific values, one of the responses will be displayed on our serial monitor. A snippet of the example code can be found below.
#ifdef USE_MANUFACTURER_MOISTURE_EQ
if(volt <= 1.1) { moisture = printf("Satisfied"); } else if(volt > 1.1 && volt <= 1.82) { moisture = printf("A little more"); } else if(volt > 1.82) {
moisture = printf("FEEED MEEEE");
}
To run our program, it is easiest to use two micro USB cables: one plugged into the user port for debugging/upload and the other for monitoring our results. After plugging in your cables, you will first want to open the AD Eclipse IDE. Within this program, open the example code and run a proper debugging session, as shown on the Analog Devices site. When it's complete, you'll need to hit stop.
Open your go-to serial monitor program and set the proper COM port and baud rate, ours being 115200. Instantly, you should see the data flow. If the soil is dry, the screen will read "FEEEED MEEEE", and if it's wet, it will read, "Satisfied". Change this however you want, but always be sure to listen to your Debra 2, as she may get aggressive.
Happy gardening making!
A glimpse at my live results
Other Soil Moisture Sensor Projects
Other MIT-i Innovations