https://eepower.com/textbook/vol-i-foundations-power-design/chapter-1-introduction-power/power-dc-circuitsIn this lesson, we will learn how to drive an active buzzer to beep with a PNP transistor.
Components
- 1* Raspberry Pi
- 1* Breadboard
- 1* Buzzer (Active)
- 1* PNP transistor (8550)
- 1* Resistor (1KΩ)
- Jumper wires
Principle
As a type of electronic buzzer with integrated structure, buzzers, which are supplied by DC power, are widely used in computers, printers, photocopiers, alarms, electronic toys, automotive electronic devices, telephones, timers and other electronic products for voice devices. Buzzers can be categorized as active and passive ones (see the following picture). Turn the pins of two buzzers face up, and the one with a green circuit board is a passive buzzer, while the other enclosed with a black tape is an active one.
The difference between an active buzzer and a passive buzzer is:
An active buzzer has a built-in oscillating source, so it will make sounds when electrified. But a passive buzzer does not have such source, so it will not beep if DC signals are used; instead, you need to use square waves whose frequency is between 2K and 5K to drive it. The active buzzer is often more expensive than the passive one because of multiple built-in oscillating circuits.
In this experiment, an active buzzer is used. When the GPIO of Raspberry Pi output is supplied with low level (0V) by programming, the transistor will conduct because of current saturation and the buzzer will make sounds. But when high level is supplied to the IO of Raspberry Pi, the transistor will be cut off and the buzzer will not make sounds.
Experimental Procedures
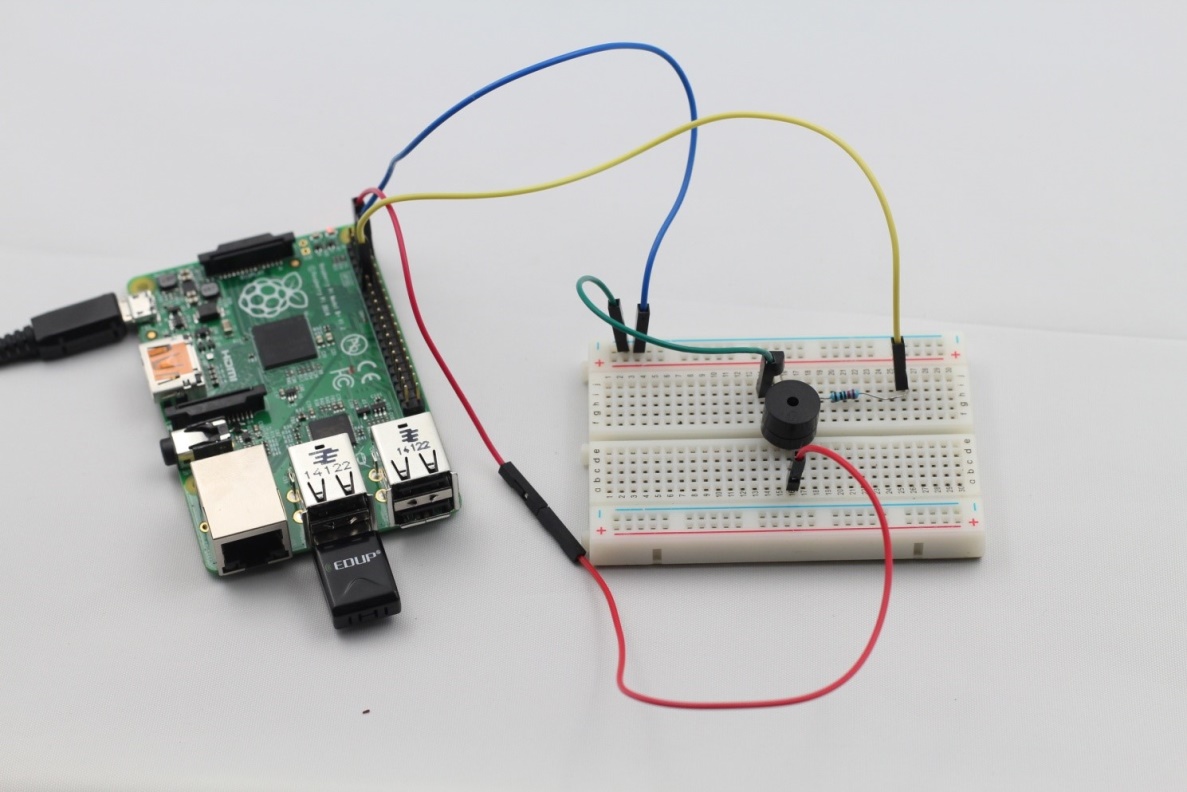
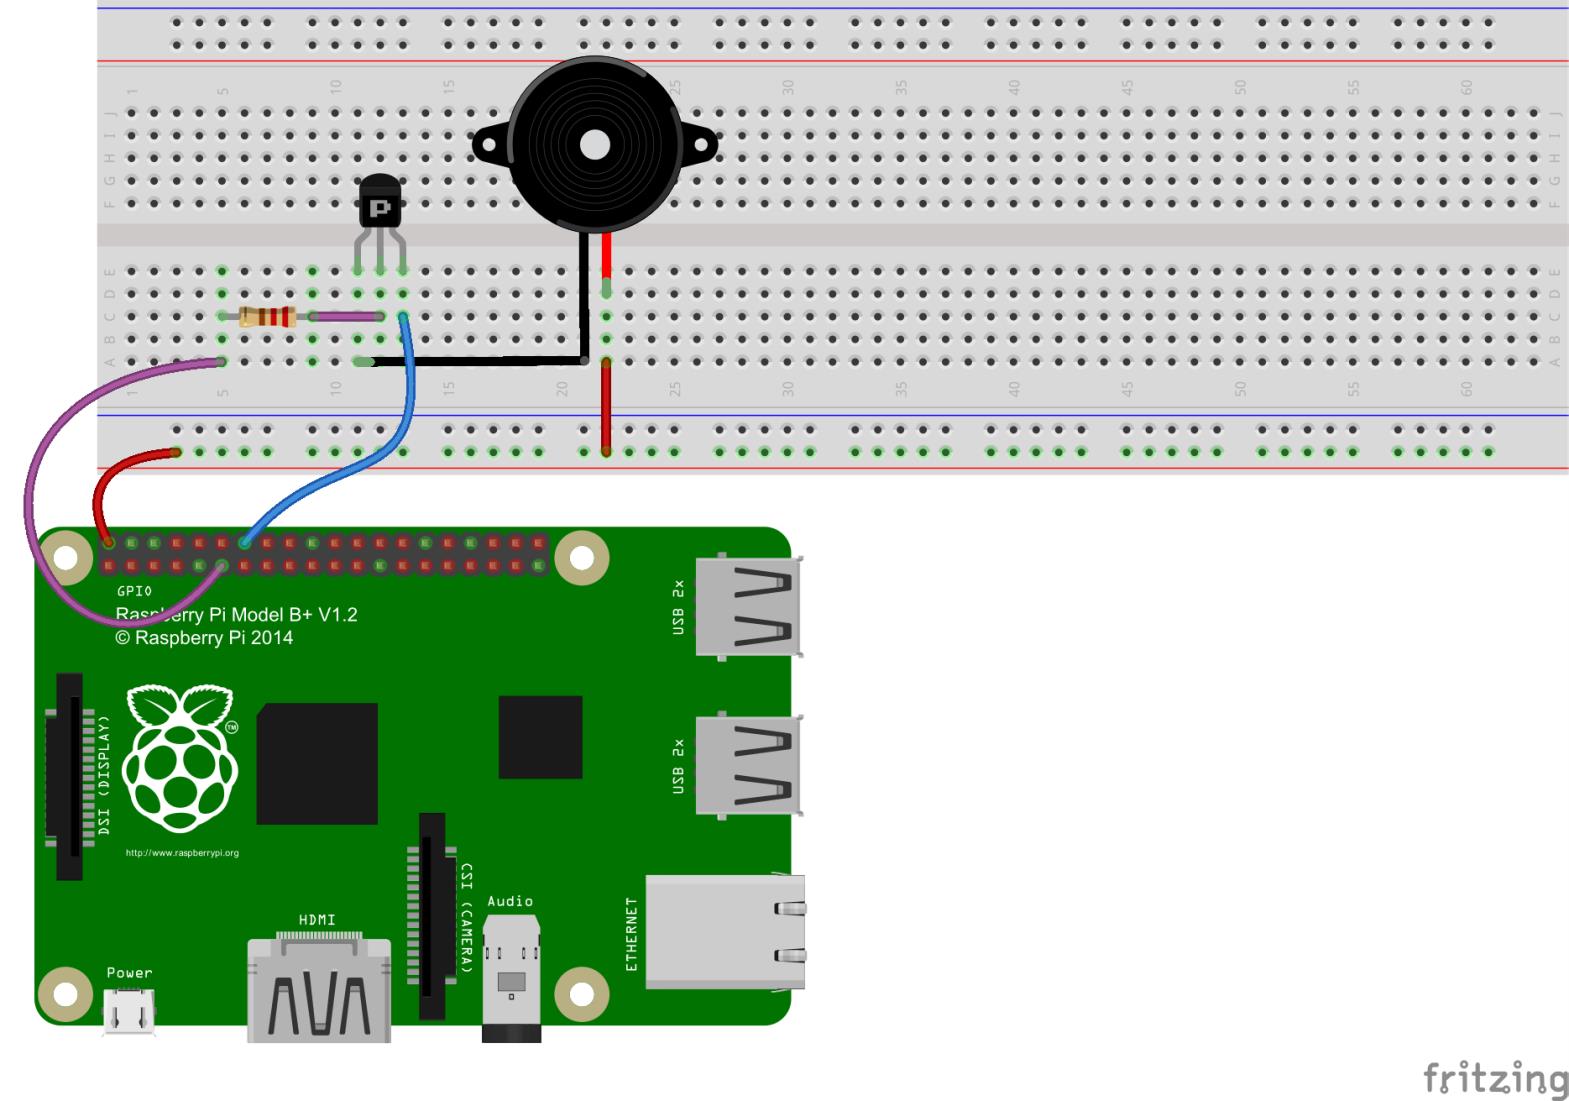
Step 1: Build the circuit (Pay attention to the positive and negative poles of the buzzer)
For C language users:
Step 2: Change directory
cd /home/pi/Primerobotics_SuperKit_C_code_for_RaspberryPi/06_Beep/
Step 3: Compile
gcc beep.c -o beep -lwiringPi
Step 4: Run
sudo ./beep
For Python users:
Step 2: Change directory
cd /home/pi/Primerobotics_SuperKit_ Python_code_for_RaspberryPi/
Step 3: Run
sudo python 06_beep.py
Now, you should hear the buzzer make sounds.
Further Exploration
If you have a passive buzzer in hand, you can replace the active buzzer with it. Now you can make a buzzer sound like “do re mi fa so la si do” with some basic knowledge of programming.Give a try!
/**********************************************************************
* Filename    : beep.c
* Description : make a buzzer sound.
* Author      : Robot
* E-mail      : [email protected]
* website     : www.primerobotics.com
* Date        : 2014/08/27
**********************************************************************/
#include <wiringPi.h>
#include <stdio.h>

#define BeepPin 0

int main(void)
{
	if(wiringPiSetup() == -1){ //when initialize wiring failed,print messageto screen
		printf("setup wiringPi failed !");
		return 1;
	}

	pinMode(BeepPin, OUTPUT);   //set GPIO0 output

	while(1){
		digitalWrite(BeepPin, LOW);  //beep on
		delay(100);                  //delay
		digitalWrite(BeepPin, HIGH); //beep off
		delay(100);                  //delay
	}

	return 0;
}
#!/usr/bin/env python
import RPi.GPIO as GPIO
import time

BeepPin = 11    # pin11

def setup():
	GPIO.setmode(GPIO.BOARD)        # Numbers GPIOs by physical location
	GPIO.setup(BeepPin, GPIO.OUT)   # Set BeepPin's mode is output
	GPIO.output(BeepPin, GPIO.HIGH) # Set BeepPin high(+3.3V) to off beep

def loop():
	while True:
		GPIO.output(BeepPin, GPIO.LOW)
		time.sleep(0.1)
		GPIO.output(BeepPin, GPIO.HIGH)
		time.sleep(0.1)

def destroy():
	GPIO.output(BeepPin, GPIO.HIGH)    # beep off
	GPIO.cleanup()                     # Release resource

if __name__ == '__main__':     # Program start from here
	print 'Press Ctrl+C to end the program...'
	setup()
	try:
		loop()
	except KeyboardInterrupt:  # When 'Ctrl+C' is pressed, the child program destroy() will be  executed.
		destroy()