Build a Wi-Fi-enabled Pico project that converts text to speech using cloud AI and an I2S audio amplifier.
Introduction
Text-to-Speech (TTS) technology converts written text into spoken audio. It is widely used in voice assistants, accessibility devices, information kiosks, and smart home systems. While computers and smartphones can easily generate speech locally, microcontrollers usually lack the memory and processing power needed for high-quality speech synthesis.
The Raspberry Pi Pico W is a powerful yet compact microcontroller designed for embedded systems. However, generating natural speech directly on the board is not practical due to limited RAM and processing capability. A practical solution is to use a cloud-based TTS service, where the heavy speech processing runs online while the microcontroller simply sends text and plays back the generated audio.
In this project, you will build a Raspberry Pi Pico Text-to-Speech Using AI. The board sends text to an online AI service, receives the generated speech as audio data, and outputs it through a speaker using an I2S amplifier. The result is a compact embedded system capable of producing clear spoken responses.
How Cloud-Based Text-to-Speech Works
Traditional speech synthesis involves multiple steps such as text analysis, phoneme generation, prosody control, and audio waveform generation. These processes require large models and significant computing resources.
In a cloud-based architecture, the workflow is simplified for the microcontroller:
- The device sends text to an online AI service.
- The server processes the request and generates speech audio.
- The generated audio is streamed back to the device.
- The device plays the audio through a speaker.
This method allows even small microcontrollers to produce high-quality speech without local AI processing.
AI Engine Behind the Project
This project uses the cloud platform Wit.ai, an AI service developed by Meta Platforms. It provides APIs for speech and language processing including speech-to-text, text-to-speech, and natural language understanding.
The platform receives text through a secure HTTP request and returns synthesized speech in audio format such as WAV or MP3. The audio can be streamed directly to the microcontroller so playback begins even before the full audio file is received.
This approach keeps the embedded firmware lightweight while still enabling advanced voice features.
Hardware Required
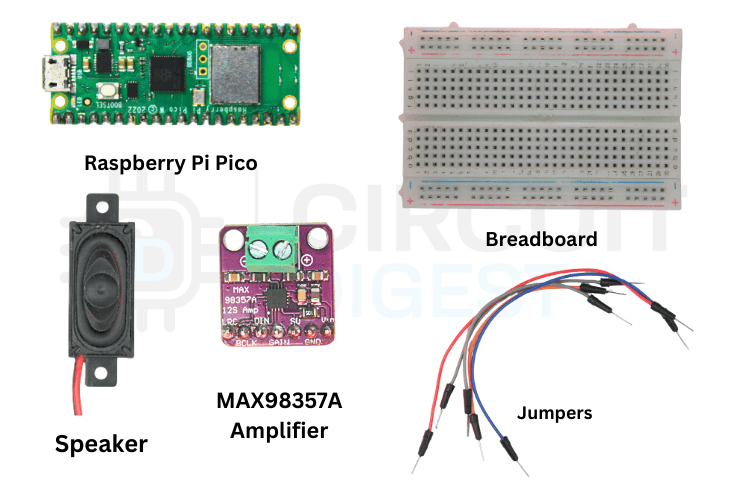
To build the system, you will need the following components:
- Raspberry Pi Pico W
- MAX98357A I2S Audio Amplifier
- 4Ω or 8Ω speaker
- Breadboard
- Jumper wires
- USB cable for programming and power
The Pico W handles Wi-Fi communication and audio streaming, while the MAX98357A amplifier converts the digital I2S audio signal into analog sound for the speaker.
Circuit Connections
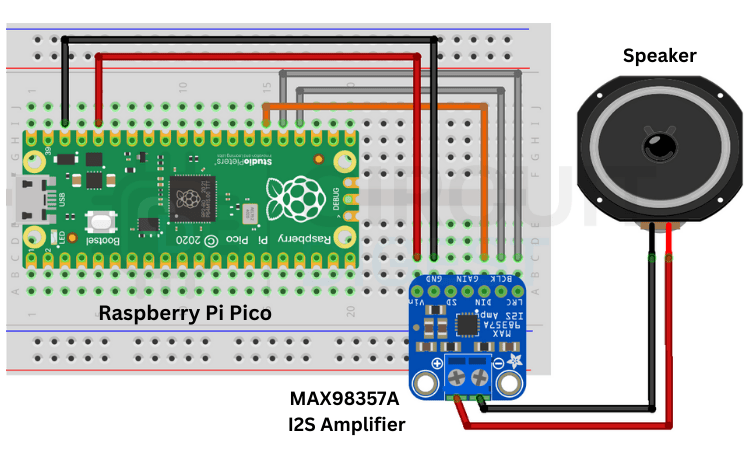
The MAX98357A module communicates with the Pico W through the I2S digital audio interface.
Make the following connections between the Pico W and the amplifier:
- GP18 → BCLK (Bit Clock)
- GP19 → LRC (Left/Right Clock)
- GP20 → DIN (Audio Data)
- 5V → VIN
- GND → GND
After connecting the amplifier, attach a speaker to its output terminals.
Creating a Wit.ai Account
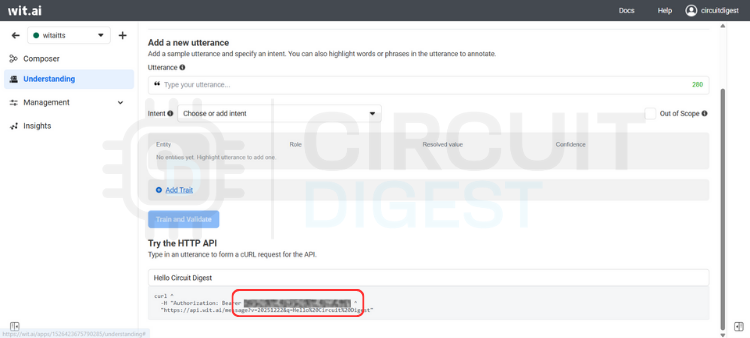
Before programming the Pico W, you need access credentials from the Wit.ai platform.
- Visit the Wit.ai website and create a free account.
- Create a new application from the dashboard.
- Select the language you want the speech system to use.
- Open the Settings page of your app.
- Copy the Server Access Token.
This token acts as authentication and allows your microcontroller to communicate with the AI service.
Installing the Required Arduino Library
A library called WitAITTS simplifies communication between the Pico W and the Wit.ai API.
To install it:
- Open Arduino IDE.
- Go to Library Manager.
- Search for WitAITTS.
- Click Install.
After installation, open the example sketch named PicoW_Basic from the examples menu.
Program Overview
The program connects the Pico W to Wi-Fi, communicates with the Wit.ai server, and streams the generated speech through the I2S amplifier.
Below is the complete example code.
#include <WitAITTS.h>

const char* WIFI_SSID     = "YourWiFiSSID";
const char* WIFI_PASSWORD = "YourWiFiPassword";
const char* WIT_TOKEN     = "YOUR_WIT_AI_TOKEN_HERE";

WitAITTS tts;

void setup() {
  Serial.begin(115200);
  while (!Serial) delay(10);

  tts.setDebugLevel(DEBUG_INFO);

  if (tts.begin(WIFI_SSID, WIFI_PASSWORD, WIT_TOKEN)) {
      Serial.println("TTS Ready!");

      tts.setVoice("wit$Remi");
      tts.setStyle("default");
      tts.setSpeed(100);
      tts.setPitch(100);
      tts.setGain(0.5);

      Serial.println("Type text to speak:");
  }
  else {
      Serial.println("TTS initialization failed");
  }
}

void loop() {

  tts.loop();

  if (Serial.available()) {
      String text = Serial.readStringUntil('\n');
      text.trim();

      if (text.length() > 0) {
          Serial.println("Speaking: " + text);

          if (!tts.speak(text)) {
              Serial.println("TTS request failed");
          }
      }
  }
}
Code Explanation
The WitAITTS object acts as the main engine that manages the entire text-to-speech workflow. It handles Wi-Fi connectivity, communication with the Wit.ai server, and audio playback.
The tts.begin() function connects the device to the Wi-Fi network and authenticates it using the access token.
Voice parameters can be customized using functions such as:
setVoice() – selects the voice stylesetSpeed() – adjusts speech speedsetPitch() – changes the tone of the voicesetGain() – controls output volume
When the function tts.speak(text) is executed, the Pico sends the text to the AI server and streams the returned audio through the I2S amplifier.
Uploading the Program
Upload the sketch to the Pico W using the Arduino IDE.
Once the program runs:
- Open the Serial Monitor.
- Type a sentence and press Enter.
- The Pico sends the text to the AI service.
- The generated speech plays through the connected speaker.
Because audio is streamed in real time, the device does not need to store the entire audio file in memory.
Troubleshooting Tips
If the project does not work correctly, check the following:
No sound from the speaker
- Incorrect wiring between the Pico and amplifier
- Amplifier not powered correctly
- Wrong I2S pin configuration
API request errors
- Invalid access token
- Wi-Fi connection issues
- Empty text input
Distorted audio
- Insufficient power supply
- Poor speaker quality
- Electrical noise in the circuit
Ensuring stable Wi-Fi connectivity and proper wiring usually resolves most issues.
Applications of Pico AI Text-to-Speech
Once working, this project can serve as the foundation for many voice-enabled embedded systems, such as:
- Smart home notification systems
- Talking IoT devices
- Interactive kiosks
- Educational electronics projects
- Assistive technology devices
Conclusion
Using cloud AI services makes it possible to add advanced speech features to resource-limited microcontrollers. By combining the Raspberry Pi Pico W with Wit.ai and an I2S audio amplifier, you can build a compact system that converts typed text into natural speech.
This approach keeps the firmware lightweight while delivering high-quality voice output. With only a few components and a simple program, you can transform the Pico W into a powerful voice-enabled IoT device ready for a wide range of creative applications.
Explore more innovative builds in this collection of AI projects and tutorials for electronics makers.