Build a pocket-sized Arduino gaming console with a 128×64 OLED display and 10 classic retro games.
If you have already built a few Arduino projects and want something more interactive, this handheld game console is a rewarding next step. Instead of blinking LEDs or reading sensors, you can create a fully functional portable gaming device that runs ten classic arcade-inspired games on a tiny OLED display.
The project combines hardware design, embedded programming, and game development into one compact build. Powered by an Arduino UNO R4 WiFi, the console includes four control buttons, a buzzer for sound effects, and a rechargeable LiPo battery, making it a true handheld system.
Why Build an Arduino Game Console?
This project is a fun way to learn several electronics and programming concepts at once:
- Reading button inputs with software debouncing
- Drawing graphics on an OLED display
- Creating menu systems
- Generating sound with a buzzer
- Managing modular code with multiple game files
- Building battery-powered portable electronics
Unlike many Arduino projects that perform a single task, this one results in a complete handheld device you can actually play.
The console includes:
- 10 built-in retro games
- 128×64 monochrome OLED display
- Four-button directional controls
- Buzzer for simple audio effects
- Rechargeable LiPo battery
- Compact perfboard-based design
- Modular firmware structure for easy expansion
Included Games
The firmware comes with ten games inspired by classic arcade titles:
- Snake
- Pong
- Tetris
- Pac-Man
- Space Invaders
- Breakout
- Flappy Bird
- Dino Run
- Asteroids
- Maze Runner
These are lightweight recreations optimized to run within the memory and processing limits of the Arduino
The console includes:
- 10 built-in retro games
- 128×64 monochrome OLED display
- Four-button directional controls
- Buzzer for simple audio effects
- Rechargeable LiPo battery
- Compact perfboard-based design
- Modular firmware structure for easy expansion
Components Required
To build the console, you will need:
- Arduino UNO R4 WiFi
- 0.96-inch SSD1306 I2C OLED display
- Four tactile push buttons
- Active buzzer
- 3.7 V LiPo battery
- 5 V boost converter
- Slide switch
- Double-sided perfboard
- Female headers
- Hook-up wire
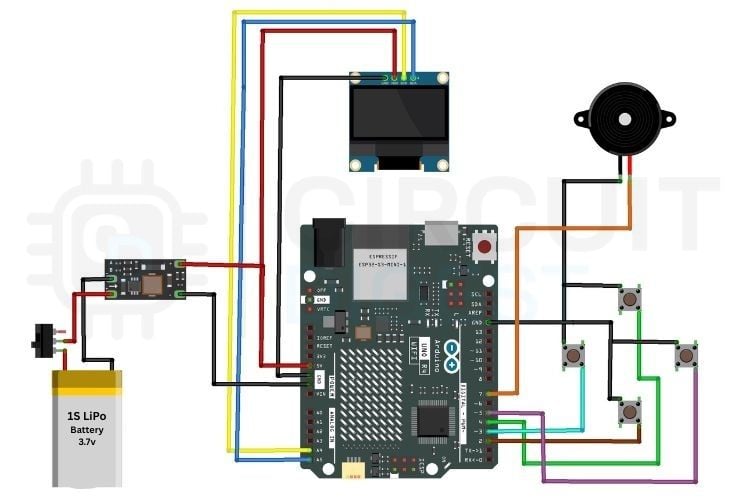
How the Hardware Works
The Arduino UNO R4 WiFi acts as the main controller and runs both the menu system and all game logic.
The OLED display connects through the I2C interface and renders graphics at a resolution of 128×64 pixels.
Four push buttons provide navigation and gameplay controls:
An active buzzer adds simple tones for menu feedback and in-game effects.
A 3.7 V LiPo battery powers the system, while a boost converter raises the voltage to a stable 5 V required by the Arduino.
Pin Connections
The project uses the following Arduino pins:
- D2 – Down button
- D3 – Left button
- D4 – Up button
- D5 – Right button
- D7 – Buzzer
- A4 – OLED SDA
- A5 – OLED SCL
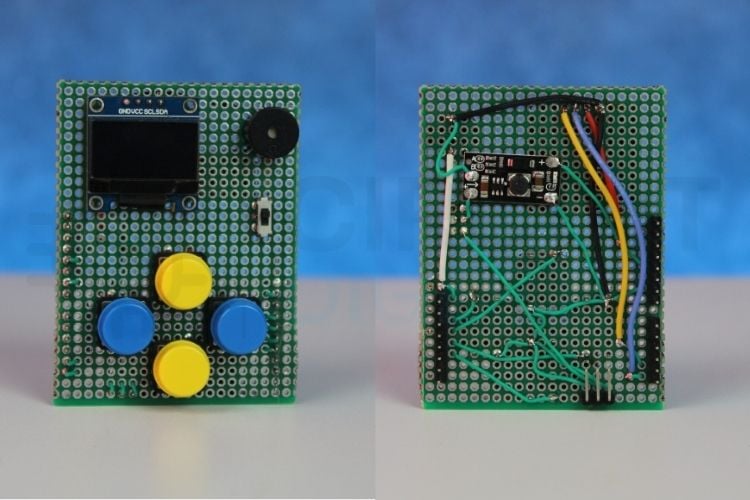
Building the Console
The circuit is assembled on a small perfboard designed to sit on top of the Arduino like a shield.
Assembly Steps
- Mount female headers so the board plugs directly into the Arduino.
- Solder the OLED display at the top of the board.
- Position the four buttons for easy thumb access.
- Add the buzzer and power switch.
- Connect the boost converter and battery.
- Verify all wiring before applying power.
Keeping wires short helps reduce noise and makes the console more compact.
Software Overview
The firmware is written in Arduino C++ and organized using a modular structure.
Core Libraries
The project uses:
The U8g2 library was chosen because it offers excellent compatibility and smooth graphics rendering on the OLED display.
Modular Game Files
Each game is stored in a separate header file. This keeps the main sketch clean and makes it easy to add or remove games.
Example structure:
Snake.hPong.hTetris.hPacman.h
Startup Sequence
When the console powers on:
- The hardware is initialized.
- A splash screen appears.
- The game menu is displayed.
- The user selects a game.
- Gameplay begins immediately.
After the game ends, the system returns to the menu.
Button Debouncing
Mechanical buttons can generate multiple rapid transitions when pressed, causing unwanted repeated inputs.
To prevent this, the firmware uses software debouncing with millis(). Each button press is accepted only after a short delay, ensuring smooth control and reliable gameplay.
Power System
The handheld console uses a single-cell LiPo battery for portability.
Because the Arduino UNO R4 requires 5 V, a boost converter is used to step up the battery voltage.
This setup allows you to play anywhere without a USB cable.
Challenges During Development
OLED Library Compatibility
Some graphics libraries did not perform reliably with the Arduino UNO R4 WiFi. Switching to U8g2 solved display initialisation and rendering issues.
Button Bounce
Without debouncing, menu navigation became erratic. A software debounce routine fixed this issue completely.
Ideas for Future Upgrades
This project is highly expandable. Possible improvements include:
- Saving high scores to EEPROM
- Additional games
- Adjustable difficulty levels
- Larger colour display
- Custom PCB
- 3D-printed enclosure
- Wireless multiplayer using the onboard Wi-Fi
What You Learn From This Project
By building this console, you gain experience in:
- Embedded graphics programming
- Menu design
- Battery-powered electronics
- Modular code organisation
- Game logic development
- Portable device prototyping
Final Thoughts
This Arduino game console is one of those projects that is both educational and genuinely fun to use. It turns a standard development board into a complete gaming device that fits in your pocket.
Whether you are a beginner looking to improve your coding skills or an experienced maker wanting a weekend build, this project offers a great combination of hardware and software challenges. Once completed, you will have a custom-built retro gaming console and a solid foundation for creating even more advanced Arduino projects.