Maker Pro
Arduino

How to Build an Arduino Speaker That Plays Music in Minutes

November 21, 2015 by Akshay James
Share
banner

Use this simple speaker project to become familiar with the basics of programming an Arduino.

The main thing which makes this project super simple is that this project requires only one extra component. If you are new to Arduino, this tutorial will help you get familiar with Arduino and learn the basics of Arduino programming. This musical project has a speaker which plays out a song. If you ever want to add some sound to your existing project, you can do it easily with this Arduino speaker tutorial. You can even make a musical car reverse horn and make it play songs. You can change it easily by uploading a new program.

If you still remember how you made ringtones on those old Nokia cell phones, you pretty much have all the knowledge required to make any song with this project. Let’s get started.

How Does the Arduino Speaker Work?

The Arduino in this circuit creates tones of different frequencies and plays it through the speaker connected to it. The variation of the frequency of the tone (a.k.a. pitch) with correct timings (a.k.a. rhythm) creates music. The Arduino generates a signal and outputs it through the Digital pin 3. This drives the speaker connected to the pin to create sound. This can be used to play different songs by modifying this program. In this tutorial, I have programmed the Arduino speaker to play a song from the Malayalam movie ‘Ennu Ninte Moideen’.

tone()

The program creates tones with a function, ‘tone( )’. It generates a square wave of the specified frequency (and 50% duty cycle) on a pin. A duration can be specified for this. Otherwise, the wave continues until a call to noTone(). The Arduino pin can be connected to a piezo buzzer or other speakers to play the tones. 

Syntax: tone(pin, frequency) 
tone (pin, frequency, duration)

Parameters

pin: the pin on which to generate the tone 
frequency: the frequency of the tone in hertz - unsigned int

duration: the duration of the tone in milliseconds (optional) - unsigned long

The code below uses an extra file, pitches.h. This file contains all the pitch values for typical notes. For example, NOTE_C4 is middle C. NOTE_FS4 is F sharp, and so forth. So instead of writing the frequency in the tone( ) function, we’ll just have to write the name of the note. This note table was originally written by Brett Hagman, on whose work the tone() command was based. You may find it useful whenever you want to make musical notes for your Arduino speaker.

How I made melody[ ] and noteDurations[ ] of this song:

If you take a look at the program, you can find two int arrays: melody[ ] and noteDurations[ ]. It is similar to how ringtones were written in old Nokia cell phones. The first array contains the notes and the second array contains its corresponding durations.


I found out the notes of this song with my guitar. 
I wrote down the musical notes of this song first and then wrote the melody[ ] array with that.

Then I wrote noteDurations[ ] according to the length of each music note. Here 8 = quarter note, 4 = 8th note, etc. Higher value gives longer duration notes. The note and its corresponding duration is what is there in melody[ ] and noteDurations[ ] respectively. You can modify those and create any song according to your wish!

Connecting the Arduino, Speaker, and Power

Connect a speaker or a piezo buzzer to the Arduino with one wire to the Digital pin 3 and the other one to the ground of the Arduino. Here’s what this project looks like:

The Arduino speaker assembly

Uploading the Program

The main sketch for Arduino speaker is as follows:

/*Arduino speaker song tutorial
* This program will play the theme song of the Malayalam movie
* 'Ennu Ninte Moideen'. The song is 'Mukkathe Penne'.
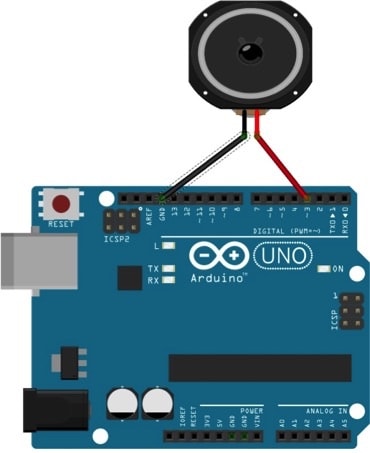
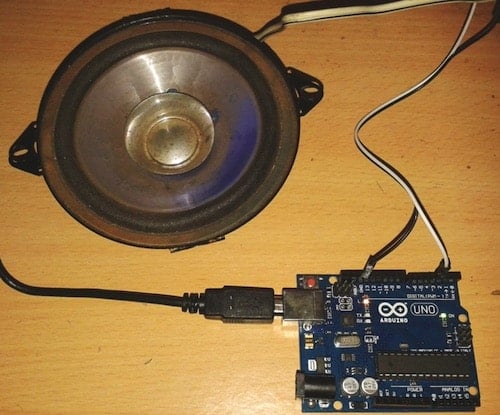
* The song is played on the speaker connected to pin 3 and GND.
* 
* Created 26 Oct 2015
* by Akshay James
* Video at https://www.youtube.com/watch?v=LgtcUxe8fmA
*/

#include"pitches.h"

// notes in the song 'Mukkathe Penne'
int melody[] = {
NOTE_D4, NOTE_G4, NOTE_FS4, NOTE_A4,
NOTE_G4, NOTE_C5, NOTE_AS4, NOTE_A4,                   
NOTE_FS4, NOTE_G4, NOTE_A4, NOTE_FS4, NOTE_DS4, NOTE_D4,
NOTE_C4, NOTE_D4,0,                                 

NOTE_D4, NOTE_G4, NOTE_FS4, NOTE_A4,
NOTE_G4, NOTE_C5, NOTE_D5, NOTE_C5, NOTE_AS4, NOTE_C5, NOTE_AS4, NOTE_A4,      //29               //8
NOTE_FS4, NOTE_G4, NOTE_A4, NOTE_FS4, NOTE_DS4, NOTE_D4,
NOTE_C4, NOTE_D4,0,                                       

NOTE_D4, NOTE_FS4, NOTE_G4, NOTE_A4, NOTE_DS5, NOTE_D5,
NOTE_C5, NOTE_AS4, NOTE_A4, NOTE_C5,
NOTE_C4, NOTE_D4, NOTE_DS4, NOTE_FS4, NOTE_D5, NOTE_C5,
NOTE_AS4, NOTE_A4, NOTE_C5, NOTE_AS4,             //58

NOTE_D4, NOTE_FS4, NOTE_G4, NOTE_A4, NOTE_DS5, NOTE_D5,
NOTE_C5, NOTE_D5, NOTE_C5, NOTE_AS4, NOTE_C5, NOTE_AS4, NOTE_A4, NOTE_C5, NOTE_G4,
NOTE_A4, 0, NOTE_AS4, NOTE_A4, 0, NOTE_G4,
NOTE_G4, NOTE_A4, NOTE_G4, NOTE_FS4, 0,

NOTE_C4, NOTE_D4, NOTE_G4, NOTE_FS4, NOTE_DS4,
NOTE_C4, NOTE_D4, 0,
NOTE_C4, NOTE_D4, NOTE_G4, NOTE_FS4, NOTE_DS4,
NOTE_C4, NOTE_D4, END

};

// note durations: 8 = quarter note, 4 = 8th note, etc.
int noteDurations[] = {       //duration of the notes
8,4,8,4,
4,4,4,12,
4,4,4,4,4,4,
4,16,4,

8,4,8,4,
4,2,1,1,2,1,1,12,
4,4,4,4,4,4,
4,16,4,

4,4,4,4,4,4,
4,4,4,12,
4,4,4,4,4,4,
4,4,4,12,

4,4,4,4,4,4,
2,1,1,2,1,1,4,8,4,
2,6,4,2,6,4,
2,1,1,16,4,

4,8,4,4,4,
4,16,4,
4,8,4,4,4,
4,20,
};

int speed=90;  //higher value, slower notes
void setup() {

Serial.begin(9600);
for (int thisNote = 0; melody[thisNote]!=-1; thisNote++) {

int noteDuration = speed*noteDurations[thisNote];
tone(3, melody[thisNote],noteDuration*.95);
Serial.println(melody[thisNote]);

delay(noteDuration);

noTone(3);
}
}

void loop() {
// no need to repeat the melody.
}

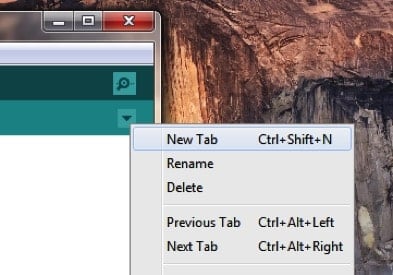
Next, you have to create a new pitches.h file. To make that, either click on the button just below the serial monitor icon and choose "New Tab", or use Ctrl+Shift+N. Then paste in the following code.

And save it as pitches.h file.

#define NOTE_B0  31
#define NOTE_C1  33
#define NOTE_CS1 35
#define NOTE_D1  37
#define NOTE_DS1 39
#define NOTE_E1  41
#define NOTE_F1  44
#define NOTE_FS1 46
#define NOTE_G1  49
#define NOTE_GS1 52
#define NOTE_A1  55
#define NOTE_AS1 58
#define NOTE_B1  62
#define NOTE_C2  65
#define NOTE_CS2 69
#define NOTE_D2  73
#define NOTE_DS2 78
#define NOTE_E2  82
#define NOTE_F2  87
#define NOTE_FS2 93
#define NOTE_G2  98
#define NOTE_GS2 104
#define NOTE_A2  110
#define NOTE_AS2 117
#define NOTE_B2  123
#define NOTE_C3  131
#define NOTE_CS3 139
#define NOTE_D3  147
#define NOTE_DS3 156
#define NOTE_E3  165
#define NOTE_F3  175
#define NOTE_FS3 185
#define NOTE_G3  196
#define NOTE_GS3 208
#define NOTE_A3  220
#define NOTE_AS3 233
#define NOTE_B3  247
#define NOTE_C4  262
#define NOTE_CS4 277
#define NOTE_D4  294
#define NOTE_DS4 311
#define NOTE_E4  330
#define NOTE_F4  349
#define NOTE_FS4 370
#define NOTE_G4  392
#define NOTE_GS4 415
#define NOTE_A4  440
#define NOTE_AS4 466
#define NOTE_B4  494
#define NOTE_C5  523
#define NOTE_CS5 554
#define NOTE_D5  587
#define NOTE_DS5 622
#define NOTE_E5  659
#define NOTE_F5  698
#define NOTE_FS5 740
#define NOTE_G5  784
#define NOTE_GS5 831
#define NOTE_A5  880
#define NOTE_AS5 932
#define NOTE_B5  988
#define NOTE_C6  1047
#define NOTE_CS6 1109
#define NOTE_D6  1175
#define NOTE_DS6 1245
#define NOTE_E6  1319
#define NOTE_F6  1397
#define NOTE_FS6 1480
#define NOTE_G6  1568
#define NOTE_GS6 1661
#define NOTE_A6  1760
#define NOTE_AS6 1865
#define NOTE_B6  1976
#define NOTE_C7  2093
#define NOTE_CS7 2217
#define NOTE_D7  2349
#define NOTE_DS7 2489
#define NOTE_E7  2637
#define NOTE_F7  2794
#define NOTE_FS7 2960
#define NOTE_G7  3136
#define NOTE_GS7 3322
#define NOTE_A7  3520
#define NOTE_AS7 3729
#define NOTE_B7  3951
#define NOTE_C8  4186
#define NOTE_CS8 4435
#define NOTE_D8  4699
#define NOTE_DS8 4978
#define END -1

Using Your Arduino Speaker

Now upload the main sketch to finish the Arduino speaker project by clicking the upload button. The song will then start playing. And if you open the serial monitor, you can see the frequencies of the output tone.

You can check out the working demo of the Arduino speaker project in the video below.

Related Content

Comments


You May Also Like