Are you fascinated by the world of electronics and eager to start a hands-on project? This guide will help you create a sleek, functional temperature monitor using an Arduino Nano, a DHT22 sensor, and a vibrant OLED display.
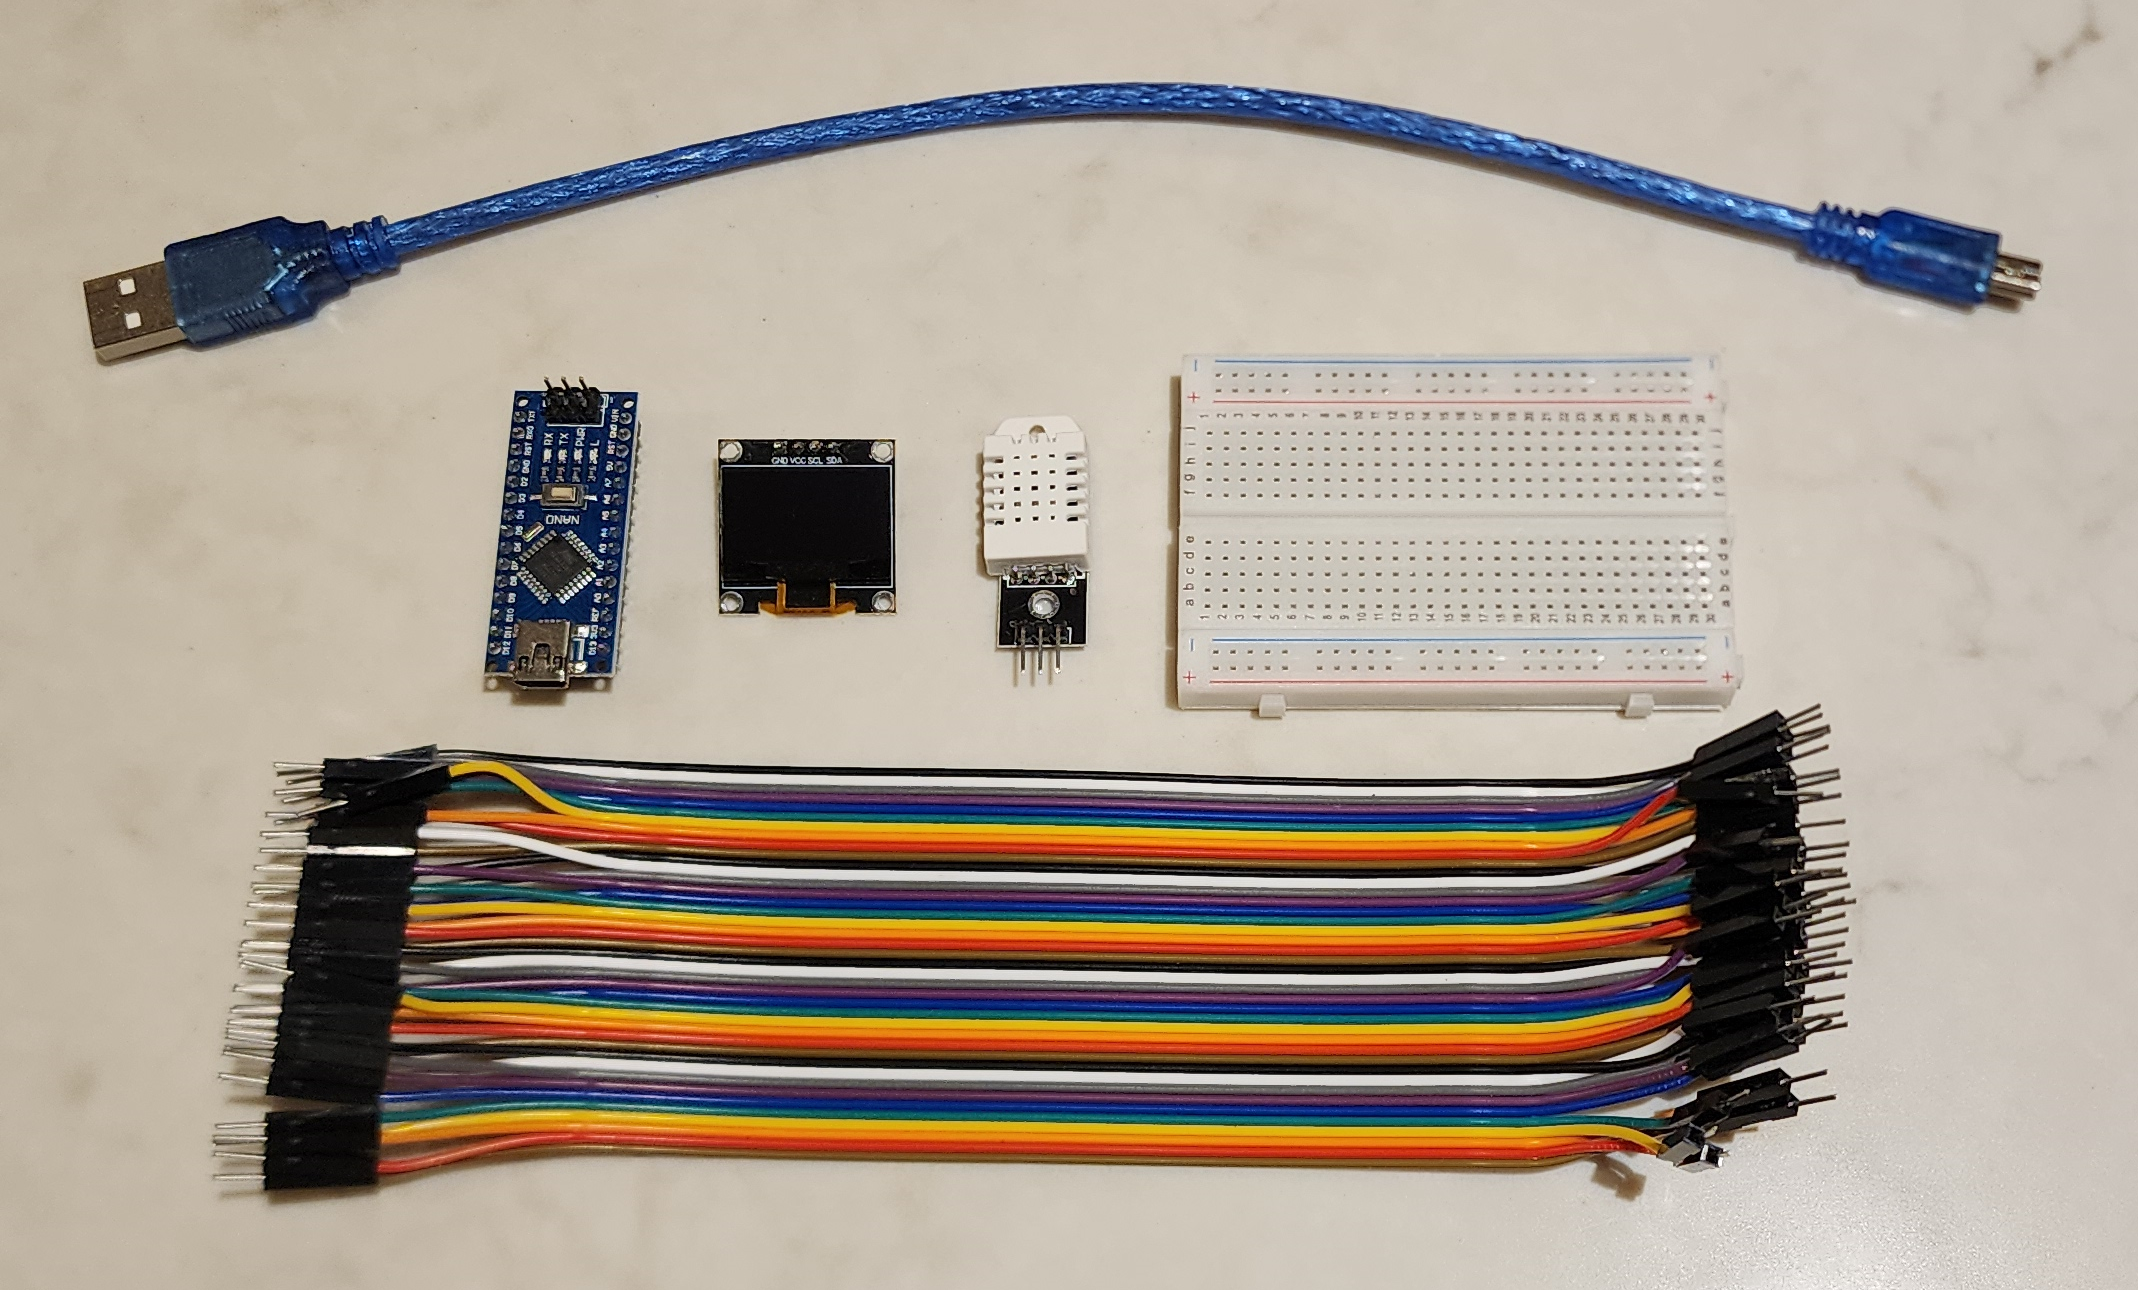
Parts list for Arduino temperature monitor, including Arduino nano, DHT22 sensor, OLED display, breadboard & cables
Software Requirements:
- Arduino IDE (Either online or installed works)
- "Adafruit SSD1306" library by Adafruit
- "DHT sensor library" by Adafruit
Step 1: Install Libraries
- Open the Arduino IDE.
- Go to Sketch > Include Library > Manage Libraries.
- In the Library Manager, search for "Adafruit SSD1306".
- Click on the result and click Install All.
- Search for "DHT sensor library" by Adafruit.
- Click on the result and click Install All.
Step 2: Wiring
Refer to the wiring diagram below and use the following wiring key to connect your components.
Wiring Key:
- DHT22 SensorVCC to 5V
- GND to GND
- DATA to D2 (or any digital pin)
SSD1306 OLED Display
- VCC to 3.3V
- GND to GND
- SCL to A5 (or SCL)
- SDA to A4 (or SDA)
Wiring Diagram:
Wiring diagram for arduino temperature monitor
Step 3: Code
Upload the following code to your Arduino to start monitoring the temperature and humidity:
<pre style="font-family: monospace; color: #444444; background-color: #f3f3f3; font-weight: 400;"><span style="color: #697070; font-weight: 400;">/*
* Temprature & Humidity Arduino Project using DHT22 Sensor and 0.96 OLED Display
*
* https://zaitronics.com.au/blogs/main/building-an-arduino-temperature-monitor-with-dht22-and-0-96-oled-display
*
* by Ethan - Zaitronics
*/</span>
<span style="color: #1f7199; font-weight: 400;">#<span style="color: #1f7199; font-weight: bold;">include</span> <span style="color: #880000; font-weight: 400;"><Arduino.h></span></span>
<span style="color: #1f7199; font-weight: 400;">#<span style="color: #1f7199; font-weight: bold;">include</span> <span style="color: #880000; font-weight: 400;"><U8g2lib.h></span></span>
<span style="color: #1f7199; font-weight: 400;">#<span style="color: #1f7199; font-weight: bold;">include</span> <span style="color: #880000; font-weight: 400;">"DHT.h"</span></span>
<span style="color: #1f7199; font-weight: 400;">#<span style="color: #1f7199; font-weight: bold;">define</span> DHTPIN 2 <span style="color: #697070; font-weight: 400;">// which pin we're connected to</span></span>
<span style="color: #1f7199; font-weight: 400;">#<span style="color: #1f7199; font-weight: bold;">define</span> DHTTYPE DHT22 <span style="color: #697070; font-weight: 400;">// DHT 22 (AM2302)</span></span>
<span style="color: #444444; font-weight: 400;">DHT <span style="color: #880000; font-weight: bold;">dht</span><span style="color: #444444; font-weight: 400;">(DHTPIN, DHTTYPE)</span></span>;
<span style="color: #1f7199; font-weight: 400;">#<span style="color: #1f7199; font-weight: bold;">ifdef</span> U8X8_HAVE_HW_SPI</span>
<span style="color: #1f7199; font-weight: 400;">#<span style="color: #1f7199; font-weight: bold;">include</span> <span style="color: #880000; font-weight: 400;"><SPI.h></span></span>
<span style="color: #1f7199; font-weight: 400;">#<span style="color: #1f7199; font-weight: bold;">endif</span></span>
<span style="color: #1f7199; font-weight: 400;">#<span style="color: #1f7199; font-weight: bold;">ifdef</span> U8X8_HAVE_HW_I2C</span>
<span style="color: #1f7199; font-weight: 400;">#<span style="color: #1f7199; font-weight: bold;">include</span> <span style="color: #880000; font-weight: 400;"><Wire.h></span></span>
<span style="color: #1f7199; font-weight: 400;">#<span style="color: #1f7199; font-weight: bold;">endif</span></span>
<span style="color: #444444; font-weight: 400;">U8G2_SSD1306_128X64_NONAME_1_HW_I2C <span style="color: #880000; font-weight: bold;">u8g2</span><span style="color: #444444; font-weight: 400;">(U8G2_R0, <span style="color: #697070; font-weight: 400;">/* reset=*/</span> U8X8_PIN_NONE)</span></span>;
<span style="color: #444444; font-weight: 400;"><span style="color: #880000; font-weight: 400;">void</span> <span style="color: #880000; font-weight: bold;">draw</span><span style="color: #444444; font-weight: 400;">(<span style="color: #880000; font-weight: 400;">void</span>)</span> </span>{
<span style="color: #697070; font-weight: 400;">// // graphic commands to redraw the complete screen should be placed here</span>
<span style="color: #880000; font-weight: 400;">float</span> h = dht.<span style="color: #397300; font-weight: 400;">readHumidity</span>();
<span style="color: #697070; font-weight: 400;">// Read temperature as Celsius</span>
<span style="color: #880000; font-weight: 400;">float</span> t = dht.<span style="color: #397300; font-weight: 400;">readTemperature</span>();
<span style="color: #697070; font-weight: 400;">// Read temperature as Fahrenheit</span>
<span style="color: #880000; font-weight: 400;">float</span> f = dht.<span style="color: #397300; font-weight: 400;">readTemperature</span>(<span style="color: #669955; font-weight: 400;">true</span>);
u8g2.<span style="color: #397300; font-weight: 400;">setFont</span>(u8g2_font_helvB10_tf);
u8g2.<span style="color: #397300; font-weight: 400;">setCursor</span>(<span style="color: #880000; font-weight: 400;">0</span>, <span style="color: #880000; font-weight: 400;">16</span>);
u8g2.<span style="color: #397300; font-weight: 400;">print</span>(<span style="color: #880000; font-weight: 400;">"Temp & Humidity"</span>);
u8g2.<span style="color: #397300; font-weight: 400;">setFont</span>(u8g2_font_helvB18_tf);
u8g2.<span style="color: #397300; font-weight: 400;">setCursor</span>(<span style="color: #880000; font-weight: 400;">0</span>, <span style="color: #880000; font-weight: 400;">42</span>);
u8g2.<span style="color: #397300; font-weight: 400;">print</span>(<span style="color: #880000; font-weight: 400;">"T= "</span>); u8g2.<span style="color: #397300; font-weight: 400;">print</span>(t); u8g2.<span style="color: #397300; font-weight: 400;">print</span>(<span style="color: #880000; font-weight: 400;">" °C"</span>);
u8g2.<span style="color: #397300; font-weight: 400;">setCursor</span>(<span style="color: #880000; font-weight: 400;">0</span>, <span style="color: #880000; font-weight: 400;">64</span>);
u8g2.<span style="color: #397300; font-weight: 400;">print</span>(<span style="color: #880000; font-weight: 400;">"H= "</span>); u8g2.<span style="color: #397300; font-weight: 400;">print</span>(h); u8g2.<span style="color: #397300; font-weight: 400;">print</span>(<span style="color: #880000; font-weight: 400;">" %"</span>);
}
<span style="color: #444444; font-weight: 400;"><span style="color: #880000; font-weight: 400;">void</span> <span style="color: #880000; font-weight: bold;">setup</span><span style="color: #444444; font-weight: 400;">(<span style="color: #880000; font-weight: 400;">void</span>)</span> </span>{
dht.<span style="color: #397300; font-weight: 400;">begin</span>();
u8g2.<span style="color: #397300; font-weight: 400;">begin</span>();
}
<span style="color: #444444; font-weight: 400;"><span style="color: #880000; font-weight: 400;">void</span> <span style="color: #880000; font-weight: bold;">loop</span><span style="color: #444444; font-weight: 400;">(<span style="color: #880000; font-weight: 400;">void</span>)</span> </span>{
<span style="color: #697070; font-weight: 400;">// Wait a few seconds between measurements.</span>
<span style="color: #397300; font-weight: 400;">delay</span>(<span style="color: #880000; font-weight: 400;">2000</span>);
<span style="color: #697070; font-weight: 400;">// Reading temperature or humidity takes about 250 milliseconds!</span>
<span style="color: #697070; font-weight: 400;">// Sensor readings may also be up to 2 seconds 'old' (its a very slow sensor)</span>
<span style="color: #880000; font-weight: 400;">float</span> h = dht.<span style="color: #397300; font-weight: 400;">readHumidity</span>();
<span style="color: #697070; font-weight: 400;">// Read temperature as Celsius</span>
<span style="color: #880000; font-weight: 400;">float</span> t = dht.<span style="color: #397300; font-weight: 400;">readTemperature</span>();
u8g2.<span style="color: #397300; font-weight: 400;">firstPage</span>();
<span style="color: #444444; font-weight: bold;">do</span> {
<span style="color: #397300; font-weight: 400;">draw</span>();
} <span style="color: #444444; font-weight: bold;">while</span> ( u8g2.<span style="color: #397300; font-weight: 400;">nextPage</span>() );
<span style="color: #397300; font-weight: 400;">delay</span>(<span style="color: #880000; font-weight: 400;">1000</span>);
}
</pre>
Results:

Once you have completed the wiring and uploaded the code, your Arduino temperature monitor will start displaying the temperature and humidity readings on the OLED display. This project is a great way to get started with Arduino and sensor integration.
Note: Ensure that the DHT22 sensor and OLED display are connected properly to avoid issues with the readings and display output. If you encounter any problems, double-check the wiring and comment below if you need any more help