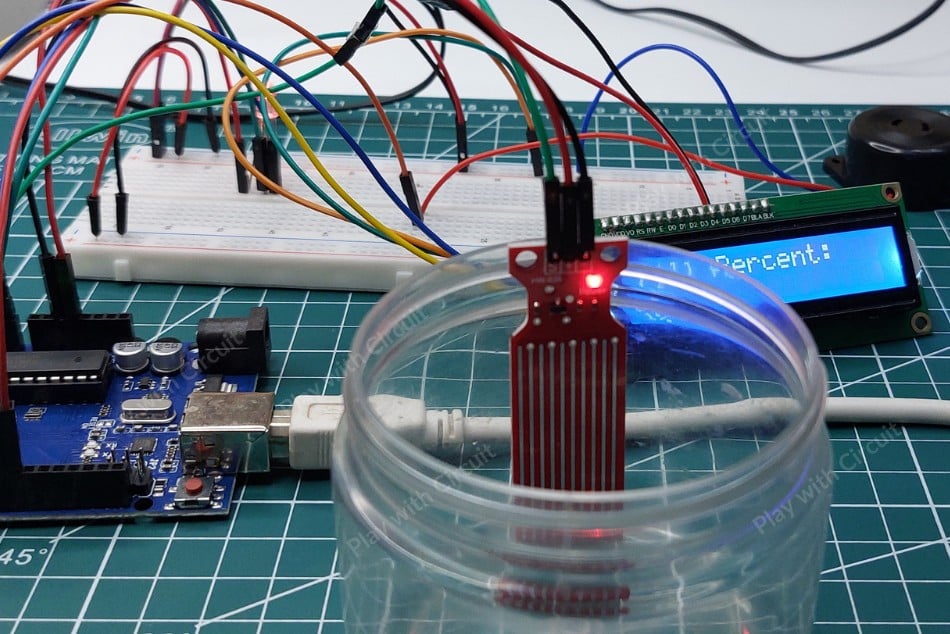
In this project, we will interface a water level sensor with an Arduino UNO to build a compact water level indicator system that can detect rising water levels and trigger alerts using LEDs and a buzzer.
Water overflow and dry-running motors are common problems in residential and industrial water management systems. A simple water level monitoring setup can help prevent water wastage and improve automation efficiency. In this project, we will interface a water level sensor with an Arduino UNO to build a compact water level indicator system that can detect rising water levels and trigger alerts using LEDs and a buzzer.
How the Water Level Sensor Works
The water level sensor detects liquid levels using conductive traces placed on the sensor board. The module contains alternating power traces and sensing traces arranged in an interleaved pattern.
When the sensor comes in contact with water, the liquid forms a conductive path between the traces. As the water level rises, a larger area of the sensing surface becomes submerged, increasing conductivity and decreasing resistance.
This resistance variation changes the output voltage of the sensor, producing an analog signal proportional to the detected water level. The Arduino reads this analog voltage and determines whether the water level is low, medium, or high.
Because of its simple operating principle, the sensor is suitable for:
- Water tank monitoring
- Overflow prevention systems
- Smart irrigation
- Liquid level detection
- DIY automation projects
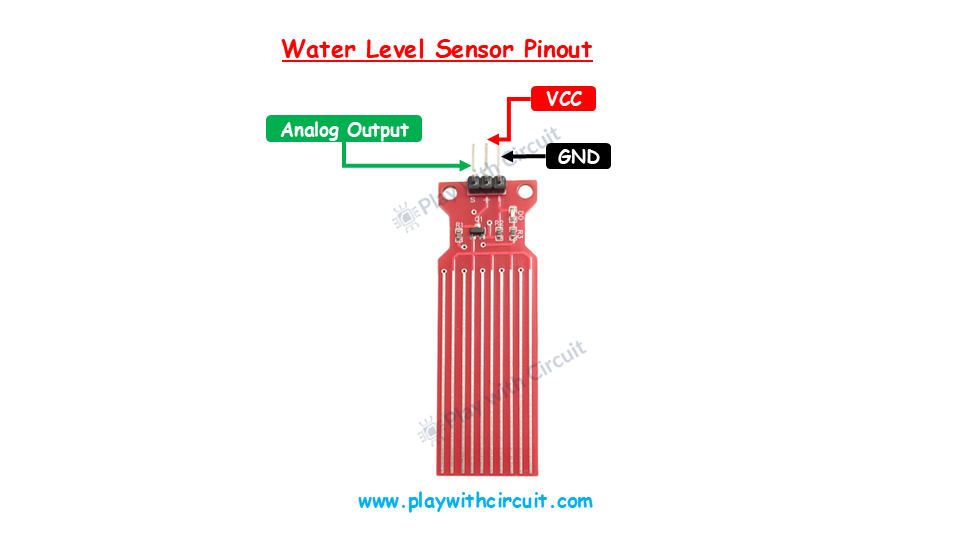
Water Level Sensor Pin Description
The sensor module contains three main pins used for interfacing with the Arduino.
VCC: The VCC pin powers the module and should be connected to the 5V output of the Arduino UNO.
GND: The GND pin provides the ground reference connection between the sensor and Arduino.
OUT: This is the analog output pin of the sensor. The output voltage changes according to the water level detected on the sensing surface.
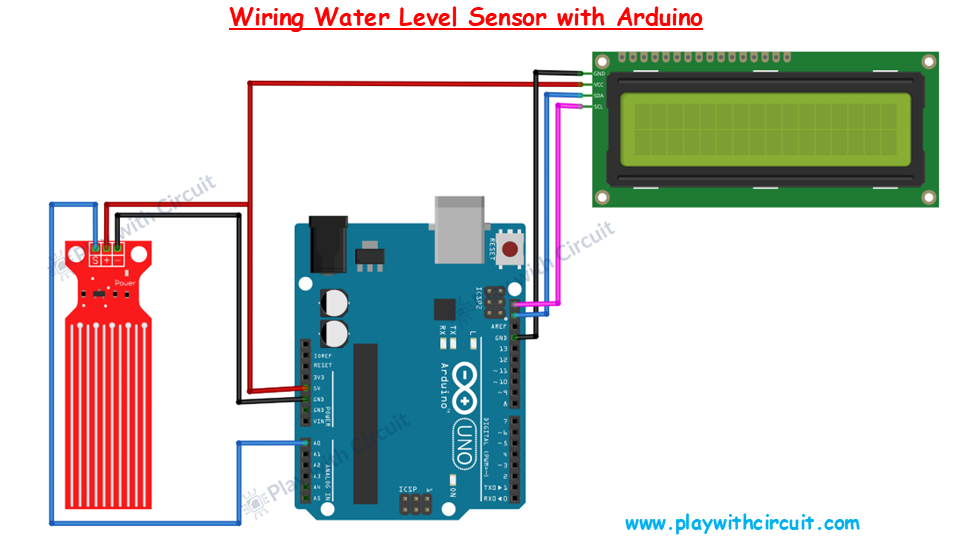
Connecting Water Level Sensor to Arduino
The water level sensor requires only three wires for interfacing with the Arduino UNO. Connect the VCC pin of the sensor to the 5V pin of the Arduino to supply power to the module. The GND pin of the sensor should be connected to the Arduino ground.
The sensor’s OUT pin is connected to the A0 analog input pin of the Arduino UNO. This analog connection allows the Arduino to continuously monitor the changing voltage generated by the sensor as the water level changes.
Once connected, the Arduino can process the sensor readings and activate indicators or alarms based on predefined thresholds.
Connecting the I2C LCD Display
To display live water level information, an I2C LCD display can be added to the system. The LCD uses only two communication lines, making the wiring simple and efficient.
Connect the VCC pin of the LCD module to the Arduino’s 5V pin and the GND pin to Arduino ground. The SDA pin of the display should be connected to the Arduino’s SDA pin, while the SCL pin connects to the Arduino’s SCL pin.
Using I2C communication reduces wiring complexity and makes the project cleaner, especially when designing a custom PCB layout.
Water Level Indicator Project
In this project, the Arduino continuously reads analog data from the water level sensor and determines the current water level inside the tank.
Depending on the sensor value:
- LEDs can indicate different water levels
- A buzzer can trigger when the tank becomes full
- LCD can display live status information
The project demonstrates a practical and low-cost approach for implementing smart water monitoring systems in homes and small industries.
Components Required
Hardware Components
- Arduino UNO
- Water Level Sensor Module
- LEDs
- Active Buzzer
- I2C LCD Display
- Breadboard
- Jumper Wires
- USB Cable
Software Requirements
Conclusion
This Arduino-based water level indicator system provides a simple yet effective solution for monitoring water levels and preventing tank overflow. The analog water level sensor makes it easy to measure liquid levels accurately, while the Arduino handles alerts and display functions efficiently.
The project can also be expanded further with relay modules, Wi-Fi connectivity, IoT dashboards, or mobile notifications for advanced smart water management applications.
To Learn More Checkout full Tutorial: Interfacing Water Level Sensor with Arduino