Attiny85/84 is very small and powerful chip from Atmel. In this tutorial we can add Bluetooth capabilities to this micro controller.
Here I have used HC -05 bluetooth module which can be purchased from ebay at a very low cost.eto Attiny85/84 .In this tutorial I won't be going in detail about how to upload the sketchs to Attiny85/84. I also hope that you are familiar with arduino and bluetooth concepts If no you can accept google as your teacher.
Setup
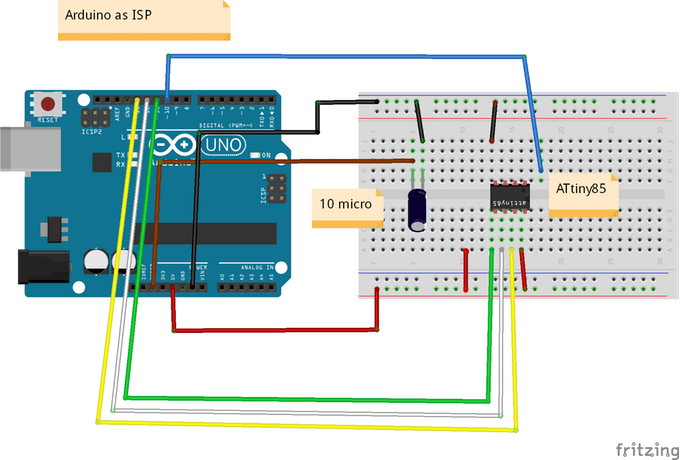
Here in this tutorial I will show you how to start serial communication with the ATiny85 over a Bluetooth network. First upload the following sketch to Attiny85. Make sure that you burn 8mz boot loader to Attiny before uploading the sketch.
Knowing your Bluetooth Connection
Here I have used HC -05 bluetooth module which can be purchased from ebay at a very low cost. Refer the following image to identify the pin diagram of Hc-05 module.
Now connect the Attiny 85 to Hc-05 module as given below.
- Bluetooth Module Rx --> ATiny85 Pin 1
- Bluetooth Module Tx --> ATiny85 Pin 2
- Bluetooth Module Gnd --> ATiny85 GND
- Bluetooth Module VCC --> ATiny85 VCC
Getting it all Connected
Connect every Attiny85 as shown above .Now to check weather the serial communication works between bluetooth module and Attiny85 download the apk(Dime.apk) file provided in the attachment. This app was made by using MIT App inventor. You too can edit this I have attached an aia(Dime.aia) file below.
How to use the Bluetooth App?
Make sure that the Attiny and bluetooth is powered .
Open the app then click on the bluetooth icon in the app and select the HC-05 from the list.(Before connecting you have to make sure that HC-05 is paired with the mobile).Once the HC-05 is connected the text will show as"Connected".
Now shake your phone and see that the led blinks. You can even use a relay instead of led and control the home appliances.
#include <SoftwareSerial.h>  //Software Serial Port
#define RxD 1
#define TxD 2

#define DEBUG_ENABLED  1

SoftwareSerial blueToothSerial(RxD,TxD);

int led = 4;

void setup()
{
  pinMode(RxD, INPUT);
  pinMode(TxD, OUTPUT);
  setupBlueToothConnection();

  pinMode(led,OUTPUT);
  digitalWrite(led,HIGH);

}

void loop()
{ int count=0;
  char recvChar;
  while(1){
    //check if there's any data sent from the remote bluetooth shield
    if(blueToothSerial.available()){
      recvChar = blueToothSerial.read();
      count++ ;
        if(count%2==0)
          digitalWrite(led,HIGH);

        else
          digitalWrite(led,LOW);
    }
  }
}

void setupBlueToothConnection()
{
  blueToothSerial.begin(9600); //Set BluetoothBee BaudRate to default baud rate 38400
  blueToothSerial.print("\r\n+STWMOD=0\r\n"); //set the bluetooth work in slave mode
  blueToothSerial.print("\r\n+STNA=HC-05\r\n"); //set the bluetooth name as "HC-05"
  blueToothSerial.print("\r\n+STOAUT=1\r\n"); // Permit Paired device to connect me
  blueToothSerial.print("\r\n+STAUTO=0\r\n"); // Auto-connection should be forbidden here

  delay(2000); // This delay is required.
  //blueToothSerial.print("\r\n+INQ=1\r\n"); //make the slave bluetooth inquirable
  blueToothSerial.print("bluetooth connected!\n");

  delay(2000); // This delay is required.
  blueToothSerial.flush();
}
Comments and Questions welcome! Thanks for reading.