Create a USB joystick controller with Arduino using simple hardware and keyboard emulation.
Build a DIY Arduino Game Controller for PC Gaming
Custom game controllers are a great way to explore human-computer interaction while building something fun. In this project, you will design a simple Arduino-based game controller that connects to a PC and works with most games using standard keyboard inputs.
Using an Arduino board, a joystick module, and a few push buttons, you can create a compact controller that sends movement and action commands directly to your computer. The system works by emulating a USB keyboard, allowing it to control games without additional drivers or software.
This project is ideal for beginners and hobbyists interested in electronics, embedded systems, or DIY gaming peripherals.
How the Arduino Game Controller Works
When connected to a computer through USB, the Arduino acts as a Human Interface Device (HID). Instead of functioning like a typical microcontroller board, it appears to the operating system as a keyboard.
The joystick provides two analog signals representing horizontal and vertical movement. The Arduino continuously reads these values and converts them into arrow-key commands (up, down, left, and right). Push buttons provide additional inputs that trigger keyboard keys such as W, A, S, and D.
Because nearly all PC games support keyboard controls, this approach allows the controller to work with a wide variety of titles without special configuration.
Components Required
You only need a few commonly available components:
- Arduino Uno R4 (or compatible board with USB HID support)
- Dual-axis joystick module
- 4 × tactile push buttons
- Breadboard or veroboard
- Jumper wires
- USB cable
- Arduino IDE
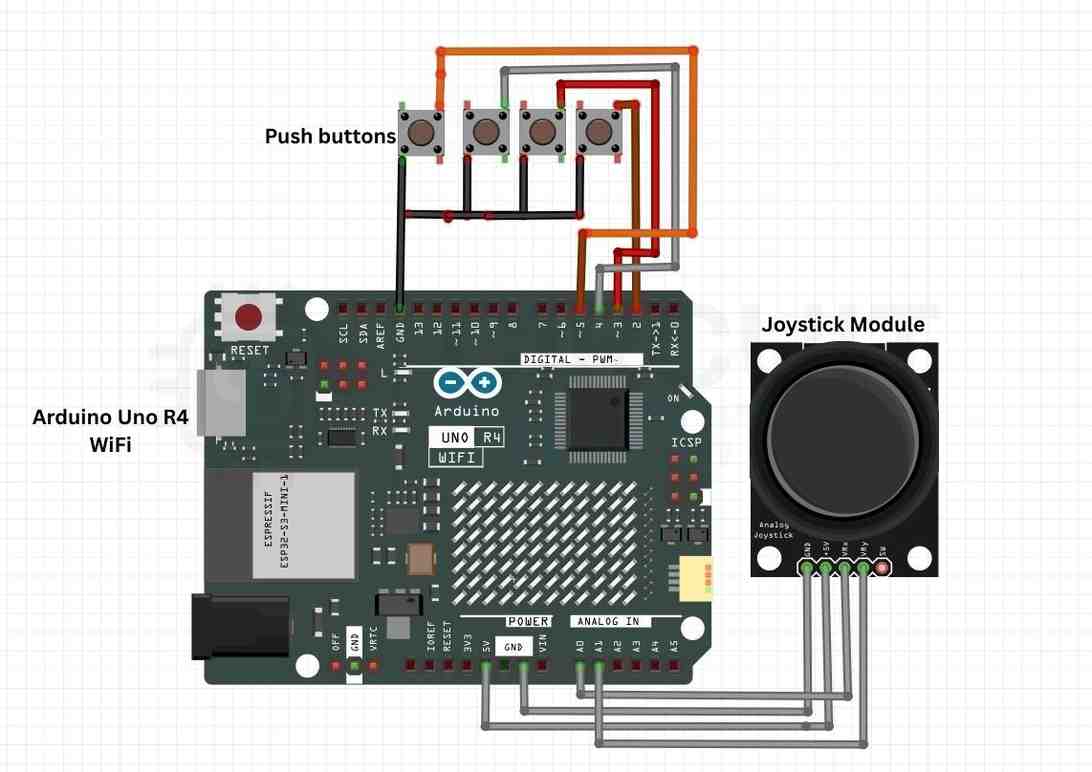
Circuit Connections
The joystick outputs two analog signals that represent movement along the X and Y axes. These signals are read by the Arduino through analog input pins.
Wiring Steps
- Connect the VCC pin of the joystick module to the Arduino 5V pin.
- Connect the GND pin of the joystick module to GND on the Arduino.
- Connect the joystick VRx output to A0.
- Connect the joystick VRy output to A1.
- Connect one terminal of each push button to digital pins 2, 3, 4, and 5.
- Connect the other terminal of each button to GND.
The buttons use the Arduino’s internal pull-up resistors, so no external resistors are required.
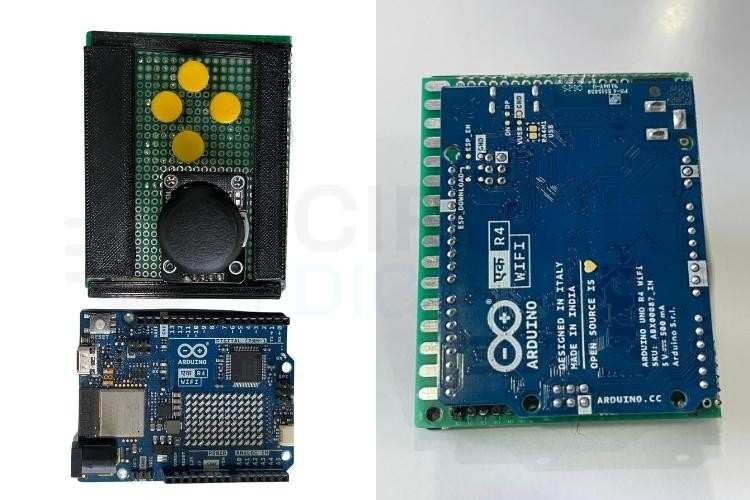
Hardware Assembly
After testing the circuit on a breadboard, you can transfer the design to a veroboard for a permanent build. Mount the joystick and buttons on an enclosure to create a comfortable handheld controller.
This simple assembly results in a functional gaming interface that mimics the behavior of a traditional controller.
Arduino Game Controller Code
#include <Keyboard.h>

// Joystick pins
const int joyX = A0;
const int joyY = A1;

// Button pins
const int buttonPins[4] = {2, 3, 4, 5};

// Dead-zone thresholds
const int LOW_TH = 350;
const int HIGH_TH = 670;

// Button key mapping
const char buttonKeys[4] = {'w', 'a', 's', 'd'};

void setup() {
  for (int i = 0; i < 4; i++) {
    pinMode(buttonPins[i], INPUT_PULLUP);
  }

  delay(3000);       // USB initialization delay
  Keyboard.begin();
}

void loop() {

  // Read joystick values
  int x = analogRead(joyX);
  int y = analogRead(joyY);

  if (x < LOW_TH) Keyboard.press(KEY_LEFT_ARROW);
  else Keyboard.release(KEY_LEFT_ARROW);

  if (x > HIGH_TH) Keyboard.press(KEY_RIGHT_ARROW);
  else Keyboard.release(KEY_RIGHT_ARROW);

  if (y < LOW_TH) Keyboard.press(KEY_UP_ARROW);
  else Keyboard.release(KEY_UP_ARROW);

  if (y > HIGH_TH) Keyboard.press(KEY_DOWN_ARROW);
  else Keyboard.release(KEY_DOWN_ARROW);

  // Button inputs
  for (int i = 0; i < 4; i++) {
    if (digitalRead(buttonPins[i]) == LOW) {
      Keyboard.press(buttonKeys[i]);
    } else {
      Keyboard.release(buttonKeys[i]);
    }
  }

  delay(10);
}
Code Explanation
1. Keyboard Library
The Keyboard.h library allows the Arduino to behave like a USB keyboard. This enables it to send key presses directly to the PC.
2. Joystick Input Processing
The joystick outputs analog values ranging roughly from 0 to 1023. A dead-zone is defined to avoid accidental movement when the joystick is centered.
- Values below the lower threshold trigger left or up commands.
- Values above the upper threshold trigger right or down commands.
3. Button Handling
The push buttons are configured with INPUT_PULLUP, meaning they remain HIGH until pressed. When pressed, the pin connects to ground and reads LOW.
The code detects this change and sends the mapped keyboard key.
4. Continuous Input Loop
The loop continuously reads joystick and button inputs and sends keyboard commands in real time, allowing smooth gameplay control.
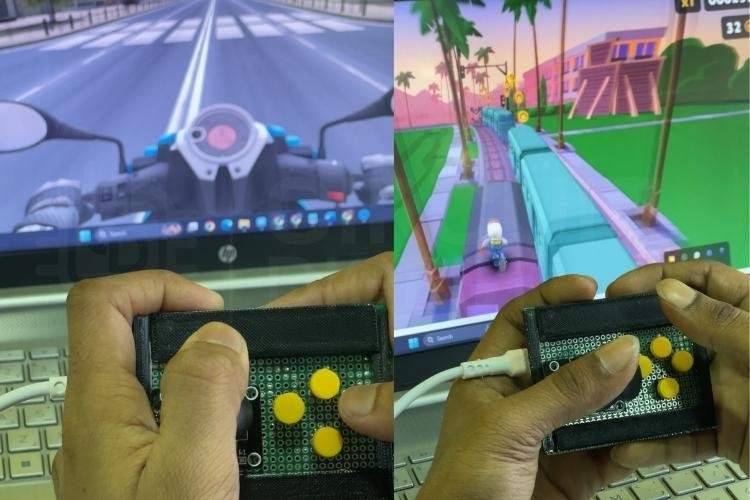
Testing the Controller
- Upload the code to your Arduino.
- Connect the board to your PC via USB.
- Open a simple text editor and move the joystick or press buttons to confirm key inputs.
- Launch a game and map the controls to the arrow keys and WASD.
Your DIY controller should now function like a simple gaming joystick.
Applications and Improvements
This project can be expanded in many ways:
- Add more buttons for additional actions
- Design a custom 3D-printed enclosure
- Integrate RGB LEDs for visual feedback
- Use a PCB for a professional build
- Implement vibration motors for haptic feedback
Conclusion
Building an Arduino game controller is a fun project that combines electronics, programming, and gaming. By using a joystick module and simple push buttons, you can create a custom controller that works with thousands of PC games through keyboard emulation.
Beyond gaming, the project demonstrates important concepts such as USB HID communication, analog input processing, and real-time control systems, making it a valuable learning experience for makers and electronics enthusiasts.
Explore 500+ Arduino projects with code, circuit diagrams, and tutorials on CircuitDigest Arduino Projects to find ideas for robotics, IoT, automation, and beginner electronics builds.