Boost your solar efficiency with a DIY dual-axis tracker! Learn how to build a smart, Arduino-powered system that follows the sun for max output.
Build a Smarter Sun-Chasing Dual-Axis Solar Tracker with Arduino
If you’ve ever wished your solar panels could think for themselves and automatically follow the sun, you’re not alone. Makers everywhere are squeezing more power out of their solar setups by adding smart tracking systems—and the dual-axis solar tracker is the gold standard.
In this build, inspired by the dual-axis tracker project from Circuit Digest, we’ll explore how an Arduino, a few light-dependent resistors (LDRs), and servo motors can work together to create a fully autonomous solar-tracking platform. Whether you're powering a garden gadget, experimenting with renewable energy, or leveling up your electronics skills, this project brings serious Maker cred.
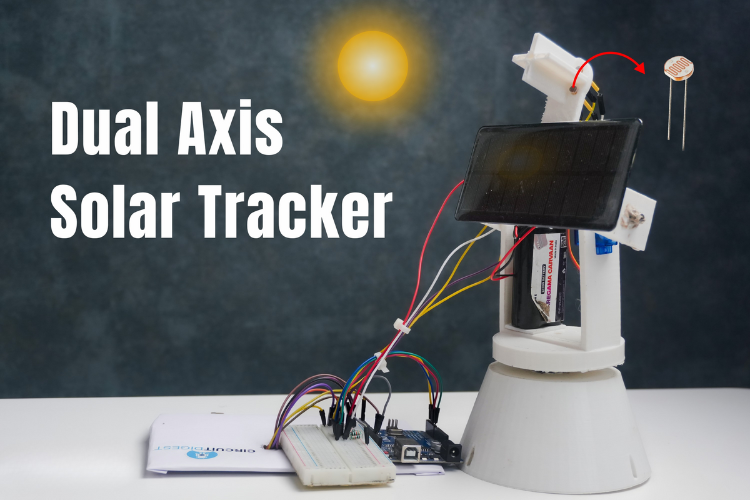
Dual Axis Solar Tracker System Using Arduino
Why Dual-Axis Tracking Matters
Traditional fixed solar panels only capture optimal sunlight for a narrow window each day. A dual axis tracker system using Arduino solves this problem by tilting up/down and left/right, ensuring the panel is always facing the sun's strongest rays.
The result?
- Higher solar energy output
- Better performance in all seasons
- A more efficient and adaptive renewable system
And the best part—this is completely buildable with Maker-friendly tools and components.
How the System Works
At the heart of the tracker is an Arduino Uno, acting as the brains of the operation. Four strategically placed LDR sensors detect the sun’s position by comparing light intensity across quadrants. The Arduino interprets this data and drives two servo motors:
- Horizontal (azimuth) movement
- Vertical (elevation) movement
As the sun shifts, the servos realign the panel to maintain the ideal orientation. It’s a simple feedback loop, but the result feels almost alive—your panel quietly tracking the sky from dawn to dusk.
Key Components
- Arduino Uno or Nano
- 4× LDRs + resistors
- 2× High-torque servo motors
- Solar panel (small prototype or full-size)
- Mechanical mount (3D-printed, wood, or aluminum)
- Jumper wires + breadboard
- Power supply
Build Highlights
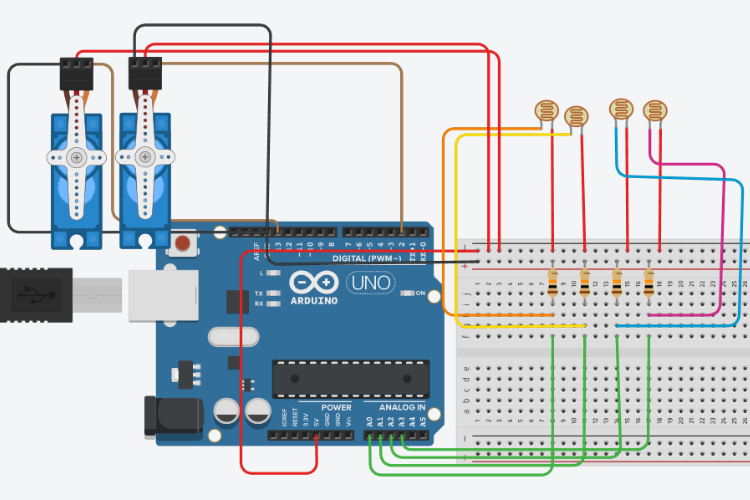
1. Sensor Array Setup
Mount the LDRs in a cross pattern with small barriers between them to amplify directional accuracy. This simple design gives the Arduino enough contrast to determine where the sun is strongest.
2. Control Logic
The code compares sensor readings and moves the servos until the panel is perfectly aligned with the highest-light quadrant. It’s a clean demonstration of analog input processing and PWM motor control.
3. Mechanical Integration
The pan-tilt assembly can be purchased or built with Maker-friendly materials. Just ensure smooth rotation and stable support for your solar panel.
Why Makers Love This Project
- Hands-on renewable energy
- Combines electronics, coding, and mechanics
- Scalable—from small demos to full off-grid rigs
- A great conversation starter or Maker Faire showpiece
This project isn't just functional—it’s a powerful learning tool and an impressive addition to any Maker portfolio.
Next Steps: Supercharge Your Tracker
Want to push things further? Try adding:
- Data logging with an SD card
- IoT monitoring using ESP8266/ESP32
- Battery charging integration
- Weather-adaptive tracking algorithms