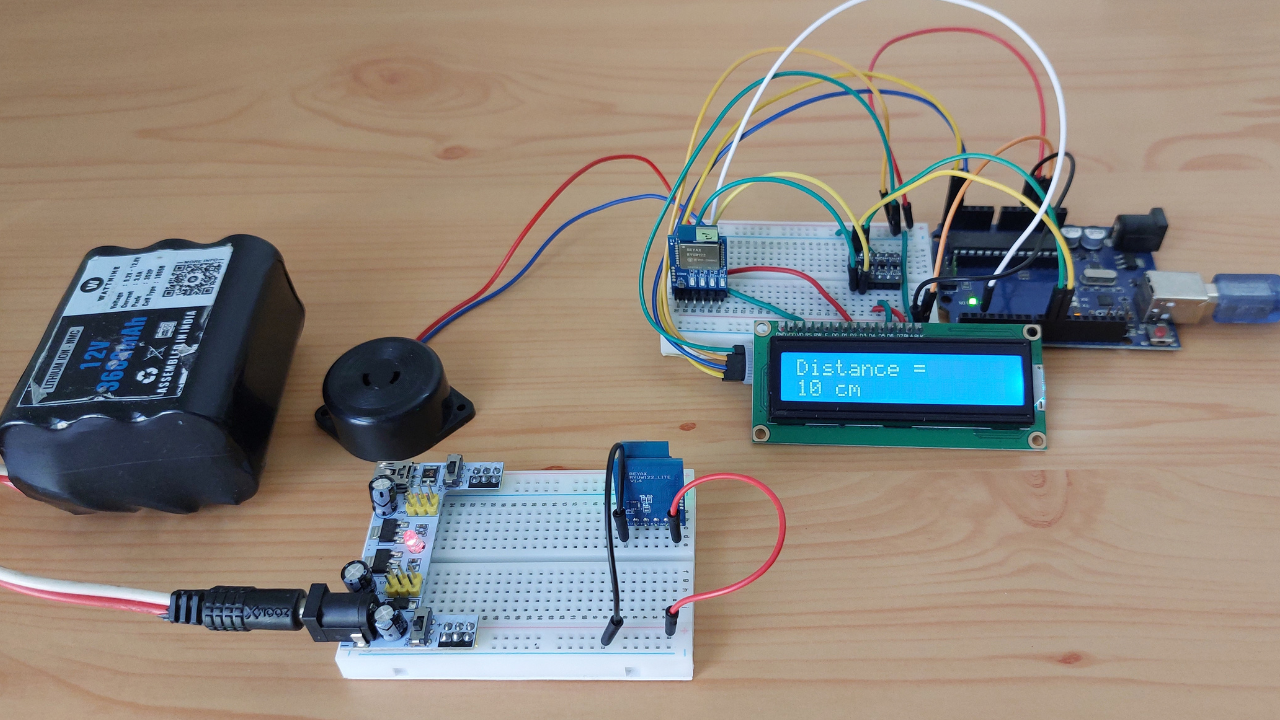
Wireless distance measurement can be useful in object monitoring, and embedded automation. In this project, I built a distance monitoring and alert system using an Arduino UNO and two REYAX RYUW122_Lite Ultra-Wideband (UWB) modules.
The system measures the distance between two points, displays the result on a 16×2 I2C LCD, and activates a buzzer when the distance exceeds a predefined threshold of 200 cm.
Project Overview
The setup consists of two RYUW122_Lite modules configured as an Anchor and a Tag. The Anchor is connected to the Arduino UNO, LCD, and buzzer, while the Tag operates as the second wireless endpoint.
The Arduino sends a ranging request to the Anchor through UART communication. The Anchor communicates with the Tag and receives the ranging result. The Arduino processes the response and displays the measured distance in centimeters on the LCD. When the distance exceeds the configured threshold, the buzzer activates.
Interfacing the UWB Module with Arduino
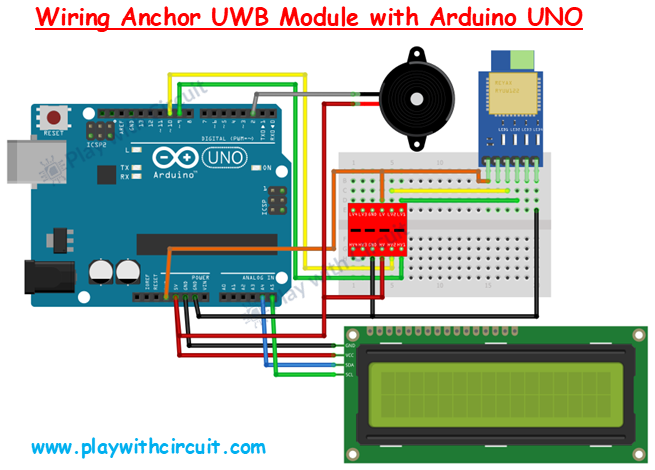
The Anchor communicates with the Arduino through its UART interface. Connect the Anchor's TXD pin through a logic-level shifter to Arduino D9, configured as the software serial RX pin. Connect Arduino D10, configured as software serial TX, through the shifter to the Anchor's RXD pin. Connect the module's GND to Arduino GND and power it using a suitable regulated 3.3 V supply.
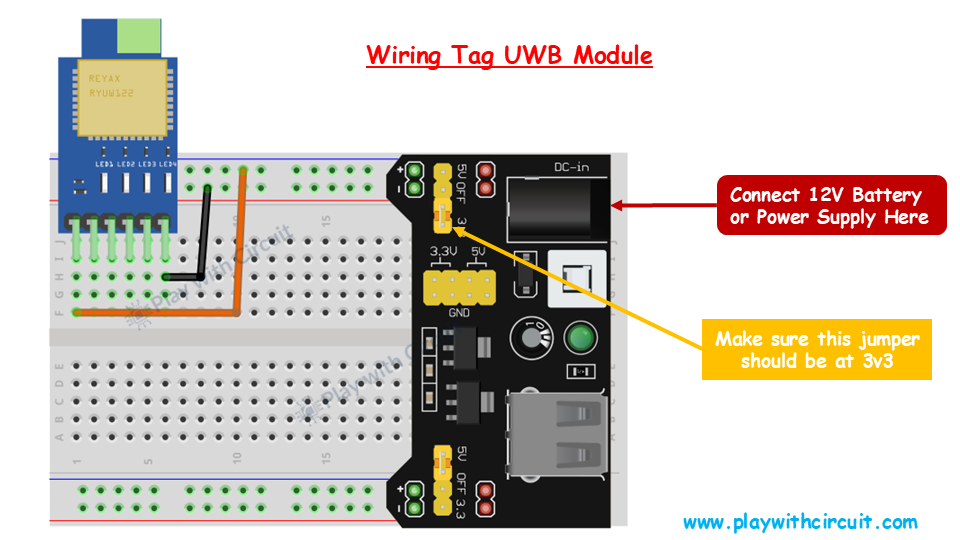
The second RYUW122_Lite module is configured as the Tag and powered separately from a regulated 3.3 V supply. It communicates wirelessly with the Anchor and does not require a direct UART connection to the Arduino in this configuration.
For the LCD, connect VCC to 5 V, GND to GND, SDA to A4, and SCL to A5. If the LCD's address jumpers A0, A1, and A2 are open, the I2C address is 0x27.
For the active-low buzzer module used in this setup, connect its positive terminal to the 5 V supply and its control/negative terminal to Arduino D2. The buzzer activates when D2 is driven LOW. Use a suitable transistor driver if the buzzer's current requirement exceeds the safe output capability of the Arduino pin.
Configuring the RYUW122_Lite Modules
Before running the Arduino program, configure one module as the Anchor and the other as the Tag using UART AT commands.
Use AT+MODE=1 to configure the Anchor and AT+MODE=0 to configure the Tag. Both modules should use the same network ID, for example AT+NETWORKID=1.
If the Arduino sketch communicates at 9600 baud, configure the Anchor's UART baud rate accordingly using AT+IPR=9600. Ensure that the module addresses, network settings, ranging commands, and response format match the firmware and Arduino sketch.
Tag Wiring
Testing the System
After completing the connections and configuring the modules, upload the Arduino sketch and power on the system. Check that the LCD displays the measured distance. Move the Anchor and Tag closer together and farther apart to observe the change in readings.
When the measured distance exceeds 200 cm, the buzzer should activate. Repeat the test in different positions and environments to observe how obstacles, antenna orientation, and surrounding conditions affect the ranging results.
Conclusion
This project demonstrates how UWB modules can be integrated with Arduino to build a wireless distance monitoring and alert system. It combines UART communication, LCD interfacing, and threshold-based control in a compact embedded application.
For the complete tutorial and additional implementation details, see the original project on Play with Circuit:
https://playwithcircuit.com/distance-monitoring-and-alert-system-using-ryuw122_lite-uwb-modules-and-arduino/
Have you used UWB modules in your own projects? I’d be interested to hear what applications or improvements you would explore next.