This is beginners project to first arduino basic learning.
In this project i am making a controllable RGB LED nightlight. Its possible to mix colour with an RGB by changing the brightness of each colour.
Section Header
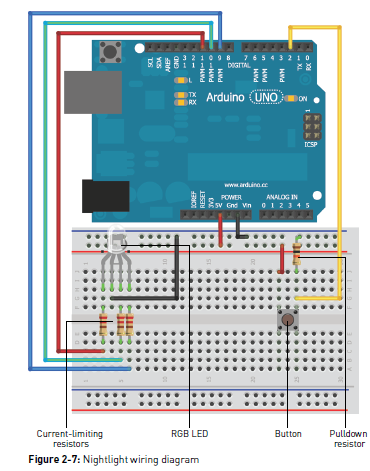
At first wire that LED up to three PWM pins through current limiting resistor on the Arduino as shown in the wiring diagram in Figure, then press the debounced button to configure and configure to cycle though a selection of colours each time to press it.
const int BLED=9; //Blue LED on Pin 9
const int GLED=10; //Green LED on Pin 10
const int RLED=11; //Red LED on Pin 11
const int BUTTON=2; //The Button is connected to pin 2
boolean lastButton = LOW; //Last Button State
boolean currentButton = LOW; //Current Button State
int ledMode = 0; //Cycle between LED states
void setup()
{
pinMode (BLED, OUTPUT); //Set Blue LED as Output
pinMode (GLED, OUTPUT); //Set Green LED as Output
pinMode (RLED, OUTPUT); //Set Red LED as Output
pinMode (BUTTON, INPUT); //Set button as input (not required)
}
/*
* Debouncing Function
* Pass it the previous button state,
* and get back the current debounced button state.
*/
boolean debounce(boolean last)
{
boolean current = digitalRead(BUTTON); //Read the button state
if (last != current) //if it's different...
{
delay(5); //wait 5ms
current = digitalRead(BUTTON); //read it again
}
return current; //return the current value
}
/*
* LED Mode Selection
* Pass a number for the LED state and set it accordingly.
*/
void setMode(int mode)
{
//RED
if (mode == 1)
{
digitalWrite(RLED, HIGH);
digitalWrite(GLED, LOW);
digitalWrite(BLED, LOW);
}
//GREEN
else if (mode == 2)
{
digitalWrite(RLED, LOW);
digitalWrite(GLED, HIGH);
digitalWrite(BLED, LOW);
}
//BLUE
else if (mode == 3)
{
digitalWrite(RLED, LOW);
digitalWrite(GLED, LOW);
digitalWrite(BLED, HIGH);
}
//PURPLE (RED+BLUE)
if (mode == 4)
{
analogWrite(RLED, 127);
analogWrite(GLED, 0);
analogWrite(BLED, 127);
}
//TEAL (BLUE+GREEN)
else if (mode == 5)
{
analogWrite(RLED, 0);
analogWrite(GLED, 127);
analogWrite(BLED, 127);
}
//ORANGE (GREEN+RED)
else if (mode == 6)
{
analogWrite(RLED, 127);
analogWrite(GLED, 127);
analogWrite(BLED, 0);
}
//WHITE (GREEN+RED+BLUE)
else if (mode == 7)
{
analogWrite(RLED, 85);
analogWrite(GLED, 85);
analogWrite(BLED, 85);
}
}
void loop()
{
currentButton = debounce(lastButton); //read deboucned state
if (lastButton == LOW && currentButton == HIGH) //if it was pressed...
{
ledMode++; //increment the LED value
}
lastButton = currentButton; //reset button value
//if you've cycled through the different options,
//reset the counter to 0
if (ledMode == 8) ledMode = 0;
setMode(ledMode); //change the LED state
}