In this blog post, we'll explore how to build an ESP32 LED web server from scratch. We'll go through the steps of setting up the ESP32, connecting the LEDs, and creating a web interface to control them. Whether
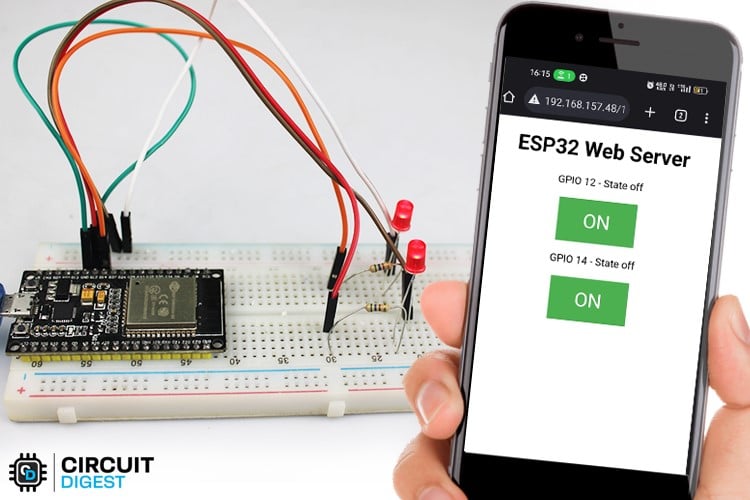
The project works by creating a web server on the ESP32 that serves a web page to a client device, such as a computer or mobile phone, over Wi-Fi. The web page contains controls that allow you to turn the LED lights on or off.
Here's a step-by-step breakdown of how the ESP32 LED webserver project works:
- The ESP32 microcontroller is connected to the LED lights and programmed to serve as a web server.
- The web server code is uploaded to the ESP32 using the Arduino IDE or other programming tools.
- The ESP32 is connected to a Wi-Fi network, allowing it to communicate with client devices over the network.
- When a client device connects to the ESP32's IP address, the web server code serves a web page to the client device's web browser.
- The web page contains controls for the LED lights, allowing the user to turn them on or off.
- When the user interacts with the controls on the web page, the ESP32 microcontroller receives the command and adjusts the LED lights accordingly.
- The ESP32 sends a response back to the client device, updating the web page with the current state of the LED lights.
CircuitDiagram
circuit diagram for connecting led with esp32
The ESP32 microcontroller has many GPIO pins that can be used for interfacing with external devices, such as LED lights. In this example, we will interface the ESP32 with two LED lights connected to GPIO pins 12 and 14.
Here's how to interface the ESP32 with two LED lights:
Connect one end of a 220-ohm resistor to GPIO pin 12 on the ESP32, and connect the other end of the resistor to the positive (anode) leg of one LED light.
Connect the negative (cathode) leg of the LED light to the ground (GND) on the ESP32.
Repeat steps 1 and 2 for GPIO pin 14 and the other LED light.
You can also use the ESP32 Ethernet webserver for the same, in which case you will need an ethernet shield for ESP32 board and minor changes with the code.
For more information check out the ESP32 webserver tutorial
Code
// Load Wi-Fi library
#include <WiFi.h>

// Replace with your network credentials
const char* ssid = "REPLACE_WITH_YOUR_SSID";
const char* password = "REPLACE_WITH_YOUR_PASSWORD";

// Set web server port number to 80
WiFiServer server(80);

// Variable to store the HTTP request
String header;

// Auxiliary variables to store the current output state
String output12State = "off";
String output14State = "off";

// Assign output variables to GPIO pins
const int output12 = 12;
const int output14 = 14;

// Current time
unsigned long currentTime = millis();

// Previous time
unsigned long previousTime = 0;

// Define timeout time in milliseconds (example: 2000ms = 2s)
const long timeoutTime = 2000;

void setup() {
  Serial.begin(115200);

  // Initialize the output variables as outputs
  pinMode(output12, OUTPUT);
  pinMode(output14, OUTPUT);

  // Set outputs to LOW
  digitalWrite(output12, LOW);
  digitalWrite(output14, LOW);

  // Connect to Wi-Fi network with SSID and password
  Serial.print("Connecting to ");
  Serial.println(ssid);
  WiFi.begin(ssid, password);

  while (WiFi.status() != WL_CONNECTED) {
    delay(500);
    Serial.print(".");
  }

  // Print local IP address and start web server
  Serial.println("");
  Serial.println("WiFi connected.");
  Serial.println("IP address: ");
  Serial.println(WiFi.localIP());
  server.begin();
}

void loop() {
  WiFiClient client = server.available();   // Listen for incoming clients

  if (client) {                             // If a new client connects,
    currentTime = millis();
    previousTime = currentTime;
    Serial.println("New Client.");          // print a message out in the serial port
    String currentLine = "";                // make a String to hold incoming data from the client

    while (client.connected() && currentTime - previousTime <= timeoutTime) {  // loop while the client's connected
      currentTime = millis();

      if (client.available()) {             // if there's bytes to read from the client,
        char c = client.read();             // read a byte, then
        Serial.write(c);                    // print it out the serial monitor
        header += c;

        if (c == '\n') {                    // if the byte is a newline character
          // if the current line is blank, you got two newline characters in a row.
          // that's the end of the client HTTP request, so send a response:
          if (currentLine.length() == 0) {
            // HTTP headers always start with a response code (e.g. HTTP/1.1 200 OK)
            // and a content-type so the client knows what's coming, then a blank line:
            client.println("HTTP/1.1 200 OK");
            client.println("Content-type:text/html");
            client.println("Connection: close");
            client.println();

            // turns the GPIOs on and off
            if (header.indexOf("GET /12/on") >= 0) {
              Serial.println("GPIO 12 on");
              output12State = "on";
              digitalWrite(output12, HIGH);
            } else if (header.indexOf("GET /12/off") >= 0) {
              Serial.println("GPIO 12 off");
              output12State = "off";
              digitalWrite(output12, LOW);
            } else if (header.indexOf("GET /14/on") >= 0) {
              Serial.println("GPIO 14 on");
              output14State = "on";
              digitalWrite(output14, HIGH);
            } else if (header.indexOf("GET /14/off") >= 0) {
              Serial.println("GPIO 14 off");
              output14State = "off";
              digitalWrite(output14, LOW);
            }

            // Display the HTML web page
            client.println("<!DOCTYPE html><html>");
            client.println("<head><meta name=\"viewport\" content=\"width=device-width, initial-scale=1\">");
            client.println("<link rel=\"icon\" href=\"data:,\">");

            // CSS to style the on/off buttons
            // Feel free to change the background-color and font-size attributes to fit your preferences
            client.println("<style>html { font-family: Helvetica; display: inline-block; margin: 0px auto; text-align: center;}");
            client.println(".button { background-color: #4CAF50; border: none; color: white; padding: 16px 40px;");
            client.println("text-decoration: none; font-size: 30px; margin: 2px; cursor: pointer;}");
            client.println(".button2 {background-color: #555555;}</style></head>");

            // Web Page Heading
            client.println("<body><h1>ESP32 Web Server</h1>");

            // Display current state, and ON/OFF buttons for GPIO 12
            client.println("<p>GPIO 12 - State " + output12State + "</p>");
            // If the output12State is off, it displays the ON button
            if (output12State == "off") {
              client.println("<p><a href=\"/12/on\"><button class=\"button\">ON</button></a></p>");
            } else {
              client.println("<p><a href=\"/12/off\"><button class=\"button button2\">OFF</button></a></p>");
            }

            // Display current state, and ON/OFF buttons for GPIO 14
            client.println("<p>GPIO 14 - State " + output14State + "</p>");
            // If the output14State is off, it displays the ON button
            if (output14State == "off") {
              client.println("<p><a href=\"/14/on\"><button class=\"button\">ON</button></a></p>");
            } else {
              client.println("<p><a href=\"/14/off\"><button class=\"button button2\">OFF</button></a></p>");
            }

            client.println("</body></html>");

            // Clear the header variable
            header = "";
            // Break out of the while loop
            break;
          } else { // if you got a newline, then clear currentLine
            currentLine = "";
          }
        } else if (c != '\r') {  // if you got anything else but a carriage return character,
          currentLine += c;      // add it to the end of the currentLine
        }
      }
    }
    // Clear the header variable
    header = "";
    // Close the connection
    client.stop();
    Serial.println("Client disconnected.");
    Serial.println("");
  }
}
Github
Github link for Code and Circuit: https://github.com/Circuit-Digest/ESP32-Webserver