Learn how to connect your ESP32 devices to the network using this simple web interface.
Brief
Using Flowcode app developer it is very easy to create and store files onto the local hard disk drive. Using inbuilt components such as the CSV writer we can easily create a file that can be loaded into excel for chart plotting and further analysis to be performed. Using our array of open source API components it is possible to pull data from real world electronics hardware such as a USB connected RedBoard or a WIFI connected ESP32 to name but a few. We can use their basic analog and digital input functionality or we can get more complex and start collecting sensor data via a bus such as I2C, OneWire, UART or SPI.
Hardware
SparkFun RedBoard
ESP32
Setup
We start by creating a blank app developer project by selecting new project and then selecting the App Developer tab at the top, then using the Components Libraries toolbar dragging on a CSV Read/Write component from the Storage category and an API (ESP32) component from the API category.
CSV Read/Write Component
The CSV Read/Write component has a number of macros to write and read data to and from a file on the local hard drive. We must first open a specific file using the macro OpenFile. This macro requires a filename to be entered, for example ”log.csv”. In our app developer project we create a new property called filename of type Line of text and this then allows the app user to specify their own log files as required.
We give the property value a default that will be used when the user first loads the app.
The OpenFile macro has a second parameter which is should we delete the existing contents of the file when opening. Again we can pass control of this over to the user by creating another property, this time with the type of True or false.
We then call the OpenFile macro using the two property variables as the macro parameters. We create a Boolean type variable with name FileOK to store the return which tells us if the file was created/opened successfully.
Now the log file is open we can add data to it by using the AddNumber or AddString macros. Calling these macros adds the specified value to the file as an ASCII string of characters followed by a comma. This automatically moves horizontally from column to column in the CSV file. When we want to move downwards onto a new row and back to the first column we use the NextRow macro.
The only other macro we may need to be aware of is the CloseFile macro. This can be used if you are opening and closing files during the operation of the app. If instead you are doing what we are doing and just opening a single file and writing to it for the duration of the app then the CloseFile macro is already called for us when the app is closed or stopped.
API (ESP32) Component
The API component allows us to connect to our target electronics to gather real world data. The API hardware be it an ESP or RedBoard etc must first be pre-programmed with the API firmware from the Flowcode wiki.
https://www.flowcode.co.uk/wiki/index.php?title=Components#API_Slave_Devices
Specific for the ESP32 device you first need to join it to your existing WIFI network and then find out the IP address so you can communicate with it. Details of how to do this are available here.
https://www.flowcode.co.uk/wiki/index.php?title=Component:_SCADA_(ESP32)_(SCADA_Slaves)#Detailed_description
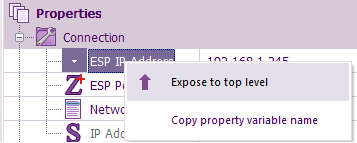
Before we can start communicating with the API hardware we must do a couple of things. Firstly we need to expose some of the component properties to the user. We do this by first selecting the component on the panel or at the top of the properties window. We then select the properties we want to user to have access to and then right clock and Expose to top level. For the ESP API this just includes the ESP IP Address. For an RedBoard this might include the COM port and the refresh properties.
Once we have exposed the properties we need we can call the macro to initialise it, this opens up the specific communications channels to the hardware.
To read specific pins as analog or digital we simply call the ADCSample8/10 and IOGetInputPin macros as required. Each analog or digital sample can be stored into a variable before being passed into the CSV file using the AddNumber macro. The API component wiki page lists the specific hardware pin connections of the analog and digital channels.
API Components and Libraries
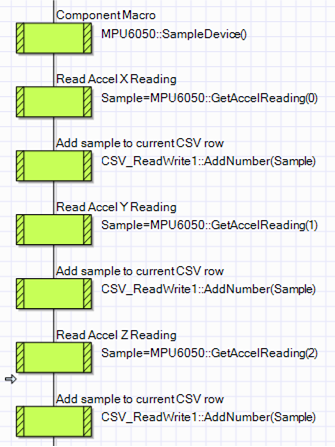
To use the API components and adjoining hardware to monitor a more complex value such as an output from a sensor connected via a bus then this can be done by dragging on the component for the sensor. The sensor should have a property called simulate comms which allows the bus communications to be virtualised. Then by pointing the sensor’s API property to the API component we can use the virtualised comms to drive real world comms.
The connections for the bus can again be found on the wiki page for the API component. It should then just be a case of initialising and sampling the sensor like you would do on an embedded device.
Exporting the project as an application
Once your done and the project runs well in simulation you can export the project into an application you can share by clicking File -> Export -> Deploy as Flowcode App.
This will bring up a menu with various settings where you can choose what panels and views are available to the user. The minimal setup should be that the properties window is optional to allow the user to configure the required settings before starting the app running. The Components and Resources tabs should pretty much take care of themselves without you really having to touch them unless you need to embed resources such as bitmaps or audio files into the project export.
The main decision you will have is whether or not to Bundle the App Developer Runtime. Bundling the runtime allows for a single self contained folder you can zip up and pass around the downside being that it’s a couple dozen MB in size. Not bundling the runtime will provide you with a much smaller file that is easier to distribute but at the cost of the user having to download the runtime from the Flowcode download page.
https://flowcode.co.uk/resources/software/FlowcodeRuntimeV9_Installer.msi
Additional
This should have hopefully shown you the basics on creating a data logging application. You could of course add a lot more into the app such as graphing, multiple data sources and of course allowing the control of outputs to allow you to control what your recording.
If you do make a project then we would be very happy to hear about what you have done.
If you have any questions about this or anything else Flowcode related then our user forums at https://www.flowcode.co.uk/forums/ is a good place to ask. You can log into the forums simply by using your Flowcode username and password.