TinyML models to recognize custom, user-defined drawn gestures on touch interfaces, embedded in low-power MCUs.
Introduction
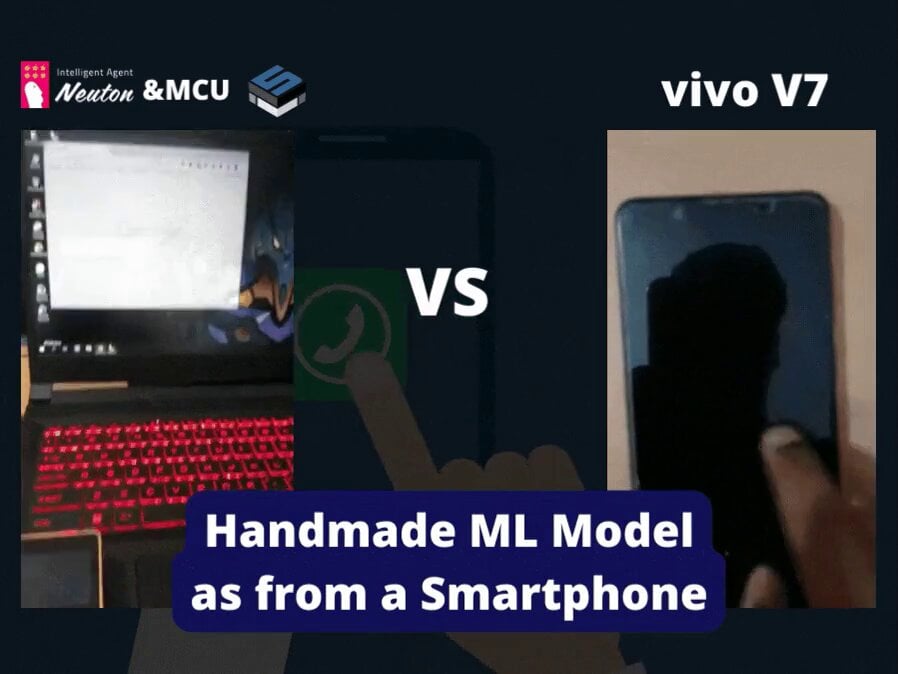
I was inspired by such features on our smartphones. My smartphone “Vivo V7” has a function of Drawing Gesture Recognition, thanks to this model working on the smartphone processor. But I want to bring those features to tiny edge devices as well
Can a touchpad run on a single microcontroller (MCU)? Can an MCU classify complex gestures in real-time, delivering inference at the edge with low power and minimal flash usage?
Looking ahead, I’ll say “definitely yes” In my project, I’ll share how to make a Machine Learning model for an embedded device to recognize complex drawing gestures like alphabets, and special symbols on TFT touch screen display units
This technique uses TinyML to recognize gestures robustly. In the interest of reaching as many developers as possible, I won’t assume any understanding of the field.
? What We’re Building?
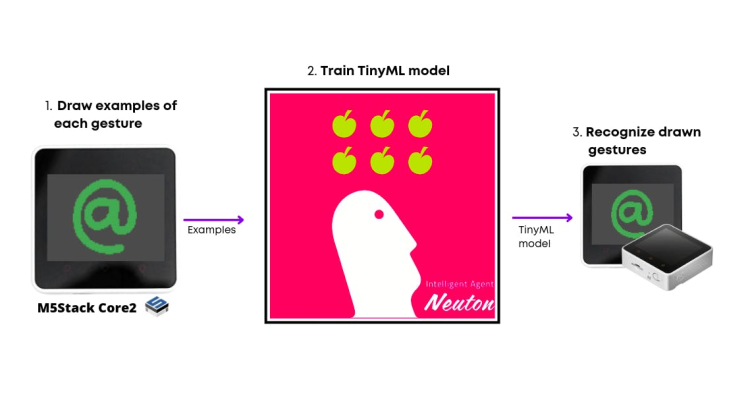
By the end of the tutorial, we’ll have a setup that allows us to draw on-screen gestures and recognize them with high accuracy using TinyML. The components involved are:
- Device to collect some examples of each gesture (draw some check marks, numbers, alphabets, special symbols, etc.)
- TinyML platform to train our collected data to recognize drawn gestures and embed them onto smaller MCUs.
- Open applications on the computer by recording the user’s strokes on the screen and using the TinyML inference algorithm to figure out what gesture, if any, an application should open.
? Why draw and use TinyML?
It has been a decade since touch screens became ubiquitous in phones and laptops, but we still generally interact with apps using only minor variations of a few gestures: tapping, panning, zooming, and rotating. It’s tempting to try to handcraft algorithms to identify each gesture you intend to use for your touchscreen device. Imagine what can go wrong when dealing with more complex gestures, with perhaps multiple strokes, that all have to be distinguished from each other.
Existing techniques: The state-of-the-art for complex gesture recognition on mobile devices seems to be an algorithm called $P (http://depts.washington.edu/madlab/proj/dollar/pdollar.html). $P is the newest in the “dollar family” of gesture recognizers developed by researchers at the University of Washington.
$P’s main advantage is that all the code needed to make it work is short and simple.
$P is not very accurate
$P is not very accurate
Another limitation of $P is its inability to extract high-level features, which are sometimes the only way of detecting a gesture.
? My approach using TinyML Neural Networks
A robust and flexible approach to detecting complex gestures is the use of machine learning. There are a number of ways to do this. I tried out the simplest reasonable one I could think of:
Track and translate the user’s gesture to fit in the fixed-size box screen resolution.
Store the location of the touched pixels in a buffer (the location of the individual pixel is decomposed by relation, L = y * screen width + x).
Use the pixel locations buffer as input to a Neural Network (NN).
This converts the problem into a classification and pattern recognition problem, which NNs solve extremely well. In short, it’s much harder than you think to write the code that explicitly detects a stroke a user made in the shape of a digit or symbol, for example, without NNs.
? What’s a Machine Learning Algorithm?
A machine learning algorithm learns from a dataset in order to make inferences given incomplete information about other data.
In our case, the data are strokes made on the screen by the user and their associated gesture classes (“alphabets”, “symbols”, etc.). What we want to make inferences about are new strokes made by a user for which we don’t know the gesture class (incomplete information).
⭐ Allowing an algorithm to learn from data is called “training”. The resulting inference machine that models the data is aptly called a “model”.
Let's begin
? Step 1: Making the Data Set
Like any machine learning algorithm, My network needed examples (drawing gestures) to learn from. To make the data as realistic as possible, I wrote a data collection code for inputting and maintaining a data set of gestures on the same touch screen where the network would eventually be used.
1 / 2
Comma-separated data to be stored in CSV format for training
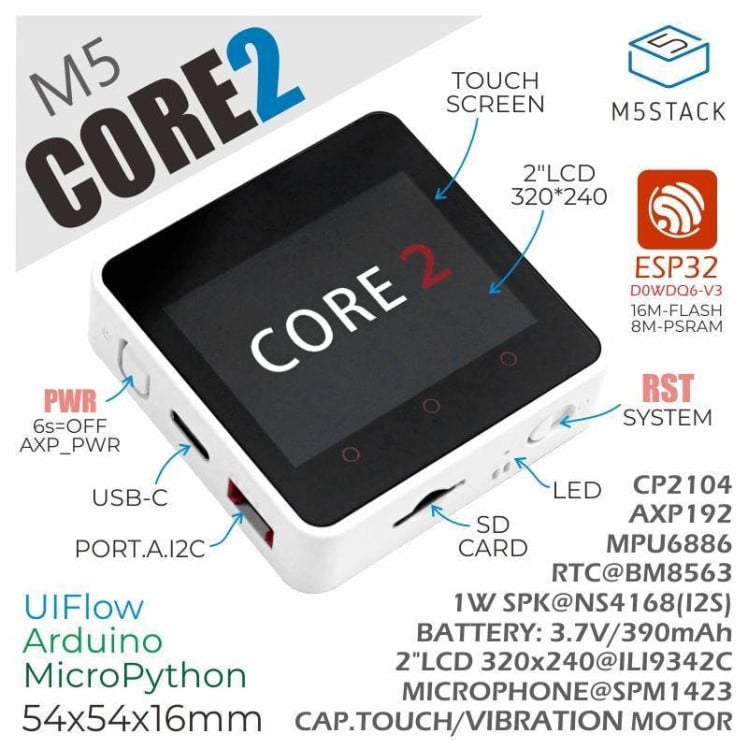
To understand the data set collection, we will need some knowledge of pixels. In simple terms, a pixel can be identified by a pair of integers providing the column number and the row number. In our case, we are using M5Stack Core2 which has a TFT 2" Touchscreen with a resolution of 320 X 240 pixels.
1 / 2 • Source: https://wiki.seeedstudio.com/Wio-Terminal-LCD-Basic/
⭐ Converting touched points on the TFT Touch screen to images then rasterizing would be complex to understand and to do on our MCU, so I took another approach. Since Neural Nets are very excellent at pattern recognition why not feed pixel locations per drawn sample and let's see how well it performs. That's the power of Machine Learning when you want to skip the implementation of your own algorithms on your data. Check the below image to understand more. The code for the data collection is available in the code section.
The buffer size is fixed to 255 since I found that at any point in time the number of touched pixels while drawing digits or symbols never exceeded 255 in total)
The buffer size is fixed to 255 since I found that at any point in time the number of touched pixels while drawing digits or symbols never exceeded 255 in total)
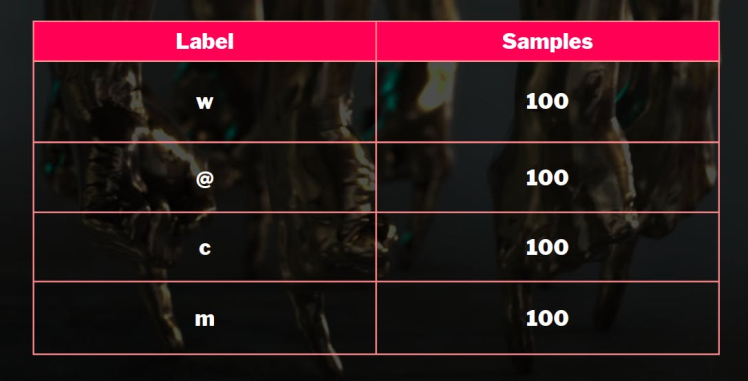
Once your dataset is collected it would look like this, I collected 100 samples for each gesture [w, @, c, m]
? Step 2: Training the model
To train the model, I used the Neuton TinyML because it is a free no-code tool that allows you to automatically build ML models of optimal size and accuracy, and embed them into ultra-low-power MCUs.
Moreover, it is easy to upload CSV datasets and get very small models, ready for deployment, without additional quantization or compression.
First, create a new solution on the Neuton Platform (https://neuton.ai) and upload your dataset.
By the way, if you don’t have your dataset ready, you can start with pre-trained datasets for a similar problem, for example, the well-known MNIST dataset. On the Platform, you also can explore a lot of Tiny ML solutions and Use Cases you can use for your inspiration.
The platform provides step-by-step instructions for each of them, including a simple guide for model embedding, so it is so easy to follow them even if you are new to machine learning and edge computing.
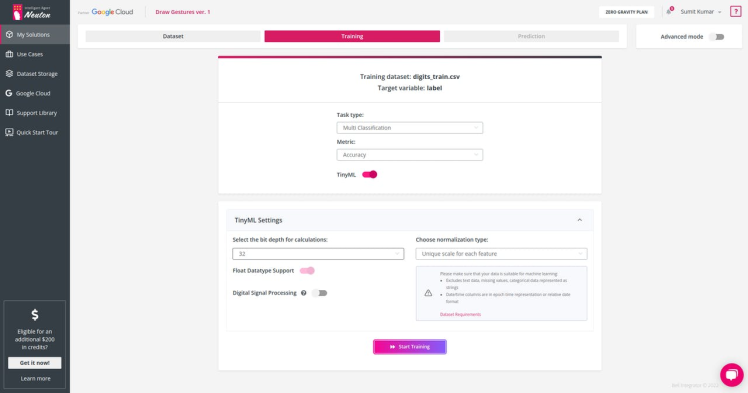
In our case, we upload the previously collected dataset to New Solution and select the target variable. In our case, it is the label.
Set TinyML model training parameters as shown below and start the training.
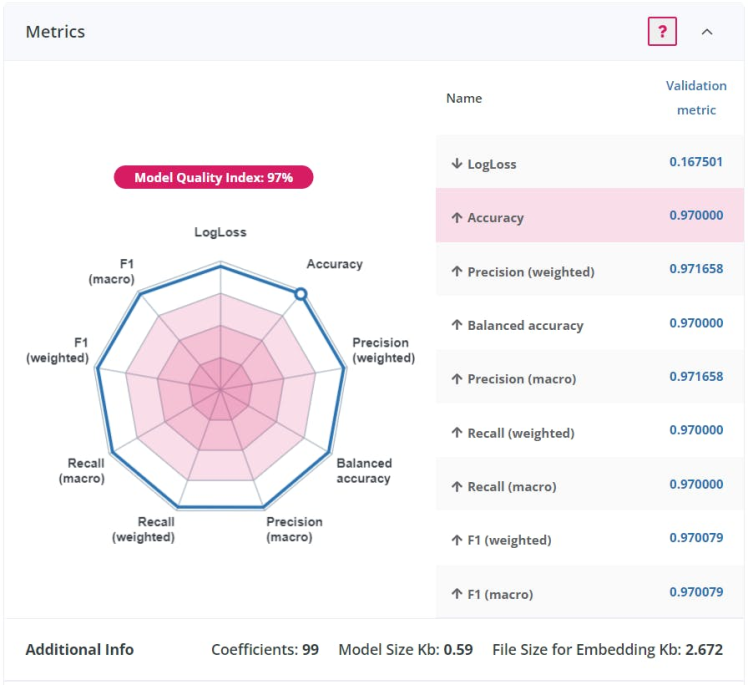
Once the training is complete, you can check the analytics below and model accuracy. In this case, accuracy was about 97%. With only 99 coefficient and only 2.672 KB embedding size, that's really freaking awesome! Such a tiny model footprint would really allow such models to be implemented in future touchpads and make laptops smarter. :)
To further test the value of my model, I also did Web prediction on the Neuton console, and it really performed well.
Download the model for embedding for the M5Stack Core2 device,
Step 3: Embedding on the device
After your model is downloaded, extract it and put it in the same folder where your main Arduino code file is.
.
├── DrawingGesture.ino
├── model
│   └── model.h
├── neuton.c
├── neuton.h
├── README.md
├── StatFunctions.c
└── StatFunctions.h
The important functions here are, neuton_model_set_inputs - to set input values, neuton_model_run_inference - to make predictions. Check the full source code in the code section.
// counter threshold ensures that the buffer is not empty or any accidental screen touch/taps
      if (neuton_model_set_inputs(inputBuff) == 0 && counter > 5)
      {
        uint16_t index;
        float* outputs;

        if (neuton_model_run_inference(&index, &outputs) == 0)
        {
          // code for handling prediction result
          // Serial.println("Prediction: " + String(index));
          if (index == 0)
          {
            Serial.println("@");
          }
          if (index == 1)
          {
            Serial.println("c");
          }
          if (index == 2)
          {
            Serial.println("m");
          }
          if (index == 3)
          {
            Serial.println("w");
          }
        }
      }

      counter = 0;
      prev = 0;

      neuton_model_reset_inputs();
      free(inputBuff); // free the memory
      inputBuff = (float*) calloc(touchBufferSize, sizeof(float));

      if (!inputBuff)
      {
          Serial.println("Failed to allocate memory");
      }
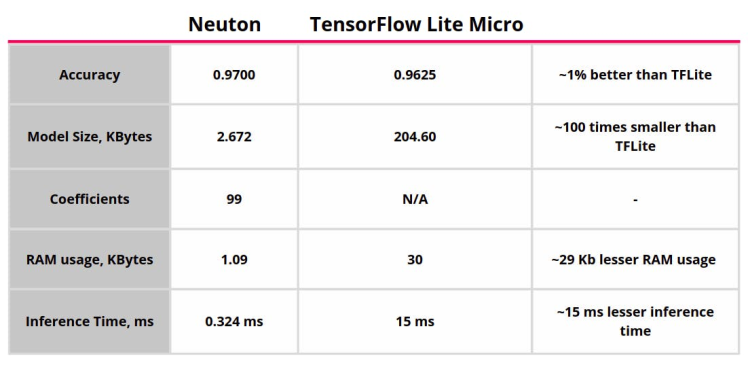
I also dis a comparison with TensorFlow Lite for MCUs and Neuton AI was about 100 times smallerand1%better than the TFLite model ?️
? Results
Hurray! We complete all the necessary steps. Now it's time for action. We have successfully embedded the model in our device, now we are going to make a Python script to open some Apps based on drawn gestures detected.
1 / 2
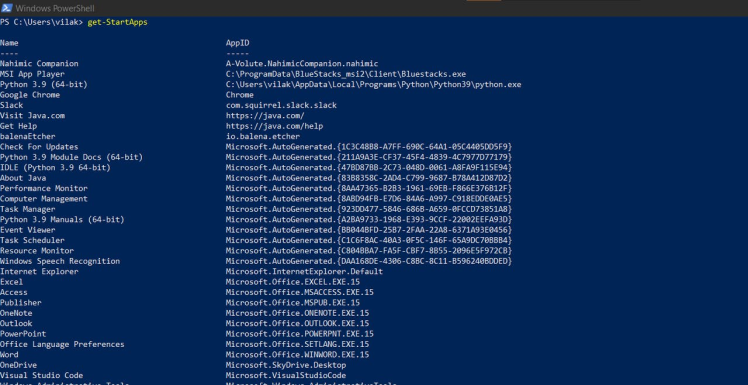
AppIDs
The code is very simple, we listen to the serial port and use the bytes sent from our device to start the windows application using their AppID, to get your AppId, go to Windows Power Shell and type this command get-StartApps
import os
import serial
import time

arduino = serial.Serial('COM3', baudrate=115200,bytesize=serial.EIGHTBITS,
                     parity=serial.PARITY_NONE,
                     stopbits=serial.STOPBITS_ONE,
                     timeout=1,
                     xonxoff=0,
                     rtscts=0
                     )
# Toggle DTR to reset Arduino
arduino.setDTR(False)
time.sleep(1)

# toss any data already received, see
# http://pyserial.sourceforge.net/pyserial_api.html#serial.Serial.flushInput
arduino.flushInput()
arduino.setDTR(True)

with arduino:
    while True:
        line = arduino.readline()
        if line:
            str = line.decode()
            symb = str.strip()
            print(symb)

            # open spotify music app if drawn gesture is m
            if symb == 'm':
                print("Opening Spotify")
                os.system('start explorer shell:appsfolderSpotifyAB.SpotifyMusic_zpdnekdrzrea0!Spotify')

            # if drawn gesture is c then open chrome
            if symb == 'c':
                print("Opening Chrome")
                os.system('start explorer shell:appsfolderChrome')

            # if drawn gesture is @ then open email
            if symb == '@':
                print("Opening Email")
                os.system('start explorer shell:appsfoldermicrosoft.windowscommunicationsapps_8wekyb3d8bbwe!microsoft.windowslive.mail')

            # if drawn gesture is w then open whatsapp
            if symb == 'w':
                print("Opening Whatsapp")
                os.system('start explorer shell:appsfolder\5319275A.WhatsAppDesktop_cv1g1gvanyjgm!WhatsAppDesktop')

            # if drawn gesture is 0 then open Office
            if symb == '0':
                print("Opening Office")
                os.system('start explorer shell:appsfolderMicrosoft.MicrosoftOfficeHub_8wekyb3d8bbwe!Microsoft.MicrosoftOfficeHub')
You can now have a very productive device, and you don't need to be an expert or data scientist to do this. ?
⏯️ What's next?
I think my further case will be about system shortcuts just by drawing a symbol on a screen. And I’ve got to admit, it’s indeed a natural and quick way to interact with a touch screen, because traditional keyboards and touch buttons, although much improved aesthetically over the years, require a lot of attention to hit the right button. :)
I am hopeful that future embedded devices and laptop trackpads will be equipped with such TinyML draw gesture recognition models and make our daily interactions with apps much faster. Hope you liked this tutorial. ?
CODE
Data Collection
#include <M5GFX.h>

M5GFX display;
const uint8_t pixelBufferSize=255;
uint32_t* targetBuff = (uint32_t*) calloc(pixelBufferSize, sizeof(uint32_t));   // allocate memory for pixel buffer with 0s
uint32_t prev = 0;
uint16_t counter = 0;

void setup()
{
    // Initialize the M5Stack object
    display.init();
    Serial.begin(115200);

    if (!targetBuff)
    {
        Serial.println("Failed to allocate memory");
    }

    // Check if the display is present
    if (!display.touch())
    {
        display.setTextDatum(textdatum_t::middle_center);
        display.drawString("Touch not found.", display.width() / 2, display.height() / 2);
    }

    display.startWrite();

    Serial.println("Width: " + String(display.width()));
    Serial.println("Height: " + String(display.height()));

    // print headers for the csv dataset file
    // for(uint8_t i = 0; i < 255; i++)
    // {
    //     Serial.print("touch"+String(i));
    //     Serial.print(",");
    // }
    // Serial.println();
}

void loop()
{
    static bool drawed = false;
    lgfx::touch_point_t tp[3];

    uint8_t nums = display.getTouchRaw(tp, 3);

    if(nums)
    {
        display.convertRawXY(tp, nums);

        for (uint8_t i = 0; i < nums; ++i)
        {
            display.setCursor(0,0);
            // print X, Y and location(L = i*width + j)
            display.printf("Convert X:%03d  Y:%03d L:%03d", tp[i].x, tp[i].y, (tp[i].y * 320 + tp[i].x));

            // ensure no duplication of touch points
            if((tp[i].y * 320 + tp[i].x) != prev && counter < 255)
            {
                // store pixel location usign the relation, l = y*width + x
                targetBuff[counter] = (tp[i].y * display.width()) + tp[i].x;
                prev = (tp[i].y * 320 + tp[i].x);
                counter++;
            }
        }
        display.display();

        // draw the points on the screen
        display.setColor(TFT_GREEN);
        for (uint8_t i = 0; i < nums; ++i)
        {
            uint8_t s = tp[i].size + 4;
            switch (tp[i].id)
            {
                case 0:
                    display.fillCircle(tp[i].x, tp[i].y, s);
                    break;
                case 1:
                    display.drawLine(tp[i].x-s, tp[i].y-s, tp[i].x+s, tp[i].y+s);
                    display.drawLine(tp[i].x-s, tp[i].y+s, tp[i].x+s, tp[i].y-s);
                    break;
                default:
                    break;
            }
            display.display();
        }
        drawed = true;
    }

    // clear the screen and go to default state once the sample is drawn
    else if (drawed)
    {
        // print the pixel locations which are stored in the buffer, user can copy from serial monitor and save in csv file
        for(uint8_t i = 0; i < 255; i++)
        {
           Serial.print(targetBuff[i]);
           Serial.print(",");
        }
        Serial.println();

        drawed = false;
        display.waitDisplay();
        display.clear();
        display.display();

        prev = 0;
        counter = 0;

        free(targetBuff); // free the memory
        targetBuff = (uint32_t*) calloc(255, sizeof(uint32_t));     // reallocate memory for pixel buffer with 0s

        if (!targetBuff)
        {
            Serial.println("Failed to allocate memory");
        }
    }
    vTaskDelay(1);
}
Code
import os
import serial
import time

arduino = serial.Serial('COM3', baudrate=115200,bytesize=serial.EIGHTBITS,
                     parity=serial.PARITY_NONE,
                     stopbits=serial.STOPBITS_ONE,
                     timeout=1,
                     xonxoff=0,
                     rtscts=0
                     )
# Toggle DTR to reset Arduino
arduino.setDTR(False)
time.sleep(1)

# toss any data already received, see
# http://pyserial.sourceforge.net/pyserial_api.html#serial.Serial.flushInput
arduino.flushInput()
arduino.setDTR(True)

with arduino:
    while True:
        line = arduino.readline()
        if line:
            str = line.decode()
            symb = str.strip()
            print(symb)

            # open spotify music app if drawn gesture is m
            if symb == 'm':
                print("Opening Spotify")
                os.system('start explorer shell:appsfolder\SpotifyAB.SpotifyMusic_zpdnekdrzrea0!Spotify')

            # if drawn gesture is c then open chrome
            if symb == 'c':
                print("Opening Chrome")
                os.system('start explorer shell:appsfolder\Chrome')

            # if drawn gesture is @ then open email
            if symb == '@':
                print("Opening Email")
                os.system('start explorer shell:appsfolder\microsoft.windowscommunicationsapps_8wekyb3d8bbwe!microsoft.windowslive.mail')

            # if drawn gesture is w then open whatsapp
            if symb == 'w':
                print("Opening Whatsapp")
                os.system('start explorer shell:appsfolder\\5319275A.WhatsAppDesktop_cv1g1gvanyjgm!WhatsAppDesktop')

            # if drawn gesture is 0 then open Office
            if symb == '0':
                print("Opening Office")
                os.system('start explorer shell:appsfolder\Microsoft.MicrosoftOfficeHub_8wekyb3d8bbwe!Microsoft.MicrosoftOfficeHub')