Build an Arduino-controlled kitchen timer and learn how to interface your Arduino with LCDs and buttons along the way.
In this post, we will be learning how to create an Arduino-controlled kitchen timer. This project will help you manage desired baking times and avoid overcooking dishes.
You can conveniently set a time limit for your dish to cook and step away until you hear the beeping timer go off.
We will be using an Arduino LCD Keypad Shield for this project. We start by wiring the small buzzer that will get the device up and running, it shouldn’t take more than a few minutes; on account of the shield’s input and output capabilities through its button interface and LCD respectively.
Note that you can adapt the module and code in this project for any other experiments requiring a user interface. For this specific build, we’ll be following the flow you’ll find listed below.
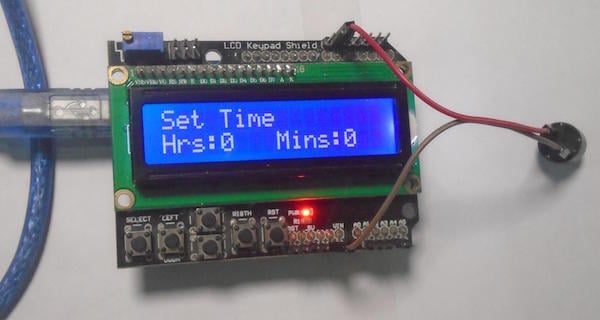
The Kitchen Timer User Interface Flow
- After powering on, the device will display an “Arduino Kitchen Timer” message for 3 seconds.
- The timer will then prompt you to set the time. You can move the cursor to minutes and hours by pressing the right and left keys.
- You can adjust the minutes and hours settings with the up and down arrow keys.
- Once the desired time is set, press the select button and the timer will start.
- If you want to set the time again, press the select button a second time.
- Once the time is completed, the buzzer will beep.
- To stop the buzzer, press the reset button on the Keypad Shield.
Required Components for the Kitchen Timer
- Arduino
- LCD Keypad Shield
- Buzzer
Circuit Diagram for the Kitchen Timer
First, align and place the LCD Keypad Shield directly onto the Arduino. Then connect the positive side of the buzzer to pin 12 on the Arduino and the negative side of the buzzer to the ground.
Arduino Kitchen Timer Project Code
Copy and upload the code below into Arduino IDE. Each section of the code has an accompanying explanation to help you understand it’s function.
#include <LiquidCrystal.h>
// select the pins used for the LCD keypad
LiquidCrystal lcd(8, 9, 4, 5, 6, 7);
// define some variables
int lcd_key     = 0;
int adc_key_in  = 0;
int hrs = 0;
int mins = 0;
int set_mins = 0;
int set_hrs = 1;
int secs = 60;
int cursor_pos = 1;
int buzzer_pin = 12;

bool startTimer = false;
bool setTimer = true;
bool get_time = false;

unsigned long interval=1000; // the time we need to wait
unsigned long previousMillis=0; // millis() returns an unsigned long.
// Defining button used by the lcd keypad
#define btnRIGHT  0
#define btnUP     1
#define btnDOWN   2
#define btnLEFT   3
#define btnSELECT 4
#define btnNONE   5

// read the buttons
int read_LCD_buttons()
{
 adc_key_in = analogRead(0);      // reading the button value from the lcd keypad
 // checking which button is pressed
 if (adc_key_in > 1000) return btnNONE; // We make this the 1st option for speed reasons since it will be the most likely result
 if (adc_key_in < 50)   return btnRIGHT;
 if (adc_key_in < 250)  return btnUP;
 if (adc_key_in < 450)  return btnDOWN;
 if (adc_key_in < 650)  return btnLEFT;
 if (adc_key_in < 850)  return btnSELECT;

 return btnNONE;  // when all others fail, return this...
}

void setup()
{
 Serial.begin(115200);
 pinMode(buzzer_pin, OUTPUT);

 lcd.begin(16, 2);              // start communication with LCD keypad shield
 lcd.setCursor(0,0);
 lcd.print("Arduino Kitchen");
 lcd.setCursor(0, 1);
 lcd.print("    Timer");
 delay(3000);
}

void loop(){
  // Checking which condition is true based on the button pressed
  if(startTimer == true){
    start_timer();
  }
  else if (setTimer == true){
    set_timer();
  }
}

// This function will count the time and will beep the buzzer when the time will be up.
void start_timer(){
  // Checking whether time is up or not
  if(hrs == 0 && mins == 0 && secs == 0){
    lcd.setCursor(0, 0);
    lcd.print(" Time is UP");
    lcd.setCursor(0, 1);
    lcd.print("  Beep Beep");
    digitalWrite(buzzer_pin, HIGH);
    delay(500);
    digitalWrite(buzzer_pin, LOW);
    delay(500);
  }

  else if(secs < 0){
    secs = 59;
    mins = mins - 1;
  }

  else if(mins < 0){
    mins = 59;
    hrs = hrs - 1;
  }

  else
  {
  get_time = true;
  counter();

  lcd.setCursor(0, 0);
  lcd.print("Timer is ON");

  lcd.setCursor(0, 1);
  lcd.print(hrs);
  lcd.print(":");

  lcd.setCursor(4, 1);
  lcd.print(mins);
  lcd.print(":");

  lcd.setCursor(8, 1);
  lcd.print(secs);
  }

  lcd_key = read_LCD_buttons();  // read the buttons

  switch (lcd_key)               // depending on which button was pushed, we perform an action
  {
    // if select button is pressed, move back to set time
   case btnSELECT:
     {
      startTimer = false;
      setTimer = true;
      delay(300);
      lcd.clear();
     break;
     }
   case btnNONE:
     {
     break;
     }
 }
}

// This function will set the time
void set_timer(){
  counter();
  lcd.setCursor(0, 0);
  lcd.print("Set Time");

  lcd.setCursor(0, 1);
  lcd.print("Hrs:");
  lcd.print(hrs);

  lcd.setCursor(8, 1);
  lcd.print("Mins:");
  lcd.print(mins);


 lcd.setCursor(0,1);
 lcd_key = read_LCD_buttons();  // read the buttons

 switch (lcd_key)               // depending on which button was pushed, we perform an action
 {
  // if right button is pressed, then move the cursor to minutes
   case btnRIGHT:
     {
      cursor_pos = set_mins;
     break;
     }
  // if left button is pressed, then move the cursor to hours
   case btnLEFT:
     {
      cursor_pos = set_hrs;
     break;
     }
  // if up button is pressed, add 1 to the minutes or hours
   case btnUP:
     {
      delay(300);
      if(cursor_pos == set_mins){
        mins++;
        if(mins > 59){
          mins = 0;
        }
      }
      else if(cursor_pos == set_hrs){
        hrs++;
        if(hrs > 24){
          hrs = 0;
        }
      }
     break;
     }
   // if down button is pressed, minus 1 from the minutes or hours
   case btnDOWN:
     {
      delay(300);
      if(cursor_pos == set_mins){
        mins--;
        if(mins < 0){
          mins = 60;
        }
      }
      else if(cursor_pos == set_hrs){
        hrs--;
        if(hrs < 0){
          hrs = 24;
        }
      }
     break;
     }
   // if select button is pressed, start the timer
   case btnSELECT:
     {
      startTimer = true;
      setTimer = false;
      mins = mins - 1;
      delay(300);
     break;
     }
   case btnNONE:
     {
     break;
     }
 }
}

void counter() {
 unsigned long currentMillis = millis(); // grab current time

 // check if "interval" time has passed (1000 milliseconds)
 if ((unsigned long)(currentMillis - previousMillis) >= interval) {

  lcd.clear();
  if(get_time == true){
   secs--;
   get_time = false;
  }
   previousMillis = millis();
 }
}
Creating a Kitchen Timer is Only the Beginning!
You have created your own kitchen timer! The best part of this project is the ability to adapt this module to build other projects that require a simple interface between an LCD and a button or buzzer. You can also design custom 3D-printed enclosures for the module and make it your own.