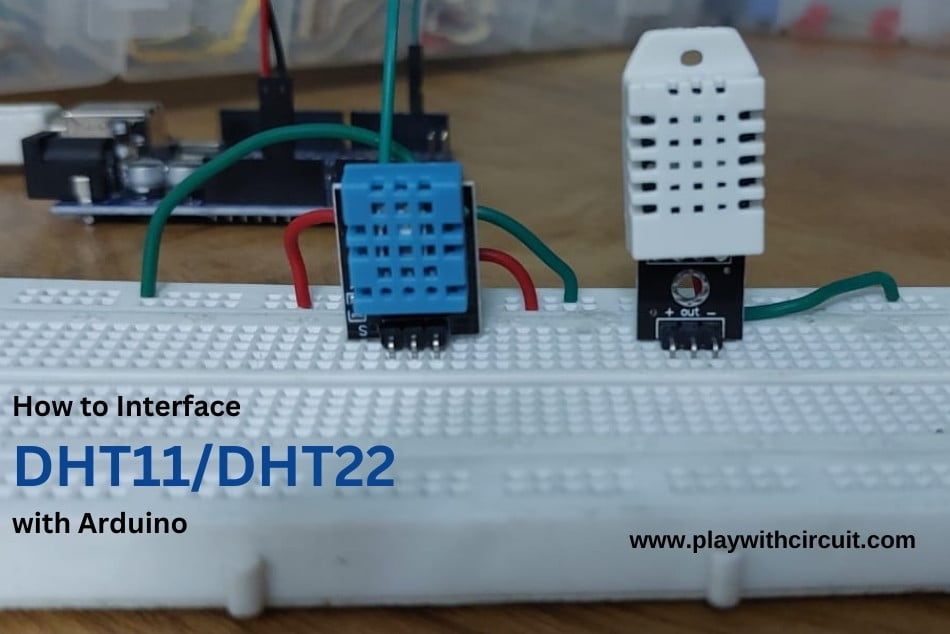
Need to add temperature and humidity sensing to an Arduino project? The DHT11 and DHT22 are two of the simplest sensors to get started with. They combine temperature and humidity measurement in a compact package and communicate with a microcontroller through a single digital data line.
They can be used in projects such as weather stations, plant monitoring systems, indoor climate monitors, and smart-home applications. In this tutorial, we will connect both sensors to an Arduino Uno and look at their working principle, pinout, communication, and wiring.
DHT11 vs DHT22
The DHT11 and DHT22 belong to the same sensor family and have similar pin configurations, but their measurement ranges and accuracy are different.
The DHT11 is the more economical option. It measures temperatures from 0 to 50°C with an accuracy of ±2°C and humidity from 20 to 90% RH with an accuracy of ±5% RH. It is suitable for basic projects where high precision is not essential.
The DHT22 provides a wider measurement range and better accuracy. It can measure temperatures from -40 to 80°C with an accuracy of approximately ±0.5°C. Its humidity measurement range is 0 to 100% RH, with an accuracy of ±2 to ±5% RH depending on the specific model.
The DHT11 has a typical sampling interval of around 2 seconds, while the DHT22 also requires more than 2 seconds between readings. This makes both sensors better suited to applications where environmental conditions change relatively slowly.
For a simple and low-cost Arduino project, the DHT11 is usually sufficient. If you need a wider temperature range or more accurate measurements, the DHT22 is the better choice.
Both sensors are pin-compatible, so the same basic wiring can be used for the DHT11 and DHT22. Only the sensor type needs to be changed in the Arduino program.
How the DHT11 and DHT22 Work
Inside the sensor are a humidity-sensing element, an NTC thermistor for temperature measurement, and an internal IC that processes the sensor signals.
The humidity element changes its electrical characteristics as the surrounding humidity changes. The internal controller measures this change and converts it into a relative humidity value.
Temperature is measured using the NTC thermistor. Its resistance decreases as temperature increases. The internal electronics measure this resistance change and calculate the corresponding temperature.
The processed temperature and humidity values are then transmitted digitally through the sensor's DATA pin.
DHT11/DHT22 Communication with Arduino
The DHT sensors use a single-wire digital communication method. The Arduino initiates communication by sending a start signal to the sensor. The sensor then responds and transmits 40 bits of data.
For the DHT11, the Arduino pulls the DATA line LOW for at least 18 ms and then releases it. The sensor responds with an approximately 80 µs LOW pulse followed by an 80 µs HIGH pulse.
Each data bit begins with a LOW pulse of approximately 50 µs. The length of the following HIGH pulse determines the bit value. A HIGH pulse of about 26–28 µs represents logic 0, while a pulse close to 70 µs represents logic 1.
The 40 transmitted bits are divided into five bytes:
- First byte – Integer part of relative humidity
- Second byte – Decimal part of relative humidity
- Third byte – Integer part of temperature
- Fourth byte – Decimal part of temperature
- Fifth byte – Checksum
The checksum allows the Arduino to verify that the received data is valid.
For example, if the sensor sends:
00100001 00000000 00011010 00000000 00111011
the first four bytes add up to 00111011, which matches the final checksum byte. The corresponding readings are 33% relative humidity and 26°C temperature.
For normal Arduino projects, a DHT library handles these timing and communication details, so you do not have to implement the protocol manually.
DHT11 and DHT22 Pinout
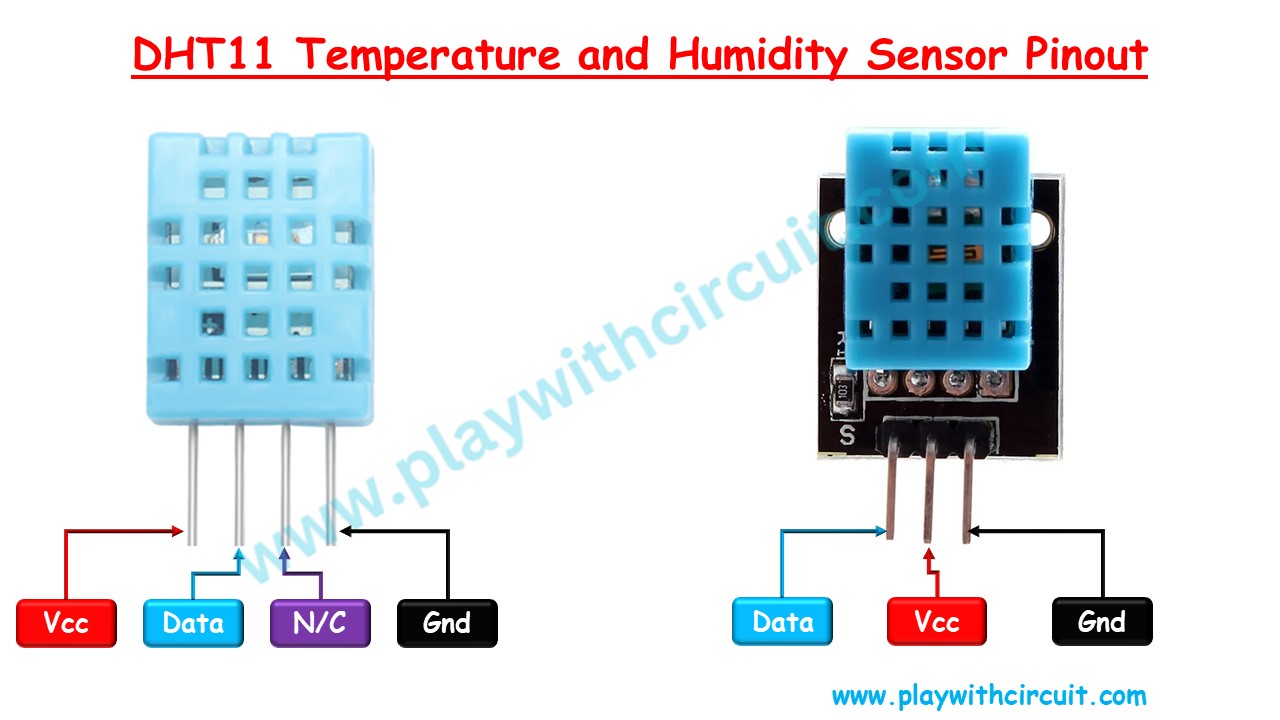
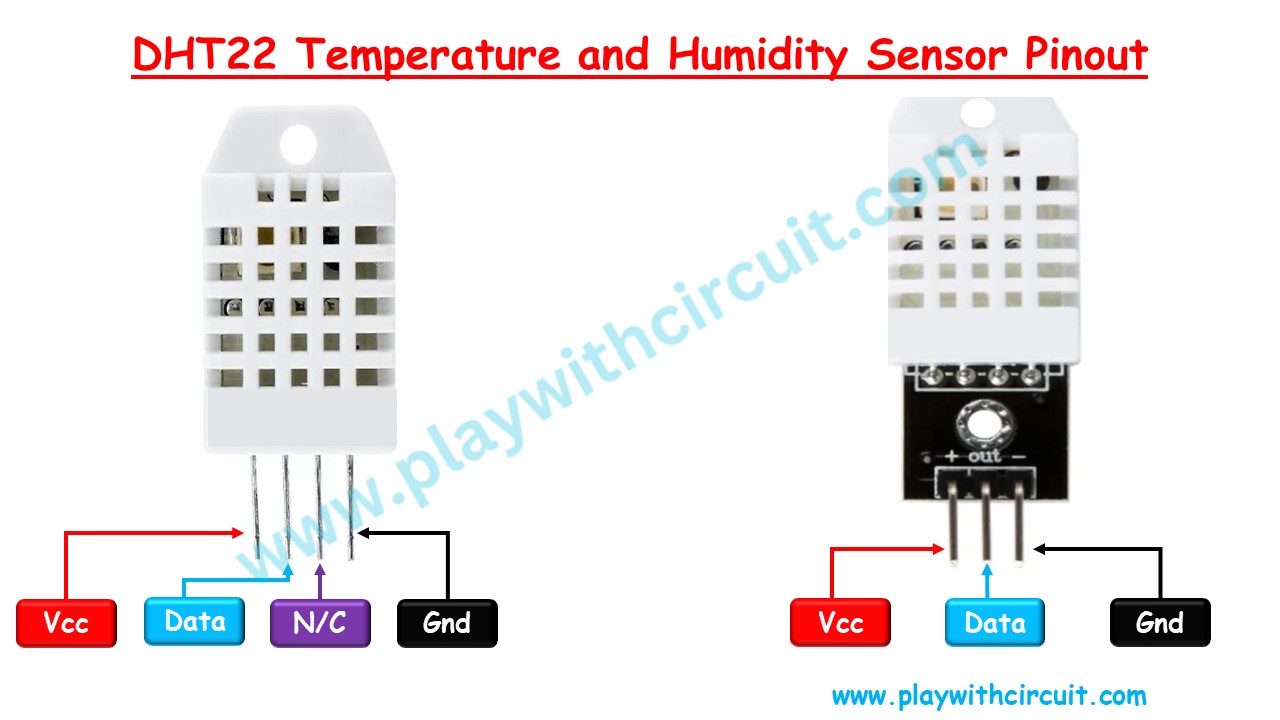
Both sensors have four pins:
- VCC – Power supply
- DATA – Digital communication line
- N/C – Not connected
- GND – Ground
For the DHT11, the VCC pin typically operates from 3.3 to 5.5V. The DHT22 supports approximately 3.3 to 6V.
The DATA pin connects to a digital GPIO pin on the Arduino. A 10kΩ pull-up resistor is used between DATA and VCC to keep the communication line at a stable HIGH level when it is idle.
When using a sensor module rather than the raw sensor, check its PCB pinout before connecting it, as the physical arrangement can vary between manufacturers.
Interfacing DHT11 with Arduino Uno
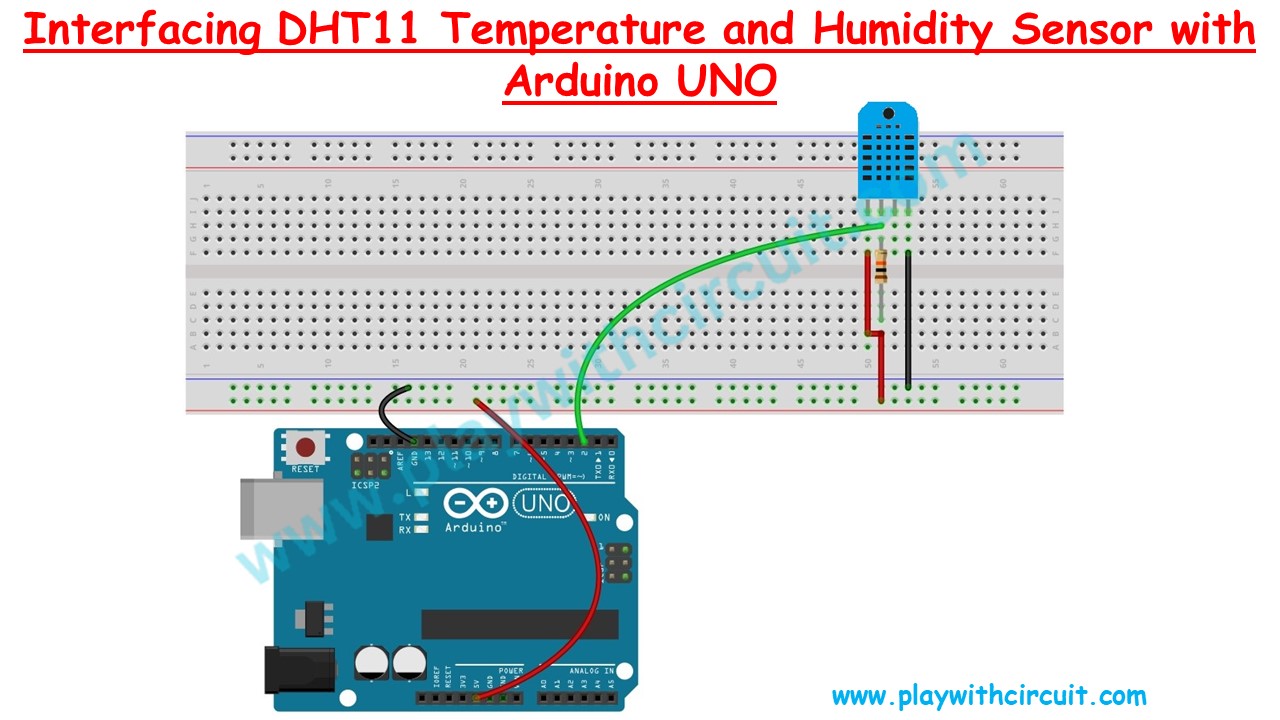
The DHT11 can be connected to an Arduino Uno with only a few connections.
Connect the first pin, VCC, to the 5V pin of the Arduino Uno. Connect the second pin, DATA, to digital pin 2. Place a 10kΩ resistor between the DATA pin and VCC. Leave the third pin, N/C, unconnected, and connect the fourth pin to Arduino GND.
The wiring is therefore:
- DHT11 VCC → Arduino 5V
- DHT11 DATA → Arduino Digital Pin 2
- 10kΩ resistor → Between DATA and VCC
- DHT11 N/C → Not connected
- DHT11 GND → Arduino GND
This simple connection is enough to start collecting temperature and humidity readings.
Interfacing DHT22 with Arduino Uno
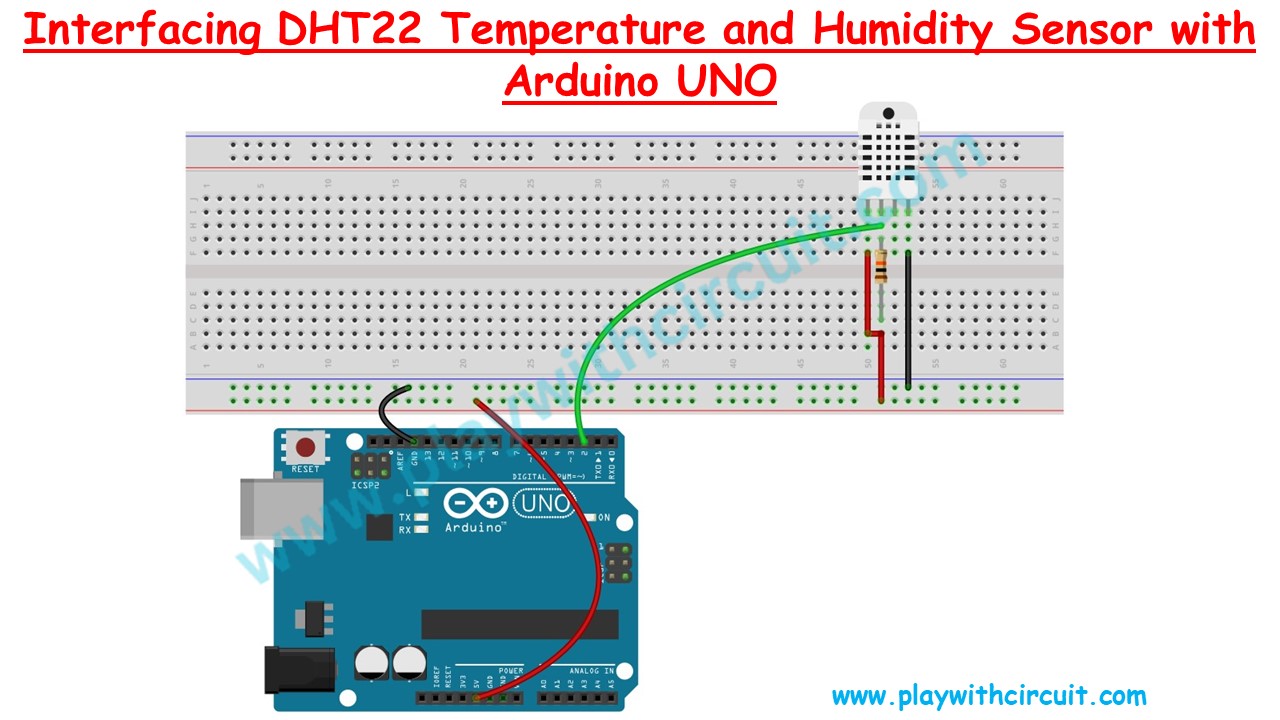
The DHT22 uses essentially the same wiring as the DHT11 because the two sensors are pin-compatible.
Connect the DHT22 VCC to Arduino 5V, DATA to digital pin 2, and GND to Arduino GND. The 10kΩ pull-up resistor should again be connected between DATA and VCC. Leave the N/C pin unconnected.
The connections are:
- DHT22 VCC → Arduino 5V
- DHT22 DATA → Arduino Digital Pin 2
- 10kΩ resistor → Between DATA and VCC
- DHT22 N/C → Not connected
- DHT22 GND → Arduino GND
The communication method is similar for both sensors, although the data format has some differences. When using an Arduino DHT library, you simply specify whether the connected sensor is a DHT11 or DHT22.
Components Required
For this setup, you need an Arduino Uno R3, either a DHT11 or DHT22 sensor, a 10kΩ resistor, a breadboard, and jumper wires.
On the software side, you can use the Arduino IDE together with the Adafruit DHT Sensor Library.
Applications
Once connected to an Arduino, the DHT11 or DHT22 can be used as the environmental sensing element in many maker projects. For example, the sensor can provide data for an Arduino weather station, indoor temperature monitor, plant monitoring system, data logger, or home automation project.
Maker Pro already features several practical Arduino projects using DHT sensors, including weather stations and temperature/humidity monitoring, making these sensors a natural starting point for extending an Arduino project into environmental monitoring.
Conclusion
The DHT11 and DHT22 offer an easy way to add temperature and humidity sensing to an Arduino Uno project. The DHT11 is inexpensive and suitable for basic applications, while the DHT22 provides a wider measurement range and better accuracy.
Both sensors use a similar single-wire interface and the same basic Arduino wiring. With a pull-up resistor on the DATA line and a suitable Arduino library, you can quickly integrate either sensor into a wide range of electronics and environmental-monitoring projects.
For more Arduino, sensor, and embedded electronics tutorials, you can also explore the practical projects published by Play with Circuit.