Learn how to enable communication between the openFrameworks platform and an Arduino.
In this tutorial, we'll be learning how to send and receive data from the openFrameworks toolkit platform using Arduino.
openFrameworks is an open source toolkit for creative coding, written in C++. It can be used to prototype project ideas and capable of producing interesting UI elements, as well as handling the backend computing required for them.
For installing and using the openFrameworks toolkit on various operating systems, you can follow the instructions for both Mac and Linux products through guides on the openFrameworks website.
This guide will cover how to interface Arduino with openFrameworks. For example, when clicking on the output window in the program, it will prompt the connected Arduino to display a message in the window and turn on the connected LED.
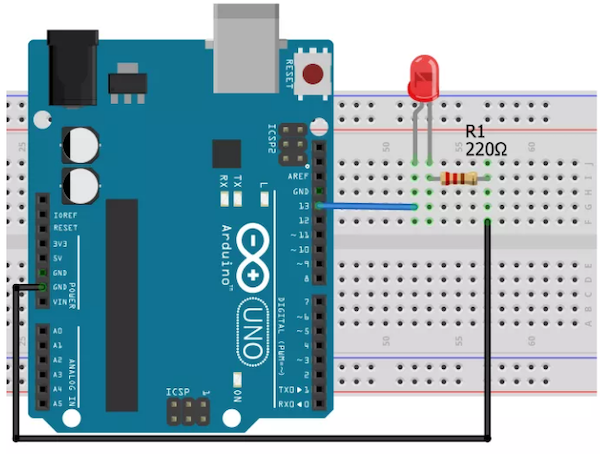
Circuit Diagram
The main challenge in this tutorial is to connect an LED with an Arduino. We do so by connecting the LED's positive side to the Arduino's pin 13 and its negative side to the Arduino's GND through a 220-ohm resistor.
For additional instruction on connecting LEDs to an Arduino, see our How to Control LEDs With an Arduino, IR Sensor, and Remote Guide.
A diagram of an LED connected to an Arduino with a 220 ohm resistor.
Arduino Code
As soon as the Arduino receives data from the openFrameworks platform it will respond with a message.
Upload the below code to the Arduino in order for it to send and receive the data.
Note: Avoid opening the serial monitor, since openFrameworks uses the same COM port.
// Code to send and receive data from openFrameworks
bool ledState = false; // Variable for storing the led state
int ledPin = 13;

void setup() {
  // Start the serial communication
  Serial.begin(9600);
  pinMode(ledPin, OUTPUT);  // Declaring the LED pin as output
}

void loop() {
  if (Serial.available()) { // If there is any data available
    char inByte = Serial.read(); // store the incoming data
    if (inByte == 1) {    // Whether the received data is '1'
      ledState = !ledState; // Change the LED state
      digitalWrite(ledPin, ledState); // Turn the LED
    }

    if (ledState == true) {
      char mystr[10] = "LED is OFF";
      Serial.write(mystr, 10); // send the response in return
    }
    else if (ledState == false) {
      char mystr[10] = "LED is ON ";
      Serial.write(mystr, 10); // send the response in return
    }
  }
}
openFrameworks Code
There are three separate files that contain the openFrameworks code.
The Main.cpp code runs the app and opens the output window.
#include "ofMain.h"
#include "ofApp.h"

//========================================================================
int main( ){

	ofSetupOpenGL(640,480, OF_WINDOW);			// <-------- setup the GL context

	// this kicks off the running of my app
	// can be OF_WINDOW or OF_FULLSCREEN
	// pass in width and height too:
	ofRunApp( new ofApp());

}
The OfApp.cpp file enables the Arduino and openFrameworks to communicate serially with one another.
#include "ofApp.h"

//--------------------------------------------------------------
void ofApp::setup(){
	serialMessage = false;

	serial.listDevices();
	vector <ofSerialDeviceInfo> deviceList = serial.getDeviceList();

	// this should be set to whatever com port your serial device is connected to.
	// (ie, COM4 on a pc, /dev/tty.... on linux, /dev/tty... on a mac)
	// arduino users check in arduino app....
	int baud = 9600;
	serial.setup(0, baud); //open the first device
	//serial.setup("COM10", baud); // windows example
	//serial.setup("/dev/tty.usbserial-A4001JEC", baud); // mac osx example
	//serial.setup("/dev/ttyUSB0", baud); //linux example
}

//--------------------------------------------------------------
void ofApp::update(){
	if (serialMessage) {
		serialMessage = false;
		serial.writeByte(sendData); // sending the data to arduino

		serial.readBytes(receivedData, 10); // Getting the data from Arduino
		printf("receivedData is %d \n", receivedData);	// Printing in ASCII format
	}
}

//--------------------------------------------------------------
void ofApp::draw(){
	ofBackground(0);	// Black background
	ofSetColor(255);	// Text color is white

	string msg;
	msg += "Click to turn LED \n";
	msg += receivedData;
	ofDrawBitmapString(msg, 200, 200); // Write the data on the output window
}

//--------------------------------------------------------------
void ofApp::mousePressed(int x, int y, int button){
	serialMessage = true;
}
In the setup function, the program will search and connect to serial ports.
In the update function, it sends data to the Arduino when the user clicks on the output window.
The Arduino is on standby to receive information so it will respond immediately with a message that the openFrameworks program will then store into an array.
In the draw section, the output window's background color is set to black and the text color to white—which is reflected in how the data sent by the Arduino is formatted in the window.
The OfApp.h file is the segment of code making up the header.
#pragma once

#include "ofMain.h"

class ofApp : public ofBaseApp{

	public:
		void setup();
		void update();
		void draw();
		void mousePressed(int x, int y, int button);

		bool serialMessage;			// a flag for sending serial
		char receivedData[10];		// for storing incoming data
		char sendData = 1;	// for sending data

		ofSerial	serial;
};
How to Run the openFrameworks Program
Create a new project using the openFrameworks project generator (an add-on isn't required for this tutorial's needs), then use the codes above to build it. If the output window looks identical to the one shown below, you'll know the project was successfully implemented.
An openFrameworks output window displaying a message from a connected Arduino.
Clicking inside the output window should switch the LED on and off. The Arduino should also respond to the action by responding with a message that will appear in the window as shown above.