In this article you will learn how to control your DFMini Player MP3 module with Arduino.
Several projects require sound reproduction to add some kind of functionality. Among these projects, we highlight: accessibility for the visually impaired, MP3 music players and the execution of voice sounds by robots, for example.
In all of these systems, we need an MP3 sound reproduction device to connect to the Arduino.
Therefore, in this article we will learn the following points:
- Basic operating circuit of the DFMini Player MP3;
- Organization and configuration of sound files on the memory card;
- Musical control with Arduino.
To create this project you'll use:
Now, we'll learn how to construct the project.
What is the DF Mini Player MP3 Module
The DFMini Player module is a small music player. It is low cost and low power and reproduces sounds stored on a memory card.
Based on this, the module can be controlled via the standalone mode, that is, in this mode, there will only be the DFMini module, a battery to power, the speaker, buttons to control it, and the SD card with the songs.
Another way to control it is to use an Arduino or another control device. The Arduino, for example, will send commands through serial communication with the DFMini Player Module. The DFMini Player module is shown in Figure 1.
Figure 1 - DFMini Player Module.
To control it, it is important to use the basic standalone circuit. This circuit is shown in Figure 2.
Figure 2 - Standalone circuit of DFMini Player Module.
The two buttons shown in the circuit above are used to change the music tracks and control the volume of the sound.
The button connected to pin IO1 is used to go to the previous track and reduce the volume.
With a quick touch the system returns to the previous song, however, if you press the button for more than 1 second, the system will reduce the volume of the song.
The button connected to pin IO2 is used to go to the next track and increase the volume.
With a quick touch the system advances to the next song, however, if you press the button for more than 1 second, the system will increase the volume of the song.
In this standalone method, the songs must be saved on the memory card, as shown in Figure 3.
Figure 3 - Song files in SD Card.
This way, each time the buttons are pressed, the system will play each song in ascending or descending order.
However, when using Arduino or another control device, we must modify the way of organizing the musical files on the SD Card.
Now, I'll explain how to control the DFMini Player using the Arduino through serial communication.
Controlling the DFMini Player with Arduino
In this step, the volume control, range control, equalization commands and other features will be sent by Arduino.
The Arduino must communicate via the serial with the DFMini Player and send the control commands. The electronic scheme of the control circuit is shown in Figure 4.
Figure 4 - Electronic Schematic with Arduino.
First, we must assemble the circuit shown in the Figure below.
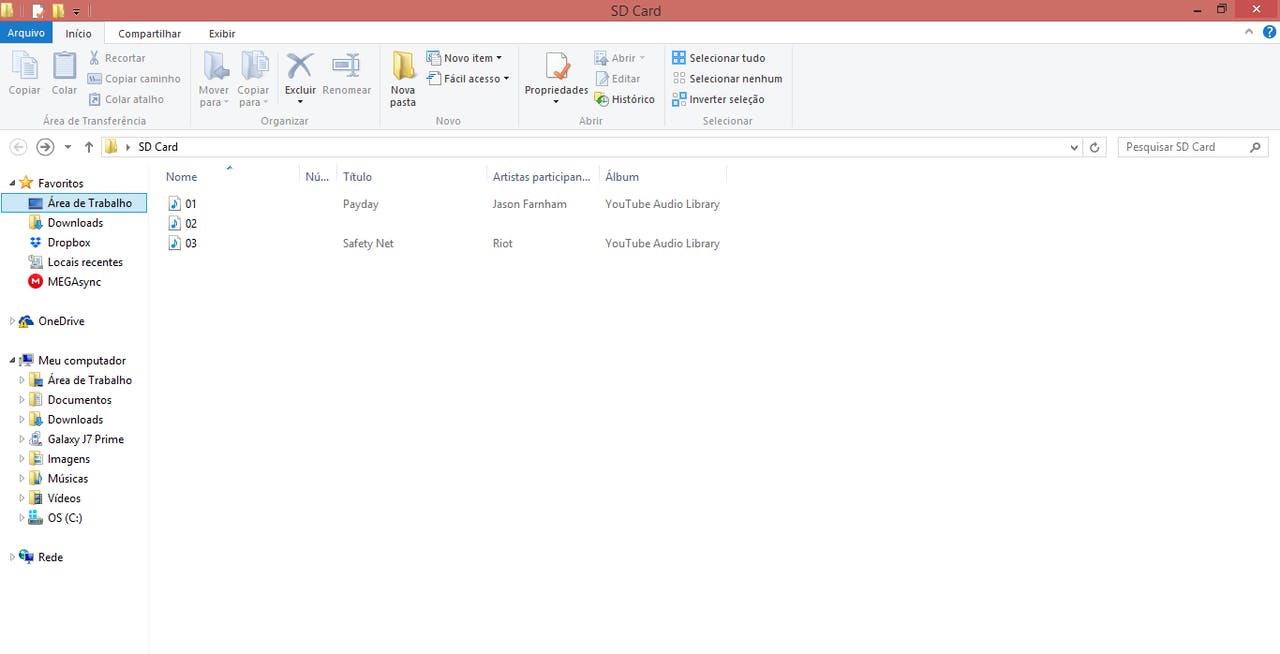
After assembling this circuit, you must add the songs on your memory card. In this step, the songs should be renamed as 01, 02, 03, for example.
You cannot leave the songs with their names, as there will be a problem when the Arduino sends the command to execute the specific track. Therefore, you must configure as shown below.
Figure 5 - Songs named by number.
After naming the files, write the following code on your Arduino.
#include "SoftwareSerial.h"
#include "DFRobotDFPlayerMini.h"

//Inicia a serial por software nos pinos 10 e 11
SoftwareSerial mySoftwareSerial(10, 11); // RX, TX
DFRobotDFPlayerMini myDFPlayer;
char command;
int pausa = 0;

void setup()
{
//Comunicacao serial com o modulo
mySoftwareSerial.begin(9600);
//Inicializa a serial do Arduino
Serial.begin(115200);
//Verifica se o modulo esta respondendo e se o
//cartao SD foi encontrado
Serial.println();
Serial.println(F("DFRobot DFPlayer Mini"));
Serial.println(F("Initializing DFPlayer module ... Wait!"));

if (!myDFPlayer.begin(mySoftwareSerial))
{
Serial.println(F("Not initialized:"));
Serial.println(F("1. Check the DFPlayer Mini connections"));
Serial.println(F("2. Insert an SD card"));
while (true);
}

Serial.println();
Serial.println(F("DFPlayer Mini module initialized!"));

//Definicoes iniciais
myDFPlayer.setTimeOut(500); //Timeout serial 500ms
myDFPlayer.volume(5); //Volume 5
myDFPlayer.EQ(0); //Equalizacao normal
menu_opcoes();
}

void loop()
{

//Waits for data entry via serial
while (Serial.available() > 0)
{
command = Serial.read();

if ((command >= '1') && (command <= '9'))
{
Serial.print("Music reproduction");
Serial.println(command);
command = command - 48;
myDFPlayer.play(command);
menu_opcoes();
}

//Reproduction
//Stop

if (command == 's')
{
myDFPlayer.stop();
Serial.println("Music Stopped!");
menu_opcoes();
}

//Pausa/Continua a musica
if (command == 'p')
{
pausa = !pausa;
if (pausa == 0)
{
Serial.println("Continue...");
myDFPlayer.start();
}

if (pausa == 1)
{
Serial.println("Music Paused!");
myDFPlayer.pause();
}

menu_opcoes();
}


//Increases volume
if (command == '+')
{
myDFPlayer.volumeUp();
Serial.print("Current volume:");
Serial.println(myDFPlayer.readVolume());
menu_opcoes();
}

if (command == '<')
{
myDFPlayer.previous();
Serial.println("Previous:");
Serial.print("Current track:");
Serial.println(myDFPlayer.readCurrentFileNumber()-1);
menu_opcoes();
}

if (command == '>')
{
myDFPlayer.next();
Serial.println("next:");
Serial.print("Current track:");
Serial.println(myDFPlayer.readCurrentFileNumber()+1);
menu_opcoes();
}

//Decreases volume
if (command == '-')
{
myDFPlayer.volumeDown();
Serial.print("Current Volume:");
Serial.println(myDFPlayer.readVolume());
menu_opcoes();
}

}
}

void menu_opcoes()
{
Serial.println();
Serial.println(F("=================================================================================================================================="));
Serial.println(F("Commands:"));
Serial.println(F(" [1-3] To select the MP3 file"));
Serial.println(F(" [s] stopping reproduction"));
Serial.println(F(" [p] pause/continue music"));
Serial.println(F(" [+ or -] increases or decreases the volume"));
Serial.println(F(" [< or >] forwards or backwards the track"));
Serial.println();
Serial.println(F("================================================================================================================================="));
}
The code presented above is quite simple and will help you to select the song by its number, stop, pause, control the volume and pass the tracks.
The musical control consists of sending data from the Arduino IDE serial to our Arduino board.
Initially, the system makes the configuration in the setup and checks if the SD Card is inserted in the module. If it is not inserted, the system presents a message to alert the user.
In addition, the system displays messages with system configuration options.
void setup()
{
//Comunicacao serial com o modulo
mySoftwareSerial.begin(9600);
//Inicializa a serial do Arduino
Serial.begin(115200);
//Verifica se o modulo esta respondendo e se o
//cartao SD foi encontrado
Serial.println();
Serial.println(F("DFRobot DFPlayer Mini"));
Serial.println(F("Initializing DFPlayer module ... Wait!"));

if (!myDFPlayer.begin(mySoftwareSerial))
{
Serial.println(F("Not initialized:"));
Serial.println(F("1. Check the DFPlayer Mini connections"));
Serial.println(F("2. Insert an SD card"));
while (true);
}

Serial.println();
Serial.println(F("DFPlayer Mini module initialized!"));

//Definicoes iniciais
myDFPlayer.setTimeOut(500); //Timeout serial 500ms
myDFPlayer.volume(5); //Volume 5
myDFPlayer.EQ(0); //Equalizacao normal
menu_opcoes();
}
If the memory card is inserted, the code flow will enter the loop function.
void loop()
{

//Waits for data entry via serial
while (Serial.available() > 0)
{
command = Serial.read();

if ((command >= '1') && (command <= '3'))
{
Serial.print("Music reproduction");
Serial.println(command);
command = command - 48;
myDFPlayer.play(command);
menu_opcoes();
}

//Reproduction
//Stop

if (command == 's')
{
myDFPlayer.stop();
Serial.println("Music Stopped!");
menu_opcoes();
}

//Pausa/Continua a musica
if (command == 'p')
{
pausa = !pausa;
if (pausa == 0)
{
Serial.println("Continue...");
myDFPlayer.start();
}

if (pausa == 1)
{
Serial.println("Music Paused!");
myDFPlayer.pause();
}

menu_opcoes();
}


//Increases volume
if (command == '+')
{
myDFPlayer.volumeUp();
Serial.print("Current volume:");
Serial.println(myDFPlayer.readVolume());
menu_opcoes();
}

if (command == '<')
{
myDFPlayer.previous();
Serial.println("Previous:");
Serial.print("Current track:");
Serial.println(myDFPlayer.readCurrentFileNumber()-1);
menu_opcoes();
}

if (command == '>')
{
myDFPlayer.next();
Serial.println("next:");
Serial.print("Current track:");
Serial.println(myDFPlayer.readCurrentFileNumber()+1);
menu_opcoes();
}

//Decreases volume
if (command == '-')
{
myDFPlayer.volumeDown();
Serial.print("Current Volume:");
Serial.println(myDFPlayer.readVolume());
menu_opcoes();
}

}
}
The user can send the following control characters:
- Numbers 1 to 3: Select the song to be played;
- Letter s: Stop the song;
- Letter p: Pause the song;
- Send the + sign: Increase the song volume;
- Send the - signal: Decrease the song volume;
- Send the signal <: Select the previous song;
- Send the signal >: Select the next song;
From these signals, letters, and numbers, the Arduino will receive them via the serial and will control the music to be played.
Each condition is presented below and internally, with its respective commands.
if ((command >= '1') && (command <= '3'))
{
Serial.print("Music reproduction");
Serial.println(command);
command = command - 48;
myDFPlayer.play(command);
menu_opcoes();
}

//Reproduction
//Stop

if (command == 's')
{
myDFPlayer.stop();
Serial.println("Music Stopped!");
menu_opcoes();
}

//Pausa/Continua a musica
if (command == 'p')
{
pausa = !pausa;
if (pausa == 0)
{
Serial.println("Continue...");
myDFPlayer.start();
}

if (pausa == 1)
{
Serial.println("Music Paused!");
myDFPlayer.pause();
}

menu_opcoes();
}


//Increases volume
if (command == '+')
{
myDFPlayer.volumeUp();
Serial.print("Current volume:");
Serial.println(myDFPlayer.readVolume());
menu_opcoes();
}

if (command == '<')
{
myDFPlayer.previous();
Serial.println("Previous:");
Serial.print("Current track:");
Serial.println(myDFPlayer.readCurrentFileNumber()-1);
menu_opcoes();
}

if (command == '>')
{
myDFPlayer.next();
Serial.println("next:");
Serial.print("Current track:");
Serial.println(myDFPlayer.readCurrentFileNumber()+1);
menu_opcoes();
}

//Decreases volume
if (command == '-')
{
myDFPlayer.volumeDown();
Serial.print("Current Volume:");
Serial.println(myDFPlayer.readVolume());
menu_opcoes();
}

}
So, if you applied all the steps presented, you were able to learn:
- Basic operating circuit of the DFMini Player MP3;
- Organization and configuration of sound files on the memory card;
- Musical control with Arduino.
From this code, you are able to develop other projects that need to use sound as system functionality.
Acknowledgements
To finish, we thank you for your reading and the support of PCBWAY in the production of this article for you.
The Silícios Lab thanks UTSOURCE for the electronic components used to construct the project.