How to Simulate Arduino online?? - Answered with a Blink an LED example and a free Arduino Simulator from Wokwi!
Step by step procedure to connect Arduino UNO to an LED on an Arduino Simulator. You will learn how to connect the parts, write the code and simulate your Arduino project online! Updated with features until Jan 2022
This article is about Virtual Arduino Simulator
The wish is to release a series of articles/projects. The plan is to use a free Arduino simulator during the course so that everybody can learn to program for free. We will use a free online Arduino simulator from Wokwi.
Here is the link to the free Arduino Simulator: https://wokwi.com
A quick introduction to Wokwi Arduino Simulator
There are several Arduino simulators that will assist in learning Arduino programming. Wokwi Arduino simulator is
- Free
- browser-based ( no installation, no downloads!)
- Supports several boards (ESP32, UNO, Mega, Nano, ATtiny85, Franzzininho, Raspberry Pi Pico etc.)
- Easy to share the projects with others (it will be just a link, anybody can open the project from any other location if they have the link (and the link is set to public)
- Several sensors are supported - Humidity sensors, analog and digital temperature sensors, PIR sensor, Motion sensor etc.
- Several displays - NeoPixels, OLED, LCD, 7 segment, smart LEDs and more
How to use Wokwi Arduino Simulator?
STEP 1:
Visit the main page https://wokwi.com ?
STEP 2:
navigate to the "Start a New Project" section ⛳
STEP 3:
In this example, we will use Arduino UNO (to create blink an LED project). So, click on Arduino UNO.
STEP 4:
Wait for the new project window to open.
STEP 5:
You can see the view of the new project window. This is an empty /blank template for the Arduino UNO project. You can now see an Arduino UNO board. No other connections are there.
Wokwi Arduino simulator - Blank Arduino UNO project
You will find more details about each block in the Wokwi Arduino Simulator. Feel free to leave comments if you have any questions or suggestions.
Arduino Simulator - parts of the simulator labelled
- Sketch - Here is where we write the Arduino code. You can copy and paste the code as well here. The editor is smart with a lot of options such as syntax highlighting, auto-complete, formatting etc.
- Share - You can share the project with others using the Share button. Clicking on this button will generate and allow you to copy the link! Sharing is easy!☘
- Save - Don't forget to save your work, time to time! Click on this button will save the project.?
- Add part button - Add the favourite parts here.
- Docs section - Clicking here will take you to the bible :) The manual of the Wokwi Arduino Simulator, and most of the parts. it is a running document.?
- Sign-in option - logging in is not mandatory but if you log in, you will save the projects and recall them in the future. You can log in via google, GitHub or even simple email.
- Simulator window - All the action takes place here. Here is where the parts you had placed will appear. You can the connections using wires here, in the simulator window. ?♀️
- Editor Window - Edit your code. play with it. do changes, see the results instantly.. all editing happens in this window??
STEP 6:
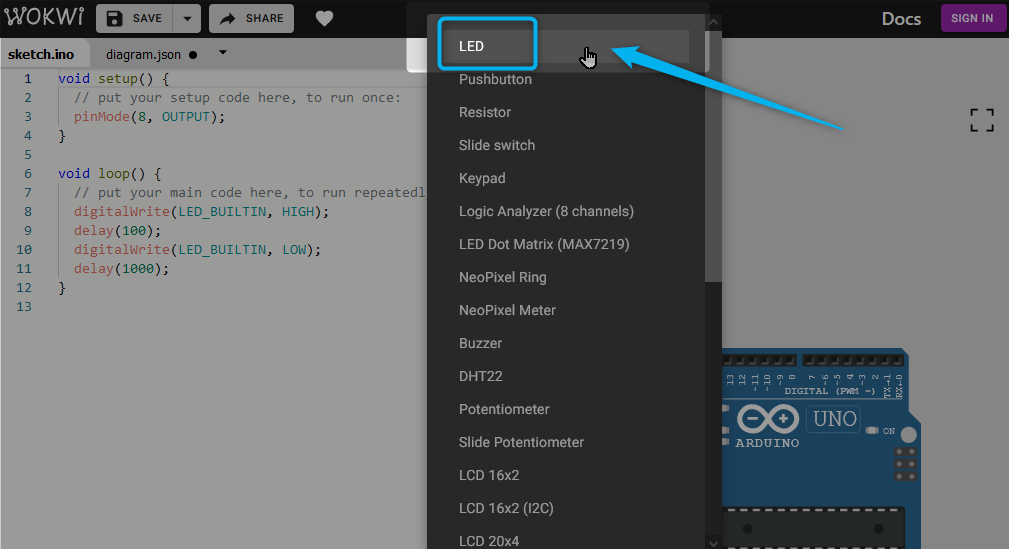
We will now continue building our first project. In the new black project window, click on the purple icon to add an LED
Inserting new part on Wokwi Arduino Simulator
Click on the LED option. Now you can see that you have placed an LED in the simulator window ?
part adding option in Wokwi Arduino Simulator
STEP 7:
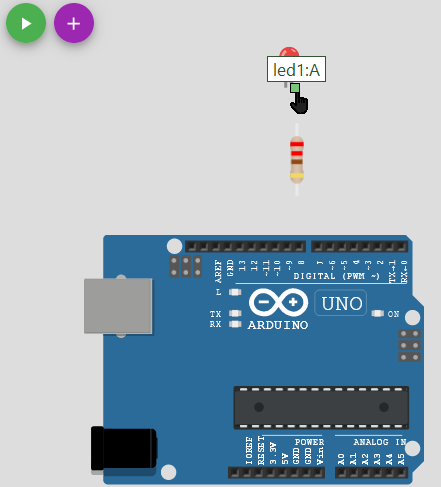
Now you can go ahead and the Resistor part as well (Resistor is needed to limit the current, without the resistor, the LED may burn out due to heating).
STEP 8:
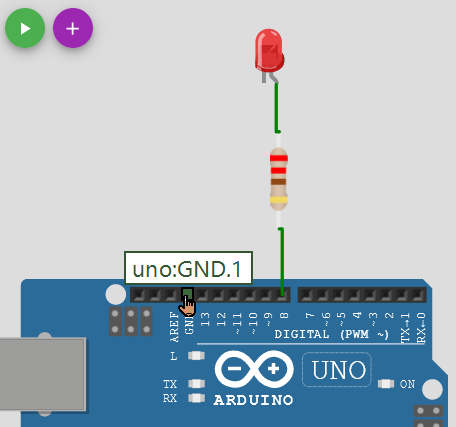
Use your mouse to draw wires. Go to the LED and point to the LED pin. you will see that the connection point gets highlighted. Click on it. you can now click on the destination pin to complete the wire operation.
Add the resistor component
Wokwi Arduino simulator showing added LED and Resistor - you can move the components by clicking on them and dragging them to the desired position.
Connect the other end of the wire to the resistor
same way, complete the connection (ground and LED cathode)
The circuit looks okay. How about yours?
STEP 9:
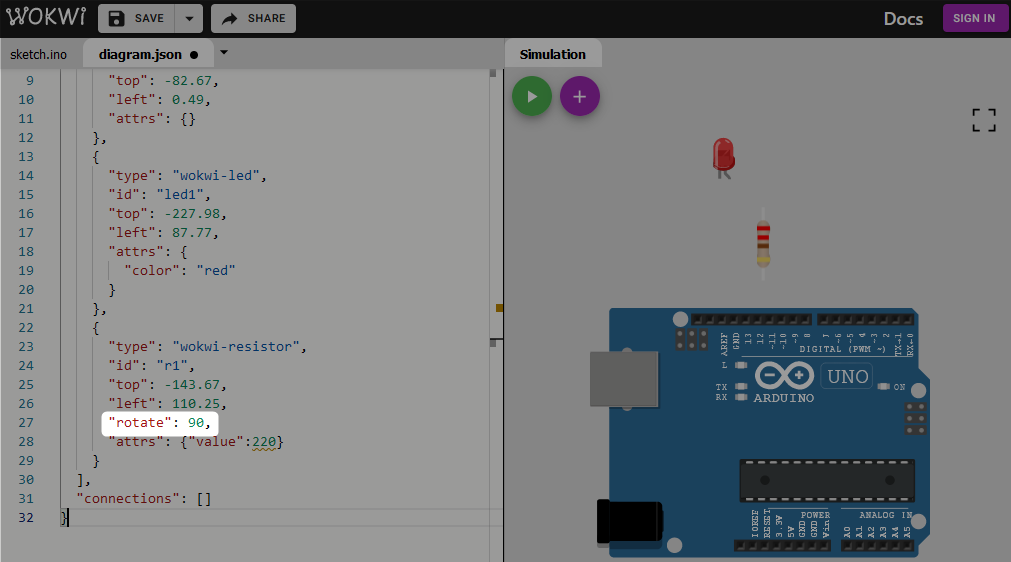
You may not be pleased with one colour of wires. You can change the colour of the wires. Head to the diagram .json file and change the colour⚫???????. The below picture will give an easy hint. You will also know how to change the resistor value.
Wokwi Arduino Simulator - Changing the wire colours
You can change the resistor value here. In the Wokwi Arduino simulator, the analog simulation is not done. The resistor is for representation only.
STEP 10:
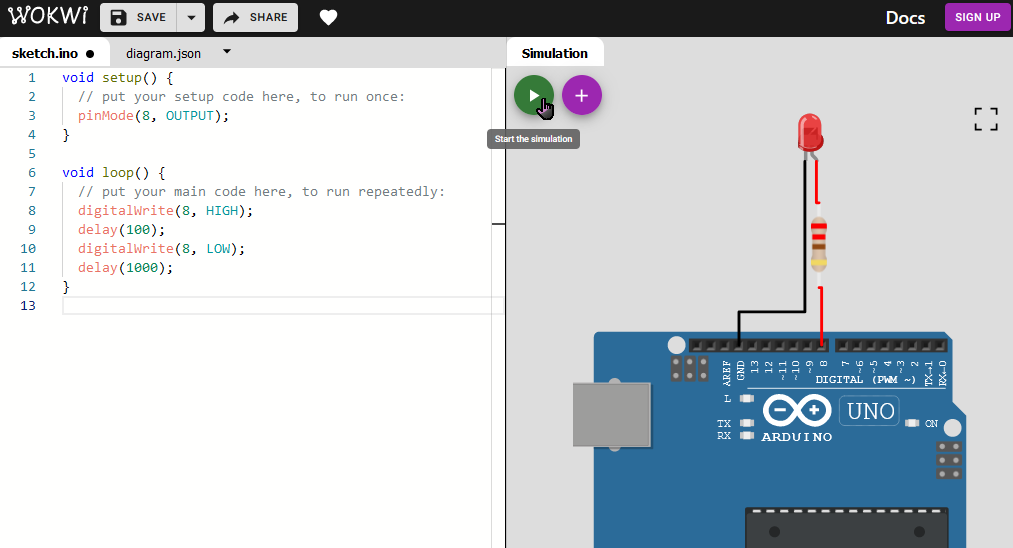
It is time to write your code. Either you can type it all out or copy-paste it from the intenet. We will use the basic blink example. The code is now pasted in the below image
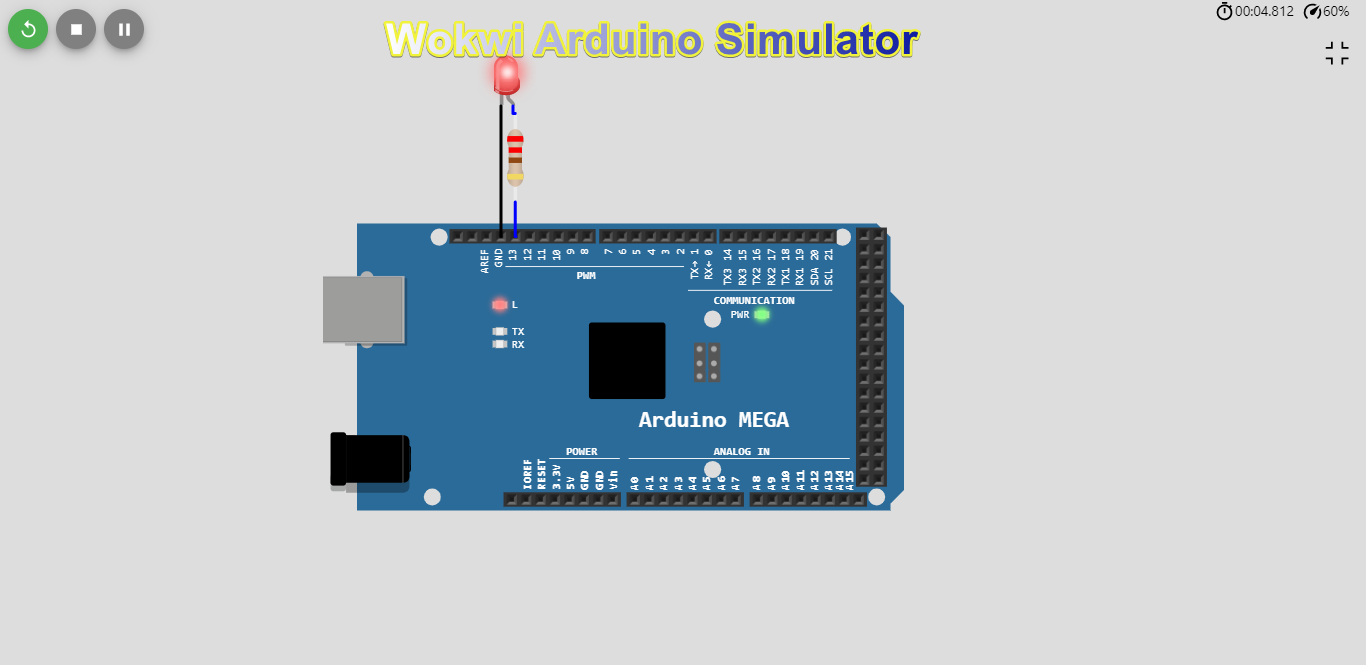
Click on the green button to start the simulation!
Wokwi Arduino simulator in action
Summary
I hope, in this section, you learnt about the Wokwi Arduino simulator and step by step way to build a simple LED blink project.
Please show your support by clicking on the Like ? button. ?
Also, leave your constructive comments to make the article as well the Wokwi Arduino simulator a better Arduino simulator tool.
You can find a cool ? community on Discord. Feel free to hop on and share your thoughts. questions or projects!
Thanks a lot and see you next time!