The rotary encoder supports the user to interact with the system and in this project, we interface it with Arduino.
The rotary encoder supports the user to interact with the system and in this project, we interface it with Arduino.
About the Project
A Rotary Encoder basically is an electromechanical transducer that converts mechanical movements into electronic pulses. It contains a knob which when moves step by step and generates a sequence of pulse trains with a predefined width
The various types of encoders are rated depends upon the Output signal and sensing technology. The Encoder utilized here is an Incremental type of Encoder.
Rotary Encoder with Arduino
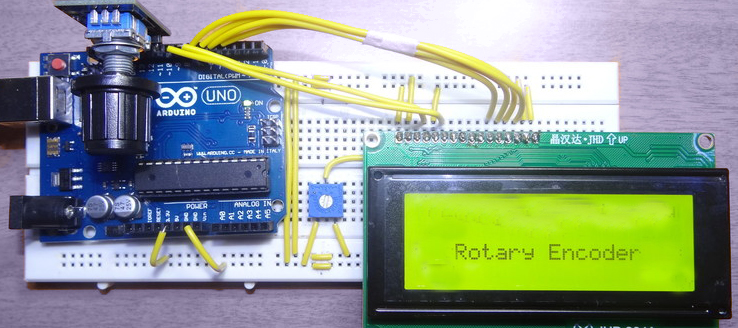
Once the hardware is ready, you need to just upload the code to the Arduino board and power up the Arduino Board. Power it with the help of the USB cable or a 12V adapter. When it gets powered the LCD should display the message and then get blank. Then rotate the rotary encoder and you can see the value start incremented or decremented depends on the direction you rotate. You can see the below image.
And when the button is pressed, the second line will display that the button is pressed.
/*
*
*
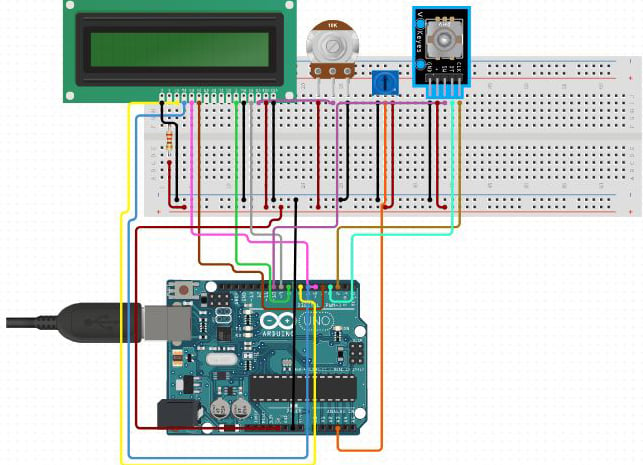
* Power LCD and Rotary encoder from the +5V pin of Arduino
* LCD RS -> pin 7
* LCD EN -> pin 6
* LCD D4 -> pin 5
* LCD D5 -> pin 4
* LCD D6 -> pin 3
* LCD D7 -> pin 2
* Encoder Switch -> pin 10
* Encoder Output A -> pin 9
* Encoder Output B -> pin 8
*/
int Encoder_OuputA = 9;
int Encoder_OuputB = 8;
int Encoder_Switch = 10;
int Previous_Output;
int Encoder_Count;
#include <LiquidCrystal.h> //Default Arduino LCD Librarey is included
const int rs = 7, en = 6, d4 = 5, d5 = 4, d6 = 3, d7 = 2; //Mention the pin number for LCD connection
LiquidCrystal lcd(rs, en, d4, d5, d6, d7);
void setup() {
lcd.begin(16, 2); //Initialise 16*2 LCD
lcd.print(" Rotary Encoder "); //Intro Message line 1
lcd.setCursor(0, 1);
lcd.print(" With Arduino "); //Intro Message line 2
delay(2000);
lcd.clear();
//pin Mode declaration
pinMode (Encoder_OuputA, INPUT);
pinMode (Encoder_OuputB, INPUT);
pinMode (Encoder_Switch, INPUT);
Previous_Output = digitalRead(Encoder_OuputA); //Read the inital value of Output A
}
void loop() {
//aVal = digitalRead(pinA);
if (digitalRead(Encoder_OuputA) != Previous_Output)
{
if (digitalRead(Encoder_OuputB) != Previous_Output)
{
Encoder_Count ++;
lcd.clear();
lcd.print(Encoder_Count);
lcd.setCursor(0, 1);
lcd.print("Clockwise");
}
else
{
Encoder_Count--;
lcd.clear();
lcd.print(Encoder_Count);
lcd.setCursor(0, 1);
lcd.print("Anti - Clockwise");
}
}
Previous_Output = digitalRead(Encoder_OuputA);
if (digitalRead(Encoder_Switch) == 0)
{
lcd.clear();
lcd.setCursor(0, 1);
lcd.print("Switch pressed");
}
}