Learn to build an Arduino-based clock with an RTC IC that voices out the time and date on demand!
In this tutorial, we will build a real-time Arduino-based clock that will speak out the time and date when a button is pressed. The idea is to create a way for sensor data from the Arduino to be spoken out via a smartphone, and I am using an RTC module as an example. It can be a nice tutorial for designing around IoT and sensor applications for the visually impaired where data can be monitored via audio.
Using an RTC IC
We will deploy a real time clock (RTC) IC instead of using an ordinary 555 timer IC. The RTC keeps track of the time even without power. It has a built-in circuit for sensing power which keeps track of power failures and automatically switches to the backup supply.
In the case of an Arduino, the internal clock resets when it is restarted or unplugged. It loses track of the time and the clock resets to zero and starts counting from zero upon power-up. Therefore, in order to synchronize the Arduino’s internal clock with the real clock even when it has no power, we use the RTC.
We will interface the Arduino and RTC to send the data to a smartphone using a Bluetooth module which allows data to be spoken out via a text-to-speech application.
Required Hardware
- Arduino UNO
- DS1307 RTC Module
- Breadboard
- Connecting wires
- Power supply
- Pushbutton
- HC-05 Bluetooth module
Required Software
- Arduino IDE
- Arduino Bluetooth Text-to-Speech Application
The DS-1307 RTC Module
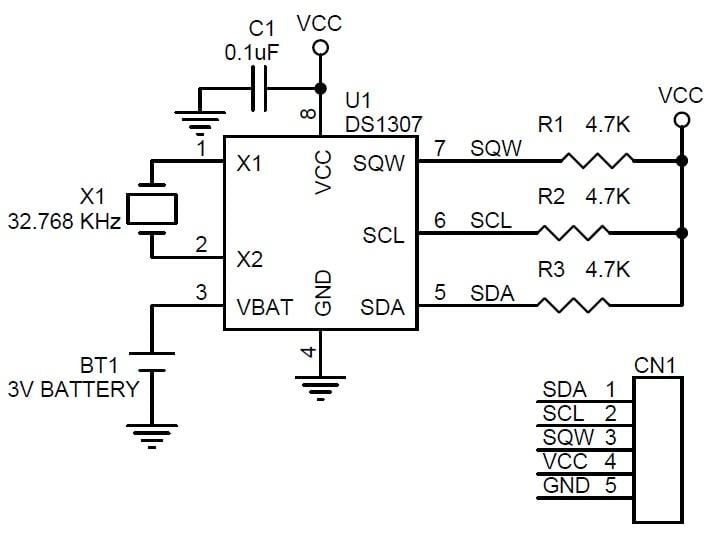
The DS1307 is a real time clock (RTC) that has eight pins and uses an I2C interface. It is a low power clock with 56-byte of battery backup SRAM. The clock gives seconds, minutes, hours, day, month, and year qualified data. The end date of each month adjusts automatically, including those months having less than 31 days.
Figure 1: Schematic Diagram of RTC
Interfacing the RTC to Arduino
The RTClib is a lightweight library used to determine the date and time for an Arduino and can be downloaded from GitHub.
The RTC IC keeps track of the current real time which can be used to program actions at a given time. A crystal oscillator is used in most of the RTC ICs with a frequency of 32.768 kHz (same frequency used in quartz clocks and watches). This frequency is equal to 2^15 cycles per second.
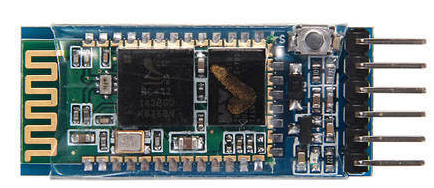
HC-05 Bluetooth Module
The Bluetooth HC-05 module is an easy-to-use component that utilizes the serial port protocol (SSP). It is designed to set up transparent wireless serial connections.
This module is Bluetooth V2+EDR (enhanced data rate), and has a 3 Mbps modulation along with 2.4GHz radio transceiver and baseband. It uses a bluecore-external single chip Bluetooth device based on CMOS technology and employs the adaptive frequency hopping (AFH) feature. Its footprint is as tiny as 12.7mm x 27mm.
Interfacing the HC-05 with Arduino Using SerialSoftware.h
The SoftwareSerial library was developed to enable serial communication on the (other digital) pins of the Arduino using the software to reproduce the functionality of a serial port, hence its name ‘SoftwareSerial’. It is also possible to have more than one software serial port with speeds up to 115200 bps.
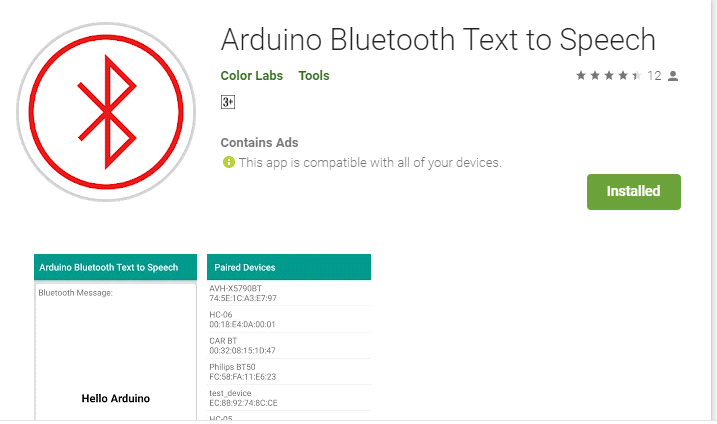
Setting Up the Arduino Bluetooth Text-to-Speech Application
This smartphone app receives text messages via Bluetooth from a paired Bluetooth device, i.e., our Arduino board with an HC-05 module. It then converts the received text into speech.
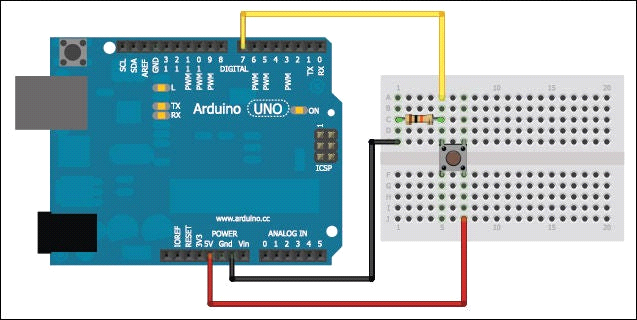
Configuring the Pushbutton
The pushbutton is attached via a 10k-ohm resistor, known as a pull-down resistor, from ground to the switch pin connecting to the Arduino. It connects the pin to the ground when the switch is open, so it reads LOW when there is no voltage coming in through the switch.
When the pushbutton is pressed, the button state is set to HIGH and the audio signal is configured via Bluetooth. As soon as the button is released i.e. button state goes to LOW and the circuit breaks.
Here is the circuit diagram showing the pushbutton and 10k-ohm resistor’s placement.
Assembling the Hardware
Let’s connect the individual components and modules explained above to the Arduino UNO as shown in the following Fritzing diagram.
Figure 2 Arduino Uno Board
Figure 3 RTC Module with Cell Battery
Figure 4 HC-05 Bluetooth Module
The Arduino Bluetooth Text-to-Speech Interface
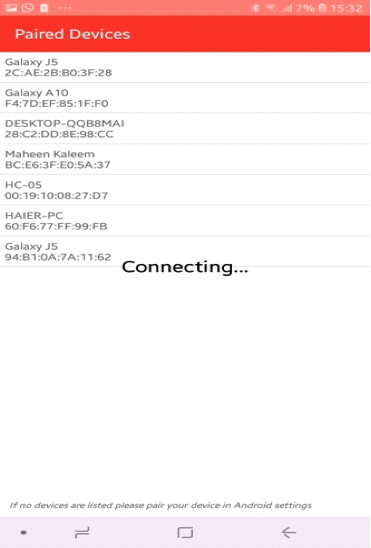
Upload the code for Arduino from the bottom of this article. Once uploaded, open your phone’s Bluetooth setting and search for Bluetooth devices. In the list of available Bluetooth devices, pair your phone with the device name HC-05 using the passcode 1234 or 0000. Then open the Arduino Bluetooth text-to-speech app. It will show you the list of paired devices. Select HC-05 as shown in pictures below.
If you press the push button, the app will speak and show the current time and date. The voice pitch and speed can also be controlled within the app.
Full Project Code
#include <Wire.h>
#include <SoftwareSerial.h>
#include "RTClib.h"

//bluetooth variable
SoftwareSerial BT(10,11);

RTC_DS1307 rtc;

//pushbutton declaration
int buttonPin = 7;
int buttonState = 0;
boolean on=false;

char daysOfTheWeek[7][12] = {"Sunday", "Monday", "Tuesday", "Wednesday", "Thursday", "Friday", "Saturday"};
char monthsOfTheYear[13][12] = {"m","January", "February", "March", "April", "May", "June", "July", "August", "September", "October", "November", "December"};
void setup ()
{
 while (!Serial); // for Leonardo/Micro/Zero
 Serial.begin(9600);
 Wire.begin();
 rtc.begin();
 BT.begin(9600);
 if (! rtc.begin())
 {
   Serial.println("Couldn't find RTC");
   while (1);
 }
 if (! rtc.isrunning())
 {
   Serial.println("RTC is NOT running!");
 }
// This line sets the RTC with an explicit date & time, for example to set
// rtc.adjust(DateTime(2020, 1, 21, 19, 47, 36));
 pinMode(buttonPin, INPUT);

 //testing serial monitor
 Serial.print("Date: ");
 Serial.print(__DATE__);
 Serial.print('\n');
 Serial.print("Time: ");
 Serial.print(__TIME__);

}
void loop () {

  buttonState = digitalRead(buttonPin);
  DateTime now = rtc.now();
  if(buttonState == HIGH)
  {
    //Serial.print('test');
      on=true;
      if(on == true)
      {
         digitalWrite(buttonPin, HIGH);
         delay(4000);
         BT.println("Today is");
         delay(3000);
         BT.println(monthsOfTheYear[now.month()]);
         delay(1000);
         BT.println(now.day());
         delay(1000);
         BT.println(now.year());
         delay(3000);
         BT.println("Time in 24 hour clock is");
         delay(3000);
         BT.println(now.hour());
         delay(1000);
         BT.println("hours");
         delay(3000);
         BT.println(now.minute());
         delay(1000);
         BT.println("minutes");
         delay(3000);
         BT.println(now.second());
         delay(1000);
         BT.println("seconds");

      }
  }
  else if (buttonState == LOW)
  {
    digitalWrite(buttonPin, LOW);
  }
  delay(800);
}