Learn how to utilize your Arduino's internal EEPROM and how you can add extra memory to permanently store data.
Some Arduino boards allow you to permanently store data in an EEPROM without having to keep the board plugged in. This article will teach you how to write to the onboard EEPROM (if your Arduino has one) and introduce you to an alternative method which allows you to use external memory.
You can use this guide for any microcontroller that supports communicating over the I2C bus.
Supported Arduino Boards
The following table lists how much data each MCU can store:
Interfacing the Built-in EEPROM
EEPROM stands for Electronically Erasable Programmable Read-Only Memory. While you can overwrite the data on the chip, you can only do so a limited number of times before it might start malfunctioning. However, you can read from it as many times as you want.
The Write() Method
The following example illustrates how you can store a byte.
#include <EEPROM.h>

void setup()
{
    int word_address = 0;

    EEPROM.write(word_address, 0x7F);
}

void loop()
{ }
Use the write() method together with a word address and the value you want to store. The address has to be a value between zero and EEPROM.length()-1 and it tells the MCU where to store the value.
The read() Method
The following example reads a byte from the EEPROM:
#include <EEPROM.h>

void setup()
{
    Serial.begin(9600);

    int word_address = 0;
    byte value;

    value = EEPROM.read(word_address);

    Serial.println(value, HEX);
}

void loop()
{ }
The read() -method will also take an address as a parameter and return the value as a byte.
Clearing the Memory
To clear the memory, store a zero at each position of the EEPROM:
void erase(void)
{
    for (int i = 0 ; i < EEPROM.length() ; i++)
        EEPROM.write(i, 0);
}
A "Hello World" Example
The following code will clear the EEPROM and then store “Hello World!” in it before writing the string to the console:
#include <EEPROM.h>

void erase(void)
{
  for (int i = 0 ; i < EEPROM.length() ; i++)
	EEPROM.write(i, 0);
}

void printMessage(byte* first, size_t len)
{
  for (int i = 0; i < len; i++)
  {
	Serial.print((char)first[i]);
  }
}

void writeMsg(byte* first, size_t len)
{
  for(int i = 0; i < len; i++)
  {
	EEPROM.write(i, first[i]);
  }
}

void readMsg(size_t len)
{
  byte res;

  Serial.print("Message: ");
  for(int i = 0; i < len; i++)
  {
	res = EEPROM.read(i);
	Serial.print((char)res);
  }
  Serial.println("");
}

void setup()
{
  char* string = "Hello World!";

  Serial.begin(9600);

  Serial.print("Serial connection opened!\n");
  Serial.print("EEPROM length: ");
  Serial.println(EEPROM.length());

  Serial.print("Attempting to erase EEPROM... ");
  erase();
  Serial.print("Done!\n");

  Serial.print("Message: ");
  printMessage(string, 12);
  Serial.print("\n");

  Serial.print("Attempting to write to EEPROM...\n");
  writeMsg(string, 12);
  Serial.print("Done!\n");
  Serial.print("Attempting to read from EEPROM...\n");
  readMsg(12);
  Serial.print("Done!\n");
}

void loop()
{ }
Using an External EEPROM
If you don’t use an Arduino or you want to have extra storage space, you can utilize an external EEPROM IC to store bytes. In this example, we’ll use the 4LC16B (PDF), which is a 16 kB I2C EEPROM.
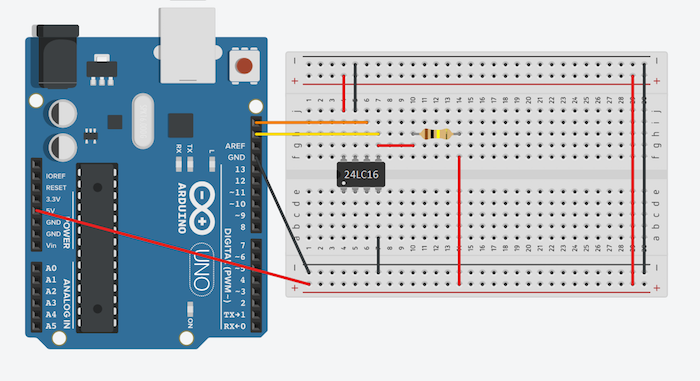
The circuit is simple and you only need to add a 100K pull-up resistor and connect the IC to the Arduino (or any other MCU you want to use):
Circuit diagram for adding the 4LC16B external EEPROM to an Arduino.
The seventh pin of this IC is a write-protect indicator. Connect this pin to GND if you want to write to the memory. If it’s high, the chip won’t save any data. Reading is possible regardless of the pin’s state.
Communicating With the External Memory
Setting up communication between the Arduino and the external memory is where things get more complicated compared to the built-in memory.
The datasheet of the 4LC16B IC precisely describes how to communicate with it to store data. I wrote this sketch to allow you to interface a word (or a byte) on the external EEPROM. I tested it with the 16 kB variant but it should work with every other size (from this manufacturer) as long as the communication works in the same way:
#include <Wire.h>

static const byte DEVICE_BASE_ADDRESS = 0x50;

void setup()
{
  Wire.begin();
  Serial.begin(9600);
}

byte readByteFromEEPROM(byte block, byte word_offset)
{
   Wire.beginTransmission(block);
   Wire.write(int(word_offset));
   Wire.endTransmission(true);

   Wire.requestFrom(int(block), 1);

   if (Wire.available())
   	return Wire.read();
}

void readBlockFromEEPROM(byte block, byte outArray[256])
{
  for(int i = 0; i < 256; i++)
  {
	outArray[i] = readByteFromEEPROM(block, i);
  }
}

void readPageFromEEPROM(byte block, byte word_offset, byte outArray[16])
{
  for(int i = 0; i < 16; i++)
  {
	outArray[i] = readByteFromEEPROM(block, word_offset + i);
  }
}

void writeByteToEEPROM(byte block, byte word_offset, byte data)
{
  writePageToEEPROM(block, word_offset, &data, 1);
}

/**
 * block:
 * 0x50 = first block = DEVICE_BASE_ADDRESS
 * 0x51 = second block
 * ...
 * 0x57 = eight block
 */

void writePageToEEPROM(byte block, byte word_offset, byte *data, size_t len)
{
  Wire.beginTransmission(block);
  Wire.write(word_offset);

  for(int i = 0; i < len; i++)
  {
	Wire.write(data[i]);
  }

  Wire.endTransmission(true);
  delay(10);
}
The memory is organized in eight blocks of 256 Bytes and each block can be directly addressed. The DEVICE_BASE_ADDRESS (0x50) represents the first one and 0x57 represents the last block.
Different chips have different base addresses too. Refer to the datasheet of your EEPROM and update the code if necessary.
Another "Hello World" Example
This program will store “Hello World” in the first page of the first block on the external EEPROM and then read the entire first block and print it to the console:
void printBlock(byte blockContent[256])
{
  for(int i = 0; i < 16; i++)
  {
	Serial.print("Page ");

	if(i+1 < 10)
  	    Serial.print("0");

	Serial.print(i+1);
	Serial.print(": ");

	for(int u = 0; u < 16; u++)
	{
   	    Serial.print((char)blockContent[i*16+u]);

   	    if(u==7)
      	        Serial.print(" ");
	}

           Serial.println("");
  }
}

void loop()
{
  byte result[256];
  writePageToEEPROM(DEVICE_BASE_ADDRESS, 0, "Hello World!", 12);
  readBlockFromEEPROM(DEVICE_BASE_ADDRESS, result);
  printBlock(result);
  delay(20000);
  exit(0);
}
Executing this example will give you the following result (Or something similar depending on the contents of your EEPROM):
Understanding EEPROM is Important for Beginners
This super simple project is perfect for beginners who want to learn about memory and I2C communications (and anyone who wants to boost their making prowess) because it allows you to permanently store information on your Arduino (or other MCU) even without power.
Knowing how to store information makes your projects mobile and also give you peace of mind that the most important parts of your project are stored whether your board is hooked up to power or not.