Learn how to set up communication between an Arduino and the visual programming language Max/MSP.
This article will show you how you can use an Arduino to send and receive data from Max/MSP.
Max/MSP is a visual programming language that helps you build complex, interactive programs without any prior code writing experience. It is especially useful for building audio, MIDI, video, and graphics applications where user interaction is needed.
We need to set up data transmission to go both ways. In order to do this, we'll begin by setting up sending data from the Arduino to Max/MSP and then cover sending data from Max/MSP to the Arduino.
Sending Data From Arduino to Max/MSP
We will first send the data from Arduino’s analog pin to the Max/MSP, where it will print. Next, we will send the data from the Max/MSP back to the Arduino, which will control the built-in LED of the Arduino connected at pin 13.
The communication between the Arduino and the Max/MSP will be serial.
The Arduino Code
Upload the code to the compiler.
**Note: Don’t open the serial monitor because the COM port will be used by the Max/MSP.
int analogPin = 1;

void setup()
{
  Serial.begin(115200);
}

void loop()
{
  Serial.println(analogRead(analogPin));
  delay(100);
}
The Max/MSP Sketch
The full sketch to send data from your Arduino to Max/MSP can be found as a downloadable file at the end of this article. Download and run the sketch. It will look like this:
After you upload the Max/MSP sketch, your screen will look like this.
The Max/MSP will continuously receive the data from the Arduino and display it. To receive the data, we will set the COM port and baud rate similarly to how they’re set up on the Arduino side.
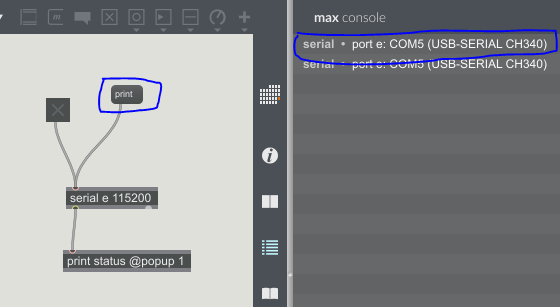
To check which COM port is available, click print. It will show you the available COM ports in the Max console.
Clicking print will let you know which COM port is available.
Enter the available COM port in the serial object and write the COM port that we have set on the Arduino side.
With the COM port set up, clicking the ON/OFF button will allow the Max/MSP to begin receiving the data.
The Arduino now ready to send and receive data to Max/MSP.
Sending Data from Max/MSP to Arduino
Now we are going to send the data from Max/MSP to Arduino. The data will be sent serially to the Arduino, which will receive it and control the built-in LED at pin 13.
We have connected a toggle button on the Max/MSP side to send data bit ‘1’ or ‘0’ to the Arduino. Upon receiving data, the Arduino will check whether it is '1' or '0'. If it is '1', the LED will light up. Otherwise, the LED will turn off.
Arduino Code
int LED_pin = 13;

void setup()
{
  Serial.begin(115200);
  pinMode(LED_pin, OUTPUT);
}

void loop()
{
  if (Serial.available()) {
    int value1 = Serial.read();
    if(value1 == 1){
      digitalWrite(LED_pin, HIGH);
    }
    else if (value1 == 0){
      digitalWrite(LED_pin, LOW);
    }

  }
}
Max/MSP Sketch
The full sketch to send data from Max/MSP to your Arduino can be found as a downloadable file at the end of this article. Download and run the sketch. It will look like this:
How the program will look after running your second Max/MSP sketch.
Click the print button to see which COM port is available in the Max console.
Click print to find an available COM port.
Enter the COM port in the serial object and set the baud rate similar to the Arduino.
Set up the COM port between Max/MSP and your Arduino.
Now, clicking the ON/OFF button controls the LED at pin 13 of your Arduino.
Additional Resources
Interested in how to connect an Arduino to other programs and modules? Check out these articles: