Learn how you can use an SD card module for data-heavy Arduino projects that require more memory.
Some projects may collect a large amount of data, such as sensor data read over the course of a month, that you want to store permanently. This large amount of data will probably not fit onto an EEPROM. Furthermore, you can’t conveniently transfer the information to a computer that way.
However, if you store the data on an SD card, you can easily transfer and work with the generated files on any computer that has an SD card reader.
This article will show you how to connect and use a generic SD card module with an Arduino. All code and test programs can be found as a zip file at the end of this article.
Wiring the Arduino to the Adapter
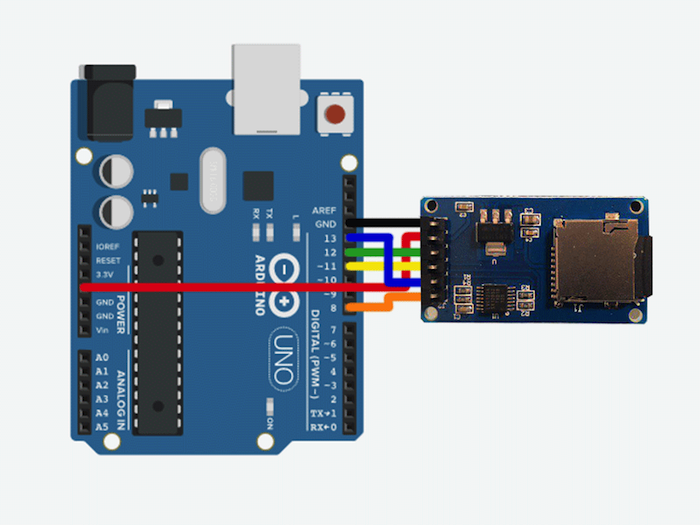
These adapter boards usually use the Serial Peripheral Interface (SPI) to communicate with a microcontroller. Therefore, it’ll occupy three GPIO pins on an Arduino. Additionally, you’ll need to connect a chip select line to enable the SD card and the supply lines for powering the adapter.
Schematic for connecting your Arduino to an SD card adapter.
The green (MISO) and yellow (MOSI) lines connect to pin 12 and 11 of the Arduino. The clock (blue) needs to be tied to pin 13. Refer to the Arduino documentation if you’re unsure which pins you need to use on your Arduino.
A Short Test Program
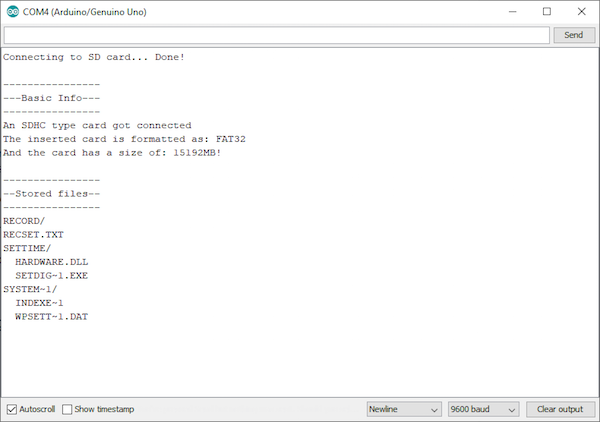
After making the necessary connections, it’s time to interface the SD card. The short test sketch lists the files present on the card. The code can be found as a zip file at the end of this article as sd_info.
As you can see, most of the code handles the console output. Just a few lines are needed to connect to the device and initialize the filesystem to read and write files. This example, however, only prints a few basic properties of the card, like the size, type, and saved files.
Writing to Files on the SD Card
Now that we know that the card and module are both functioning, it’s time to write some values to a file. The example SD_write (found at the end of the article) writes two lines into a log file that is stored on the SD card.
The initialization portion of the code is almost the same as in the first program. However, instead of opening the volume, the SD card itself has to be initialized. After initialization, the file has to be opened.
When opening a file for writing, a file is automatically created if it doesn’t already exist. The cursor is always placed at the end of the file. So if you don’t move it upon opening a file, you simply append the new text to it. Because the contents are stored on an SD card, you can simply use your computer to read the contents of the file.
The SD_write program example.
Reading From a File Stored on an SD Card
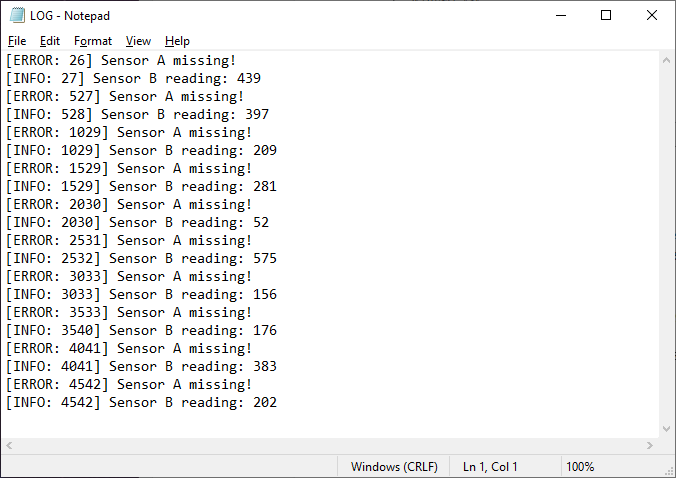
You can also use the SD card library to read a file. However, compared to standard C functions, the available methods are pretty limited. I found that the SD card library oftentimes has problems finding files that are in folders. The following example (under SD_read in the zip file) illustrates how you can read a value from a file that contains a sensor readout.
The code should be pretty self-explanatory. The only real difference between this example and the write example is the fact that the file gets read byte-wise. Therefore, you have to loop over the number of bytes you want to read from a file. The result should look something like this:
SD card adapters can be useful when you want to leave a project unattended and make it create log files or save a large number of sensor readings over a longer period of time. However, I found that reading files from the SD card doesn’t always work as expected.