You may have seen tutorials about using "cherry mx" mechanical keyboard switches, and then XDA (all-same-size) key caps. That works well, hardware-wise, but the Keypad library doesn't cut it for gaming. Here is my solution. Note that I switched L shown above for F...
I looked at the Keypad.h and Keypad.cpp (iirc) files, and replicated how they scanned for up and down keys, and how they delay 20 milliseconds between scans to prevent debounce. I borrowed that code, but put it directly into my source file. What I ultimately needed, though, was:
- Behavior more like a keyboard, where keys are pressed and released matching the physical buttons.
- The ability to define which keys act like normal keyboard keys, and which can be customized in code.
- For custom code, the ability to see whether any key is currently up or down, and the ability to see how long it was last held down (even if it's currently up).
- The ability to use timers to do things at interval when toggles are on. Teensy LC (my prefered arduino mini device) has built-in hardware they wrap in a class called elapsedMillis. These are super-convenient if what you want to do it see how many milliseconds have elapsed since they were zeroed.
- The ability to send mouse clicks or movements when a key is pressed. Easy, since most arduino devices can be set to "usb keyboard / mouse" during programming.
- The ability to define keys as "alt", "control" or "shift".
- The ability to define a key as "auto", so it behaves like your car window -- if you hold the button for 1 second, it acts like it's still held when you release it. Tapping the same key again stops it.
In the end, I wrote my own code to do all that. If you decide to build your own Tink Keys, just follow the instructions everywhere else for wiring a keyboard matrix. I first tried a 5x6 (with one blank spot), but found I had to reach over the WASD keys to hit the attack keys, and didn't like that. I ended up doing a 3x9 matrix instead (also with an empty spot next to the TAB key since my XDA key set didn't have a square, normal size TAB cap).
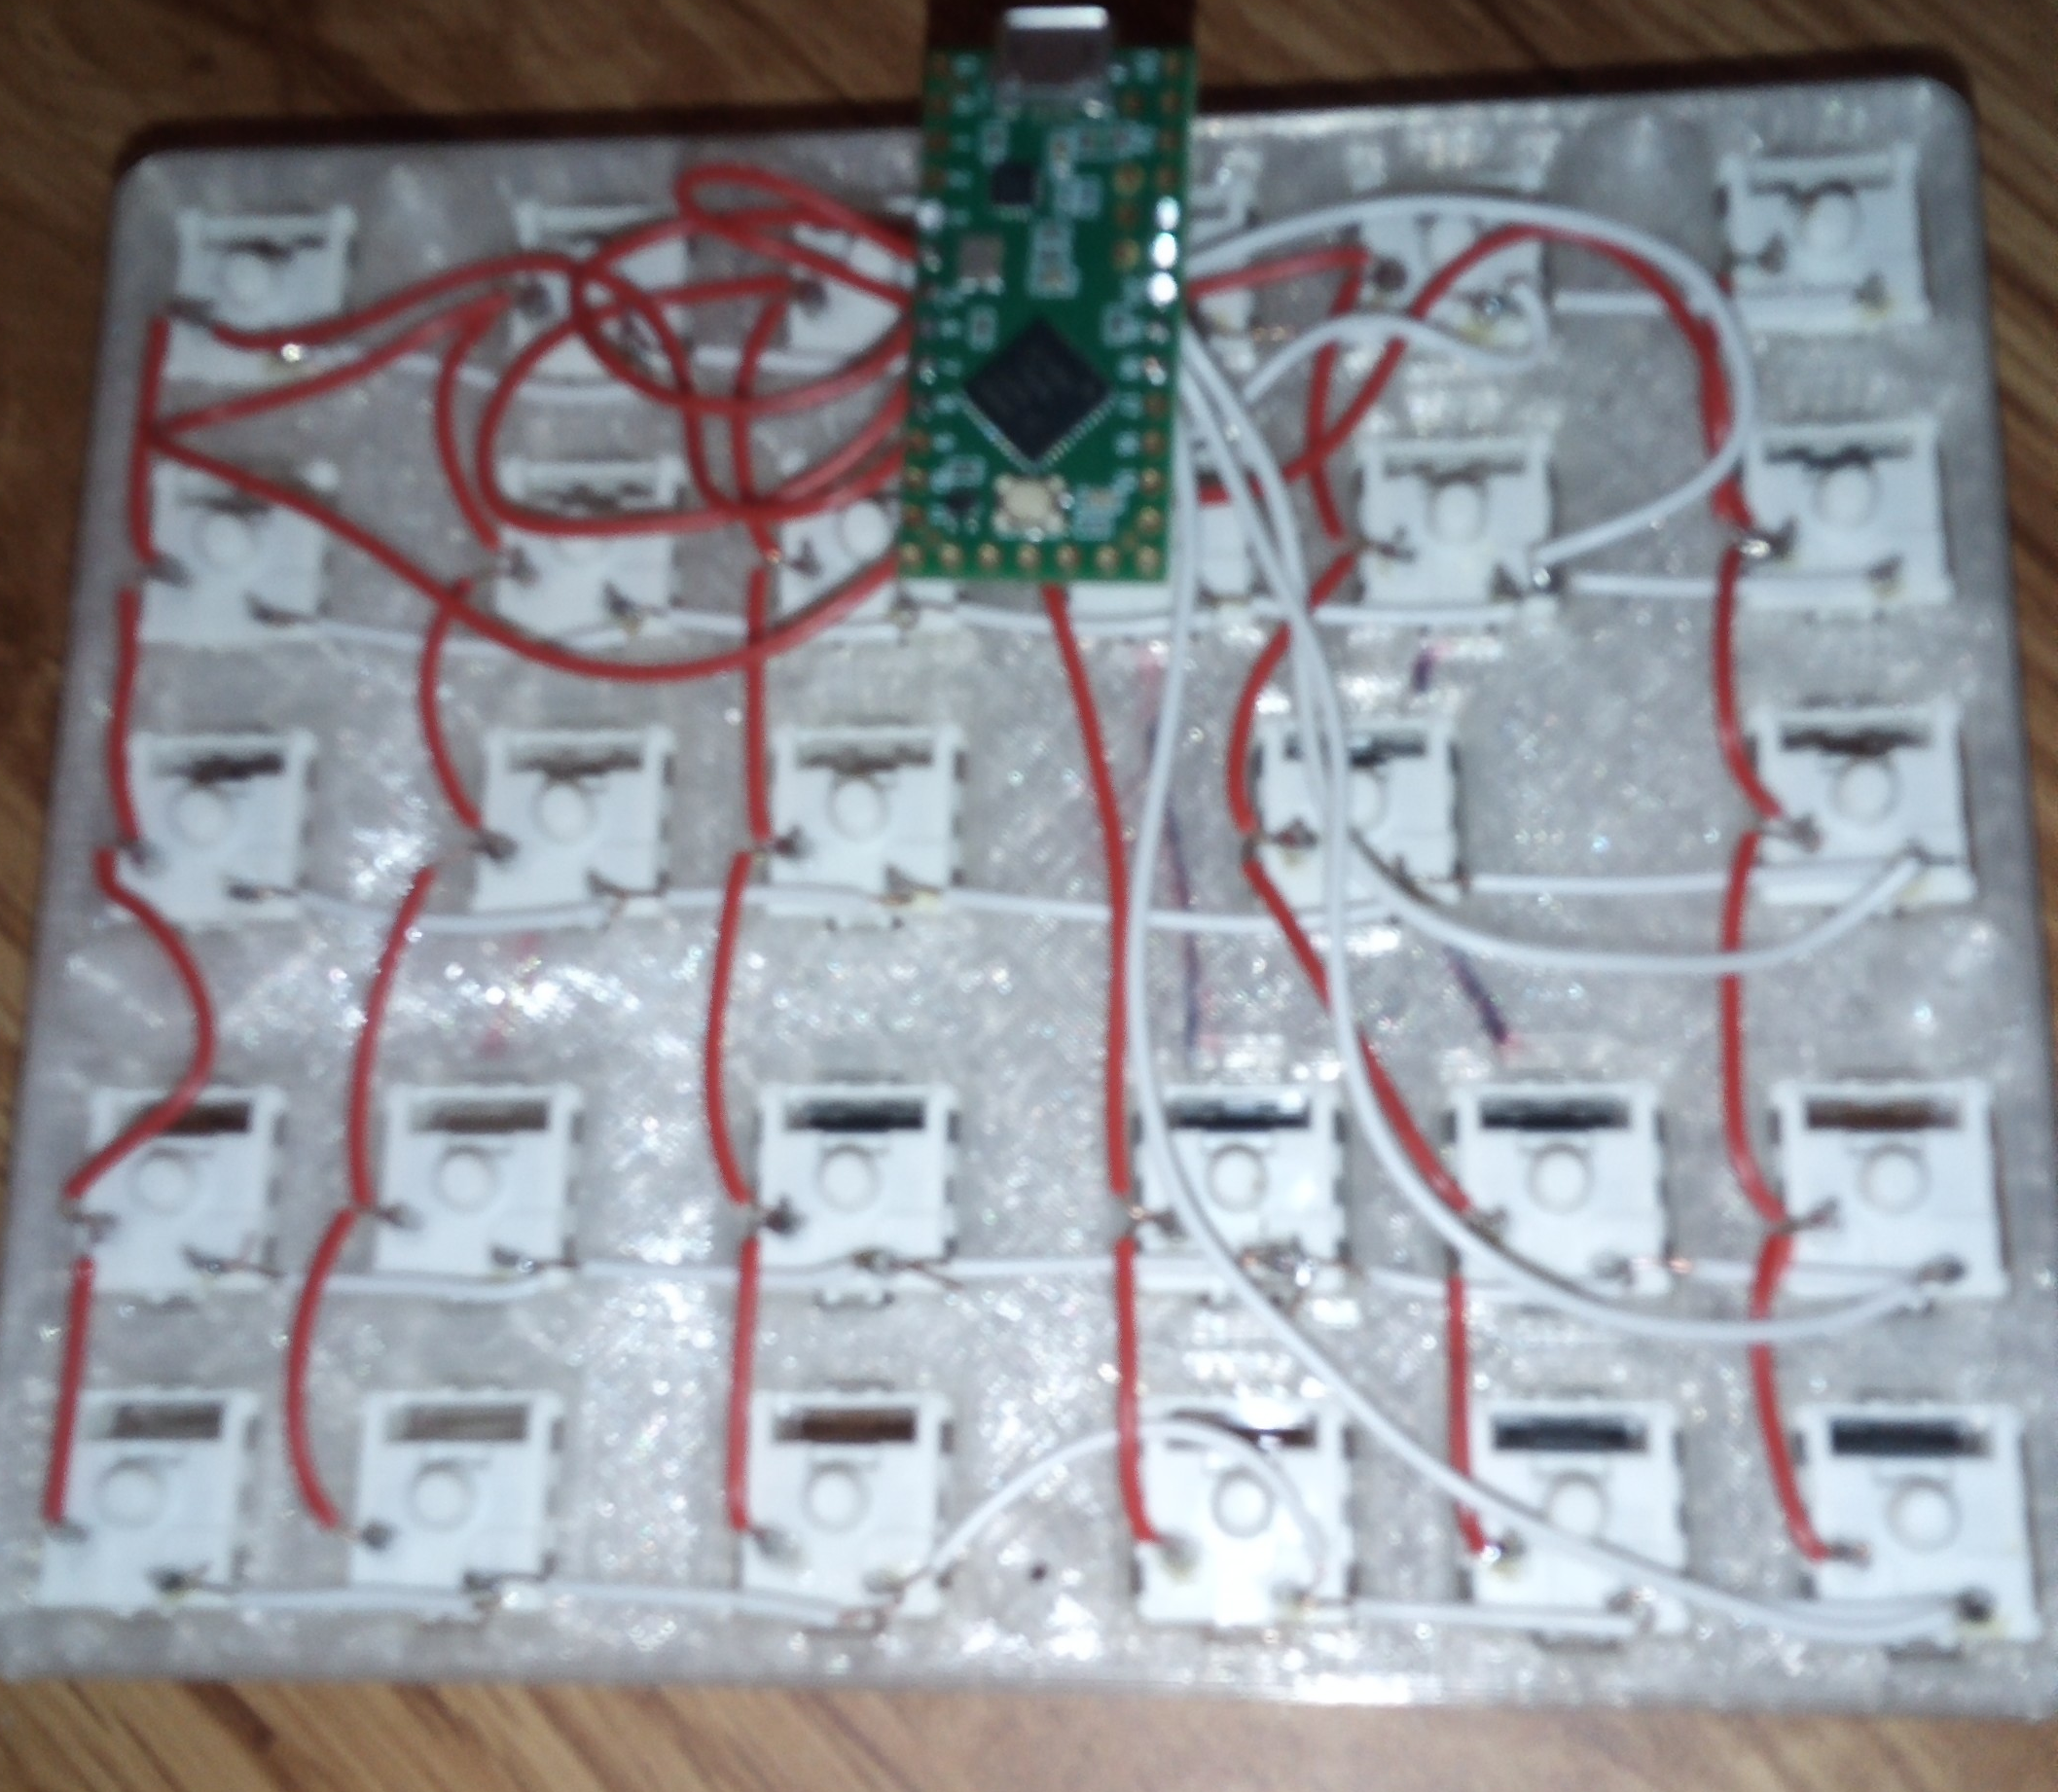
Teensy LC (arduino device) soldered to a matrix of "cherry mx" type keyboard switches mounted into a 3D-printed faceplate
My latest version is the 3x9, where most keys act like normal keyboard keys. My home of choice is the Reunion server Homecoming hosting of City of Heroes. You might see TinkerBell in the game giving away prizes for odd things, If you're on during U.S. evenings.
In some games I've played (notably Black Desert), there is no way to continue forward in a straight line unless you hold the W key. For something like that, you can define W as an "auto". Hold it for more than a second, release it, and as far as the pc is concerned, it's still being held. Although none of the keys in this example use that, I tested it on W and SPACE and it works fine. For that, add setAsAuto(key) in the setup() code.
For City of Heroes, the Tink Keys have several features I'll describe in detail below. You can follow the patterns there if you want to be creative, or do other things your game doesn't usually support. For instance, put mouse buttons and movements behind the Q or E keys when your game requires steering with the mouse only.
Summary of behavior
If you select Tools / USB Type in arduino, setting it to Keyboard / Mouse (or more) will include header files with KEY_A, MODIFIERKEY_LEFT_SHIFT and other definitions for any key you need to send behind all this. In my code, any key not defined as "custom" or "auto" behaves like you would expect. What the picture shows are just keycaps. If you look at the keys[][] array, you'll see the I use the arduino keyboard library names for keys, and not "char" values as the KeyPad library does.
That being said, all they keys by default function exactly as you need for gaming, just like keys on a keyboard. The keycaps in the picture are not what I have defined. CoH keys for movement are used instead (WASD plus Q and E for turning) mapping: "LEFT" is really Q, UP ARROW is W, "RIGHT" is E, LEFT ARROW is A, DOWN ARROW is S, RIGHT ARROW is D, "UP" is [space] and "DOWN" is X.
The "better than a keyboard" behavior I wanted is really in the C, B, F and TAB keys. All others behave normally. TAB is actually defined as normal too, but I have custom code that kicks in when it's NOT down but was previously held for various amounts of time. C is for "click" so when I am in "mouse look" mode in the game, but something needs to be clicked, pressing C clicks middle mouse / left mouse / middle mouse buttons (about 1/8 second for that). B is never sent to the pc, and toggles "Buffs" to be sent regularly (what is sent is really PAUSE/BREAK and NUM LOCK). F behaves normally except when ALT is down. ALT-F toggles the sending of SCROLL LOCK every second (to search for a named enemy).
After the initial post, I added ALT-UP as scroll up and ALT_DOWN as scroll down, as well as ALT-C for a mouse repeating toggle to delete stacks of salvage. See details below.
March '24 I decided I hated the membrane keypad I use for "quick sell", so I re-coded this to use ALT-M to toggle in or out of "marketing" (quick sell) mode, and then use the same code for sending the mouse clicks. As with that project, you need to highlight the item you are selling to the vendor, then hover over the "SELL" button so the mouse clicks will register. If there are 7 items in the highlighted stack, then 4 of the next item, then 3 (for example), hit 7, 4, 3 and the code will send fast and slow mouse clicks to sell stacks quickly but without losing the jump to the next highlighted item.
How I implemented the C key
The "C" key sends a series of mouse clicks. I usually run in "mouse look" mode, which means the mouse pointer is invisible. Hitting the C button does a sequence of middle button, left button, middle button. Essentially taking you out of "mouse look" mode, clicking once, then putting you back into "mouse look" mode. Position the mouse pointer right in your characters chest before turning it on initially. Position your chest over the door, blinky, elevator, or whatever it is that needs clicking, and hit C.
Code wise, I decided to make a few easy-to-use variables that get set by the scan code, so that any custom code can be simpler. Almost always, since the scan happens 50 times per second, you have one "event" like the pressing or releasing of a specific key, with modifiers (alt, ctrl, shift) in a specific state at the time. The scan code puts those into keyAction (equal to PRESSED or RELEASED), actionKey (the KEY as seen in your keys[][] array), and actionModifier (the OR'd together state of alt, ctrl, shift, but usually only one is down so you can check for one of them).
The C key is a good case of how to use those easy-to-use variables. If the scan detected a press of a key, and you want to do something upon the press of KEY_C, but only if the ALT, CTRL and SHIFT are up, this line does all that:
if (keyAction == PRESSED && actionKey == KEY_C && actionModifier == 0) {...
Since we defined it as a custom key in the setup part, nothing gets sent to the pc by normal code, and you must put something in the custom code to send keys, move the mouse, click the mouse buttons, etc.
I also added a toggle on ALT-C that right clicks, moves down and right, left clicks, then moves back. It keeps doing that until ALT-C is hit again to turn it off. What that does for me in the game is sell all the white and yellow-level salvage that isn't worth even the time to sell to a vendor. Just deleting these is much quicker. Since there is no "delete all" button, this is how I handle it.
The completely custom B key
It's also custom, so it doesn't act like a keyboard key when pressed. Instead, this one is a toggle. Maybe future versions (or yours if you are arduino-savvy) could have an indicator LED. I didn't feel the need to do that. When Tink is running her solo build, auto-fire is on Hasten. This B code also auto-refreshes Focused Chi (30 second cooldown) and Practiced Brawler (75 second cooldown). I looked at all the options for key mapping, and found that the SCROLL LOCK and PAUSE/BREAK keys could be mapped to a button, and interfere the least if I am typing in chat, clicking on a menu choice, etc. Once every 15 seconds, those keys are sent (when the toggle is on). Zoning, and even going through elevators, will pause the cooldown timers on powers, so it's not an exact science. Tapping them a lot through non-invasive keyboard keys is about as close as you can get to have multiple auto-fire buttons.
The mostly-normal F key
On any other keyboard, F does FOLLOW in CoH, by just pressing F. That's true here too, but I wanted to use ALT-F to spam "find enemy XYZ" while I am flying around the spawn points. If the enemy comes into range, the Target box shows them. There are 2 aspect of making this work: 1. What they Tink Key code does and 2. having a tray of search macros for CoH.
- We define F as a custom key so that ALT-F doesn't get sent. We otherwise want F (or with other modifiers) to go through. The custom code looks for ALT-F press and sets the toggle to opposite of its current state, and any other situation if F key is down, it uses the sendKey() method to send it through. NOTE: That function is also used to inject keys into the stream when toggles are on, etc., but usually only on specific timing. They won't get sent during the next loop, so the pc will see them as having been released. If we sendKey() on every loop, they pc sees the key as being held down.
- I have tray 8 set up with a series of macros like this: /macro KRA "target_name krak"
- I switch my botom tray to tray 8 (using those little arrows on the left of the tray).
- I drag the desired key (from all over tray 8) into position 1 based on what I'm trying to find.
- I already have SCROLL LOCK mapped to fire bottom tray, slot 1
Ambitious folks might also want an LED for that toggle, but in my case my main keyboard is backlit, and the scroll lock function toggles the backlighting, oddly enough even if the Teensy is sending the keystroke. So if my main keyboard is blinking, I know the search toggle is on.
The spammy TAB key
It's left as normal. In COH holding TAB does not repeat it. I added some custom code to send things if the last time it was held down was 1-2 seconds or more than 2 seconds. It's kind of like a 2-speed AUTO key. Hold TAB for 1 to 1.999 seconds and release, you get a fast scan of enemy reticles, because every 1/10th second the Teensy sends TAB. Hold TAB for 2 seconds or more then release, you get a slow scan of enemies, because Teensy sends TAB every half-second.
Sidebar about convenience versus efficiency
The Teensy runs at 48Mhz, RISC, meaning for each scan, about 1 million instructions can be run. That's way more than enough to be wasteful about looking through 27 buttons for an index, for example. I'd rather have the custom code more readable and easier to use. C programmers tend to focus more on fewer lines, more efficient, etc. That's great. For this project, meh.
The plastic parts
See: https://www.thingiverse.com/thing:6511526
ALT-UP and ALT-DOWN as mouse scrolls
The code shows that KEY_SPACE and KEY_X are custom. I changed them so I could intercept ALT versions of those to send mouse scrolls instead. Because even 1 mouse scroll every 1/50th second was way too fast, I use a rolling integer to only send those every 3rd cycle, or a value of 1 (or -1) every 60 milliseconds. It turns out I didn't really need this because the Home and End buttons do this in the game. But I left it here in case people have a similar need. Note that I also tried to code a volume up and down, and the keyboard library simply doesn't handle these correctly. I didn't need it enough to turn the project into a raw HID as appears to be required.
Quick Sell
March 24, 2024 I switched a couple things to incorporate a "quick sell" logic, seen here as a separate project: https://maker.pro/arduino/projects/coh-quick-sell. I had to turn M and the numerics into custom keys. I also had to slightly modify the sendKey() related code to go ahead and send when modifiers are pressed, because in my game alt and ctrl numeric keys are important and have to go through. ALT-M switches in and out of quick-sell mode ("Market" is how I remember alt-M). As with the coh_quick_sell project, it sends faster and slower clicks in order to sell stacks of items without the client losing the highlighted item. For details on that, check the other project. Note that I changed the "plus ten" logic to use ALT when in quick sell mode. so if the stack is 11, you do alt-1, for example. Ten is still done via the 0 key. Quick example, if you highlight the top item in the vendor window, and there are 7 or that, 4 or the next item, and 19 of the next one, you would hit 7 4 alt-9, then glance at what the next 3 quantities are and enter those. The teensy will send fast and slow clicks and eventually clear out the type-ahead buffer of your quantities. If anything goes nutty, I just turn off the device (I have a USB hub with on/off buttons per slot). The worst otherwise is that it just gets ignored and sells nothing, then you can set it up to go again.
Source code doing everything described above
Be sure to select the correct device and port in arduino! Happy tinkering.
/*
tink_keys project 3x9, Tink's customizations

24-mar-2024 tried to add in alt-m to toggle quick sell, and then the follow-up mouse clicking

*/
#define NO_KEY 0
#define NO_CHANGE 0
#define MODS_BELOW 0xF000
#define PRESSED 1
#define RELEASED 2
#define KEY_LIMIT 6
#define AUTO_TRIGGER 25

/*
DEFINE YOUR KEYS HERE! Similar to Keypad projects, except using Keyboard values instead of chars.
if there is an actual empty spot in your wiring (like we have here for [2][6]), use NO_KEY
*/
const byte ROWS = 3;
const byte COLS = 9;
uint16_t keys[ROWS][COLS] = {
  { KEY_C, KEY_B, KEY_M, KEY_F,     MODIFIERKEY_LEFT_SHIFT,   KEY_1, KEY_2, KEY_3, KEY_4 },
  { KEY_Q, KEY_W, KEY_E, KEY_SPACE, MODIFIERKEY_LEFT_CTRL,    KEY_5, KEY_6, KEY_7, KEY_8 },
  { KEY_A, KEY_S, KEY_D, KEY_X,     MODIFIERKEY_LEFT_ALT,     KEY_TAB, NO_KEY, KEY_9, KEY_0 }
};
byte rowPins[ROWS] = {20,19,18}; // these depend entirely on how you soldered it, just like for every other Keypad example you see online
byte colPins[COLS] = {2,3,4,5,6,7,8,9,10};

/*
These control most of what's going on, and shouldn't be used directly in custom code.
*/
bool isDown[ROWS][COLS];
bool wasDown[ROWS][COLS];
uint16_t downCount[ROWS][COLS];
bool isAuto[ROWS][COLS];
bool isCustom[ROWS][COLS];


// these gloss over debounce by scanning only once per 20 millis. These also shouldn't be changed.
uint32_t startTime = millis();
uint32_t debounceTime = 20;  // 1/50 second between scans to reduce debounce

/*
  Simplified vars for custom code use. Almost always only one key at a time is pressed or released.
  Although that's not strictly always true, it's close enough for typical cases.
  actionKey is the key pressed or release, or NO_KEY if nothing changed in the last scan.
  keyAction is NO_CHANGE (and key will be NO_KEY) or PRESSED or RELEASED (with an actual key value).
  actionModifier will be MODIFIER* keys above, logically OR'd together, or in most cases, one of them alone,
  or ZERO (meaning none of the MODIFIERS were down when the actionKey was PRESSED or RLEASED).
*/
uint16_t actionKey = NO_KEY;
uint16_t actionModifier = 0;
byte keyAction = NO_CHANGE;

/*
  Simple stack to allow custom code to inject keys without messing up timing.
  Don't use these directly! to inject a key press use sendKey(key) from custom code.
*/
#define INJECT_LIMIT 32
uint16_t injectKeys[INJECT_LIMIT];
byte injectIdx = 0;


void setup() {
  setAllDefaults();
  // CUSTOM or AUTO are indicated here:
  setAsCustom(KEY_C); // C for click mouse middle/left/middle
  setAsCustom(KEY_B); // B for buffs (PAUSE and NUMLOCK every 15 seconds more or less)
  setAsCustom(KEY_F); // F has special handling (ALT-F is not sent and controls a toggle. any other F is sent normally)
  setAsCustom(KEY_SPACE); // the UP button will have multiple personalities
  setAsCustom(KEY_X); // so will the DOWN button
  // alt-m switches numerics to quick-sell keys, so all that has to be custom too
  setAsCustom(KEY_M);
  setAsCustom(KEY_1);
  setAsCustom(KEY_2);
  setAsCustom(KEY_3);
  setAsCustom(KEY_4);
  setAsCustom(KEY_5);
  setAsCustom(KEY_6);
  setAsCustom(KEY_7);
  setAsCustom(KEY_8);
  setAsCustom(KEY_9);
  setAsCustom(KEY_0);
}

// CUSTOMIZATION VARS HERE -- anything that needs to persist across multiple loop() iterations.
byte clickStep = 0;
elapsedMillis scrollDelay = 0;
elapsedMillis tabTimer = 0;
bool buffToggle = false;
int buffCycle = 0;
bool findToggle = false;
elapsedMillis findTimer = 0;
byte scrollCounter = 0;
bool crapToggle = false;
int crapCycle = 0;

// QUICK SELL vars cloned from membrane4x4_sellquick

// toggle
bool quickSell = false;

// simplified queue: write[idx++%] read[idx++%]
#define QUEUE_SIZE 32
int queue[QUEUE_SIZE];
byte qReadIdx = 0;
byte qWriteIdx = 0;

// timing cycle, on 0 we press button and on 2 we release. total number adds a delay between
#define CLICK_CYCLE 5
byte clickCounter = 0;

// just to avoid spamming release of buttons, we set this to true when the button is down
bool mouseDown = false;

// when we need a slow click, this is used for the delay
#define PAUSE_AMOUNT 5
int pauseCycle = 0;

// in cases of amounts > 10, we click # to add 10 to whatever we send next. > 20 is very rare, so we'll just gloss over that case
bool plusTen = false;


void loop() {
  if ((millis() - startTime) > debounceTime) {
    scanKeys();
    /*
    CUSTOM CODE GOES HERE

    DO NOT use delay() !

    This will mess up scanning, and miss press/release that happen during any delay.

    An alternative to sending multiple timed things can be seen in the C key, and it's use of a countdown where these different events
    are each sent on the appropriate countdown value.

    These are safe to use:

    Mouse.set_buttons(left, middle, right);
    Mouse.move(xDiff, yDiff...)
    sendKey(key); so the key will be sent to the PC as being currently DOWN

    THESE ARE NOT SAFE TO USE and will mess things up

    delay();
    Keyboard.press()
    Keyboard.release()
    Keyboard.send()
    Keyboard.*

    */

    // C for "click" while in mouse look mode
    if (keyAction == PRESSED && actionKey == KEY_C && actionModifier == 0) {
      clickStep = 6;
    }
    // numeric countdown: 6 middle button down, 4 left button down, 2 middle button down, 5,3,1 release buttons
    if (clickStep == 4) {
      Mouse.set_buttons(1, 0, 0);
      clickStep--;
    } else if (clickStep == 2 || clickStep == 6) {
      Mouse.set_buttons(0, 1, 0);
      clickStep--;
    } else if (clickStep > 0) {
      Mouse.set_buttons(0, 0, 0);
      clickStep--;
    }

    // ALT-C to dump all your CRAP
    if (keyAction == PRESSED && actionKey == KEY_C && actionModifier == MODIFIERKEY_LEFT_ALT) {
      crapToggle = ! crapToggle;
      crapCycle = 0;
    }
    // for repeating stuff it's better to use a rolling integer and put events at numberic values within that (this one counts UP, not DOWN like clickStep)
    // at 0 we set mouse button right down
    // at 1 we release it
    // at 2-3 we pause for the click to register
    // at 4 thru 11 we move the mouse (3,10) for a total of 24,80
    // at 12-13 we pause again
    // at 14 we click left button (to choose Delete Salvage Stack)
    // at 15 we release it
    // at 16-17 we pause
    // at 18 thru 25 we move the mouse (-3,-10) for a total of -24,-80
    // at 26-29 we pause again
    // don't bother trying to make this faster -- the game cannot handle it
    if (crapToggle) {
      if (crapCycle == 0) {
        Mouse.set_buttons(0, 0, 1);
      } else if (crapCycle == 1 || crapCycle == 15) {
        Mouse.set_buttons(0, 0, 0);
      } else if (crapCycle >= 4 && crapCycle <= 11) {
        Mouse.move(3, 10);
      } else if (crapCycle == 14) {
        Mouse.set_buttons(1, 0, 0);
      } else if (crapCycle >= 18 && crapCycle <= 25) {
        Mouse.move(-3, -10);
      }
      crapCycle = (crapCycle + 1) % 30;
    }

    // TAB works as normal, except that,
    // if previously held 1-1.99 seconds we send TAB every 100 millis
    if ( ! isKeyDown(KEY_TAB) && heldHowLong(KEY_TAB) >= 1000 && heldHowLong(KEY_TAB) < 2000 && tabTimer > 100) {
      sendKey(KEY_TAB);
      tabTimer = 0;
    }
    // and if previously held > 2 seconds we send TAB every 500 millis
    if ( ! isKeyDown(KEY_TAB) && heldHowLong(KEY_TAB) >= 2000 && tabTimer > 500) {
      sendKey(KEY_TAB);
      tabTimer = 0;
    }

    // B for Buffs. send PAUSE/BREAK and NUMLOCK spaced slightly apart every 15 seconds
    if (keyAction == PRESSED && actionKey == KEY_B) {
      buffToggle = ! buffToggle;
      buffCycle = 0; // reset the rolling counter
    }
    if (buffToggle) {
      if (buffCycle == 0) { // immediately on activating toggle. this is how you know the toggle is being turned on or off.
        sendKey(KEY_PAUSE);
      }
      if (buffCycle == 50) { // 1 second later
        sendKey(KEY_NUM_LOCK);
      }
      buffCycle = (buffCycle + 1) % 750; // repeat about every 15 seconds (50 cycles per second * 15)
    }

    // if we see ALT-F we toggle "look for named enemy", but otherwise we send F normally when it's down
    if (keyAction == PRESSED && actionKey == KEY_F && actionModifier == MODIFIERKEY_LEFT_ALT) {
      findToggle = ! findToggle;
    } else if (isKeyDown(KEY_F) && actionModifier != MODIFIERKEY_LEFT_ALT) {
      sendKey(KEY_F);
    }
    if (findToggle && findTimer > 1000) {
      sendKey(KEY_SCROLL_LOCK);
      findTimer = 0;
    }

    // UP (KEY_SPACE) and DOWN (KEY_X) are sent as volume up/down when ALT is down, and scroll up/down when CTRL is down
    if (isKeyDown(KEY_SPACE)) {
      if (actionModifier == MODIFIERKEY_LEFT_ALT) {
        if (scrollCounter == 0) {
          Mouse.scroll(1);
        }
      } else {
        sendKey(KEY_SPACE);
      }
    }
    if (isKeyDown(KEY_X)) {
      if (actionModifier == MODIFIERKEY_LEFT_ALT) {
        if (scrollCounter == 0) {
          Mouse.scroll(-1);
        }
      } else {
        sendKey(KEY_X);
      }
    }
    scrollCounter = (scrollCounter + 1) % 2;

    // quick sell buttons (and regular pass-through when not in that mode)
    if (keyAction == PRESSED) {
      // alt-m toggles quick sell mode, regular M is sent
      if (actionKey == KEY_M) {
        if (actionModifier == MODIFIERKEY_LEFT_ALT) {
          quickSell = ! quickSell;
        } else {
          sendKey(KEY_M);
        }
      }
      if (actionKey >= KEY_1 && actionKey <= KEY_0) { // behind-the-scenes numbers for these run from 1-9 then 0, so this range covers all number keys
        if (quickSell) {
          // write to the queue plus ten if appropriate, and reset plusTen
          queue[qWriteIdx] = (actionKey - KEY_1) + 1;
          // we deviate from membrane4x4 code here by using ALT to trigger plus ten, so 11 is alt-1, 12 is alt-2, etc.
          if (actionModifier == MODIFIERKEY_LEFT_ALT) {
            queue[qWriteIdx] += 10;
          }
          qWriteIdx = (qWriteIdx + 1) % QUEUE_SIZE; // then bump index
        } else {
          sendKey(actionKey);
        }
      }
    }
    if (quickSell) {
      if (clickCounter == 0) {
        if (pauseCycle > 0) {
          pauseCycle--;
        } else if (qReadIdx != qWriteIdx) {
          Mouse.set_buttons(1);
          mouseDown = true;
          if (queue[qReadIdx] < 3) {
            pauseCycle = PAUSE_AMOUNT;
          }
          queue[qReadIdx]--;
          if (queue[qReadIdx] == 0) {
            qReadIdx = (qReadIdx + 1) % QUEUE_SIZE;
          }
        }
      } else if (clickCounter == 2 && mouseDown) {
        Mouse.set_buttons(0);
        mouseDown = false;
      }
      clickCounter = (clickCounter + 1) % CLICK_CYCLE;
    }


    // END OF CUSTOM CODE -- leave below stuff alone!
    complexOutput(); // handles all normal and auto keys, and includes anything you added via sendKey() above
    startTime = millis();
  }
}

// EVERYTHING BELOW DOES NOT CONTAIN CUSTOM CODE AND SHOULD BE LEFT ALONE

void setAsCustom(uint16_t key) {
  for (byte c = 0; c < COLS; c++) {
    for (byte r = 0; r < ROWS; r++) {
      if (keys[r][c] == key) {
        isCustom[r][c] = true;
        return;
      }
    }
  }
}

void setAsAuto(uint16_t key) {
  for (byte c = 0; c < COLS; c++) {
    for (byte r = 0; r < ROWS; r++) {
      if (keys[r][c] == key) {
        isAuto[r][c] = true;
        return;
      }
    }
  }
}

// setup default values into all the under-the-hood arrays
void setAllDefaults() {
   // initialize everything to defaults
  for (byte c = 0; c < COLS; c++) {
    for (byte r = 0; r < ROWS; r++) {
      isDown[r][c] = false;
      wasDown[r][c] = false;
      downCount[r][c] = 0;
      isAuto[r][c] = false;
      isCustom[r][c] = false;
    }
  }
}

// for simplicity, even though this is slower than specifying [row][col] directly, it's better for the custom code if you move or reassign keys and such

bool isKeyDown(uint16_t key) {
  for (byte c = 0; c < COLS; c++) {
    for (byte r = 0; r < ROWS; r++) {
      if (keys[r][c] == key) {
        return isDown[r][c];
      }
    }
  }
  return false;
}

int heldHowLong(uint16_t key) {
  for (byte c = 0; c < COLS; c++) {
    for (byte r = 0; r < ROWS; r++) {
      if (keys[r][c] == key) {
        return downCount[r][c] * debounceTime; // approximate only! but close enough
      }
    }
  }
  return 0;
}

// handles non-custom and auto keys
void complexOutput() {
  actionModifier = 0;
  uint16_t downKeys[KEY_LIMIT] = {0, 0, 0, 0, 0, 0};
  byte idx = 0;
  for (byte c = 0; c < COLS && idx < KEY_LIMIT; c++) {
    for (byte r = 0; r < ROWS && idx < KEY_LIMIT; r++) {
      if ( ! isCustom[r][c]) {
        if (isDown[r][c] || (isAuto[r][c] && downCount[r][c] > AUTO_TRIGGER) ) {
          if (keys[r][c] < MODS_BELOW) {
            actionModifier = actionModifier | keys[r][c];
          } else {
            downKeys[idx] = keys[r][c];
            idx++;
          }
        }
      }
    }
  }
  // TURNED OFF THE SAFETY FOR MOD KEYS AND SENDKEY() since numerics are now custom and we need to send mods with them
  // add in any injected keys from custom code (ONLY IF MODIFIERS ARE ZERO!, we don't want to send alt-1 when we were supposed to send 1 for example)
  // while (idx < KEY_LIMIT && injectIdx > 0 && actionModifier == 0) {
  while (idx < KEY_LIMIT && injectIdx > 0) {
    injectIdx--;
    uint16_t addKey = injectKeys[injectIdx];
    downKeys[idx] = addKey;
    idx++;
  }
  // send these updates to the PC (ONLY ON CHANGES)
  sendIfChanged(actionModifier, downKeys[0], downKeys[1], downKeys[2], downKeys[3], downKeys[4], downKeys[5]);
}


uint16_t lastModifier = 0;
uint16_t lastKey1 = 0;
uint16_t lastKey2 = 0;
uint16_t lastKey3 = 0;
uint16_t lastKey4 = 0;
uint16_t lastKey5 = 0;
uint16_t lastKey6 = 0;
void sendIfChanged(uint16_t modifier, uint16_t key1, uint16_t key2, uint16_t key3, uint16_t key4, uint16_t key5, uint16_t key6) {
   if (modifier != lastModifier || key1 != lastKey1 || key2 != lastKey2 || key3 != lastKey3 || key4 != lastKey4 || key5 != lastKey5 || key6 != lastKey6) {
    Keyboard.set_modifier(modifier);
    Keyboard.set_key1(key1);
    Keyboard.set_key2(key2);
    Keyboard.set_key3(key3);
    Keyboard.set_key4(key4);
    Keyboard.set_key5(key5);
    Keyboard.set_key6(key6);
    Keyboard.send_now();
    lastModifier = modifier;
    lastKey1 = key1;
    lastKey2 = key2;
    lastKey3 = key3;
    lastKey4 = key4;
    lastKey5 = key5;
    lastKey6 = key6;
  }
}

// stupidly simple stack via array, ignored if limits exceeded
void sendKey(uint16_t key) {
  if (injectIdx < INJECT_LIMIT) {
    injectKeys[injectIdx] = key;
    injectIdx++;
  }
}

void scanKeys() {
  // copy current status to old status
  for (byte c = 0; c < COLS; c++) {
    for (byte r = 0; r < ROWS; r++) {
      wasDown[r][c] = isDown[r][c];
    }
  }

  // scan using COLUMNS defaulting to HIGH, and setting them to LOW in a loop...
  // then looking at ROWS for LOWS (meaning it's curently down)
  for (byte r = 0; r < ROWS; r++) {
    pinMode(rowPins[r], INPUT_PULLUP);
  }
  for (byte c = 0; c < COLS; c++) {
    pinMode(colPins[c], OUTPUT);
    digitalWrite(colPins[c], LOW);
    for (byte r = 0; r < ROWS; r++) {
      isDown[r][c] = (LOW == digitalRead(rowPins[r]));
    }
    digitalWrite(colPins[c], HIGH);
    pinMode(colPins[c], INPUT);
  }

  // simplified most-recent key and action (for toggle code in the loop() method)
  keyAction = NO_CHANGE;
  actionKey = NO_KEY;

  for (byte c = 0; c < COLS && keyAction == NO_CHANGE; c++) {
    for (byte r = 0; r < ROWS && keyAction == NO_CHANGE; r++) {
      if (wasDown[r][c] != isDown[r][c]) {
        if (isDown[r][c]) {
          keyAction = PRESSED;
          if (keys[r][c] != NO_KEY) { // we only set this when a key is PRESSED
            actionKey = keys[r][c];
          }
          downCount[r][c] = 0; // on PRESS we reset the held down counter
        } else {
          keyAction = RELEASED;
        }
      }
      if (isDown[r][c]) {
        downCount[r][c]++;
      }
    }
  }
}