Applying sensor fusion with RSL10 Bosch sensors to run a TinyML model for predictive maintenance of compressor pump.
STORY
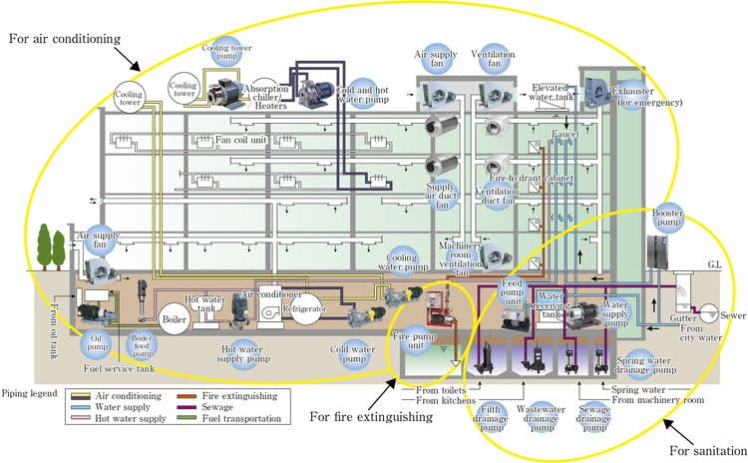
An ordinary resident of a metropolis rarely thinks about how water enters taps or central heating pipes, and may not even have an idea of what a compressor water pump looks like. But in reality, it’s hard to picture life without water pumps as no one likes not being able to take a hot shower in the morning, after all.
In some countries, the situation is even more acute. I’m from the Jharkhand state of India, and in some places, access to processed potable water is very difficult so people have to rely on underground water. In such cases, water pumps are the only option. But ordinary men don't have the skills, time, and know-how for water pump maintenance, and if heavy wear and tear occurs, people have to wait for almost a week for the pump to be repaired.
Like any other machines, water pumps should undergo maintenance and repairs like lubricating, cleaning, changing air filters, and inspecting the machine for potential problems, so it’s important to address any potential concerns before they cause serious issues. Instead of taking reactive measures when the damage has already happened, people can use ML-based predictive maintenance that will help avoid any severe issues and extend the life of a compressor pump.
With RSL10 sensors and Neuton AI, I’ve built a fast scalable solution for compressor water pump predictive maintenance. Let's watch a demo to see how the solution works:
?? Predictive Maintenance VS Reactive Maintenance?
Predictive maintenance is a type of troubleshooting that addresses needs before they turn into problems. This process helps you prevent equipment breakdowns rather than waiting until a concern reveals itselfReactive maintenance requires far less forethought but can cost a lot. Predictive maintenance requires more planning, but it can pay off in big ways, as we’ll see. Of course, it’s not possible to predict every problem, but you can avoid a lot of unexpected machinery issues.
Reactive maintenance requires far less forethought but can cost a lot. Predictive maintenance requires more planning, but it can pay off in big ways, as we’ll see. Of course, it’s not possible to predict every problem, but you can avoid a lot of unexpected machinery issues.
? Importance of water pumps
Water pumps have several areas of use: residential, industrial, and commercial, depending on their features. But, the functions of all these pumps remain the same – they all transport water and other liquids from one place to another.
In this project, I used RSL10, the industry’s lowest power Bluetooth® 5 SoC, and several sensors from ON Semiconductor and Bosch.
- Arm® Cortex®−M3 Processor Clocked at up to 48 MHz
- Supply Voltage Range: 1.1 − 3.3 V
- 384 kB of Flash Memory
- 76 kB of Program Memory
- 88 kB of Data Memory
- ~10 yrs battery operation on deep sleep mode
Advanced Wireless features:
- Bluetooth 5.2 Certified with LE 2−Mbit PHY (High Speed), as well as Backwards Compatibility and Support for Earlier
- Supports FOTA (Firmware Over−The−Air) Updates
- Rx Sensitivity (Bluetooth Low Energy Mode, 1 Mbps): −93 dB
- Transmitting Power: −17 to +6 dBm
- Range up to 100 Meters
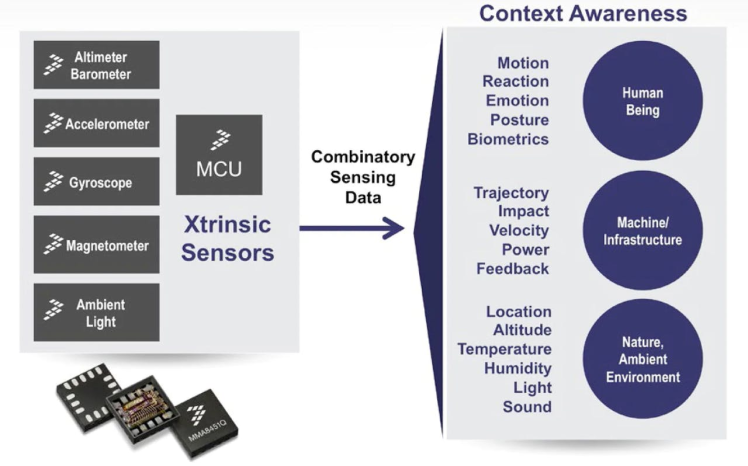
Sensor fusion is the process of combining sensor data or data derived from disparate sources so that the resulting information can be more accurate. Sensor fusion creates a situation in which the whole is much greater than the sum of its parts. These mechanisms provide a way to resolve contradictory situations and allow the development of dynamic sensing strategies. Sensor fusion is also known as (multi-sensor) data fusion and is a subset of information fusion
The concept of data fusion has origins in the evolved capacity of humans and animals to incorporate information from multiple senses to improve their ability to survive. For example, a combination of sight, touch, smell, and taste may indicate whether a substance is edible.
Sensor fusion and ML and connectivity enable context awareness, and context awareness enables a new world of services.
What is "Context?"
Context is defined as the circumstances or facts that form the setting for an event, statement, situation, or idea. In software programming, the idea of developing context-aware applications has been around for a while. Context-aware apps examine who, where, when, and what. The software designer uses this contextual information to determine why a situation is happening and then encodes some action in the application.
Source: https://www.mouser.in/applications/sensor-fusion-iot/
Based on this definition, the four most important categories of information to formulate a context-aware action are:
- Identification
- Location
- Time
- Activity
Procedure
Step 1: Data Collection
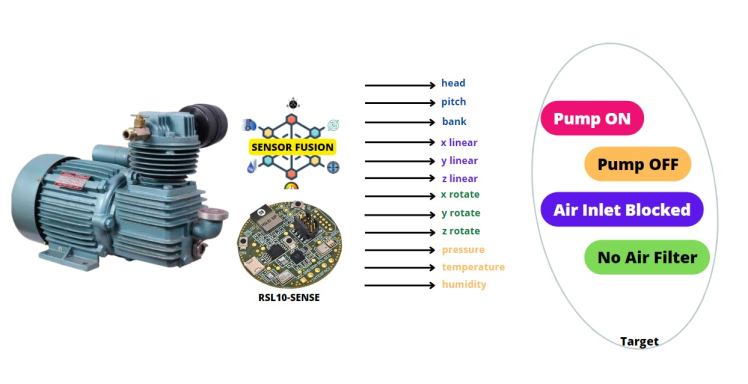
Input features description for this project,
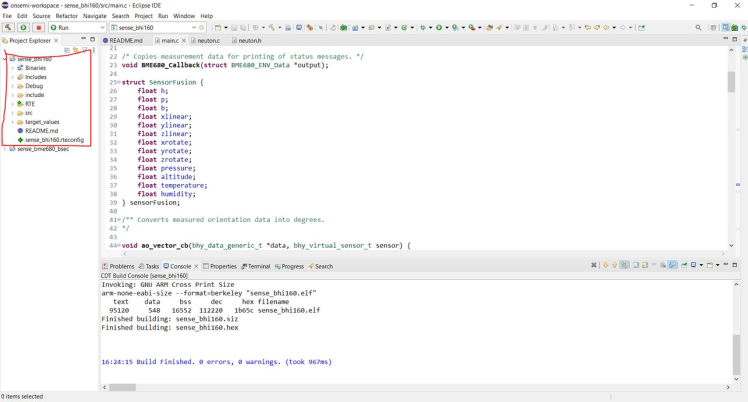
As shown above, we will set up our data collection stage for our compressor water pump with RSL10 device sensors. To do so, we need to configure our IDE for programming first.
4. We can modify the example code to build a dataset for our project,
Hardware Setup
The pump runs hot so I tried to use a rough enclosure to protect the RSL10 sensor board from any damage. Once the setup is ready we are ready to print all the sensor values and prepare our dataset.
printf("%.2f, %.2f, %.2f, %.2f, %.2f, %.2f, %.2f, %.2f, %.2f, %.2f, %.2f, %.2f n", sensorFusion.h, sensorFusion.p, sensorFusion.b, sensorFusion.xlinear, sensorFusion.ylinear, sensorFusion.zlinear, sensorFusion.xrotate, sensorFusion.yrotate, sensorFusion.zrotate, sensorFusion.pressure, sensorFusion.temperature, sensorFusion.humidity)
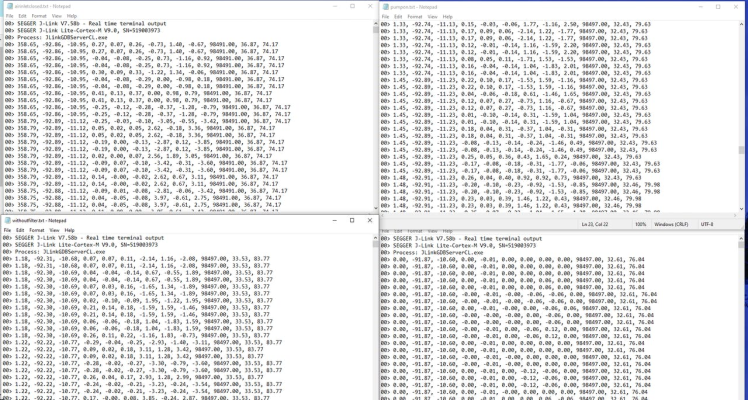
The sensor values would be printed on the J-Link RTT Viewer
Once we are ready with the data collection part, we will proceed to Neuton AI model training and inference.
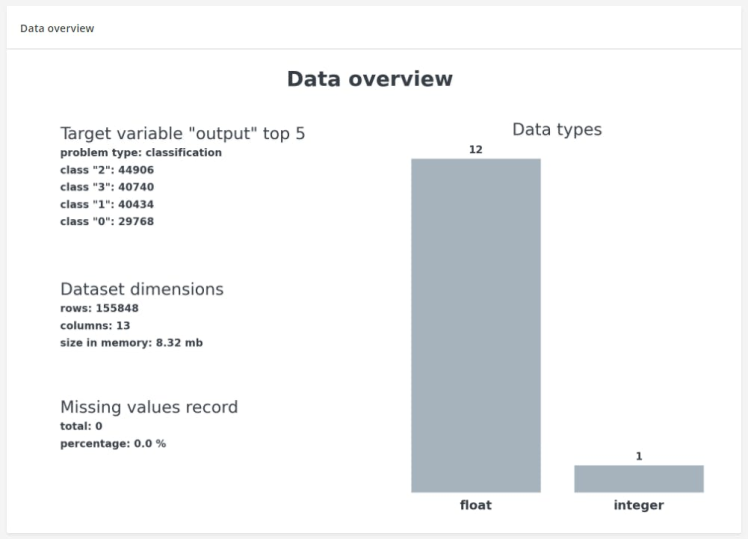
Check our dataset summary,
Step 2: Model Training
On the Neuton platform, upload your dataset, and select 'output' as the target variable. Neuton by default uses cross-validation which gives perfect metric results for created models. I also uploaded a holdout dataset to measure metrics on data that were not seen during model training.
In this case, our goal is to define the action mode on the pump based on provided feature values to solve the classification task.
Toggle the DSP option and select Windows size auto selection and start training. In the automatic mode, the optimal window size will be selected. Also, additional features will be generated from the data and then feature selection will occur.
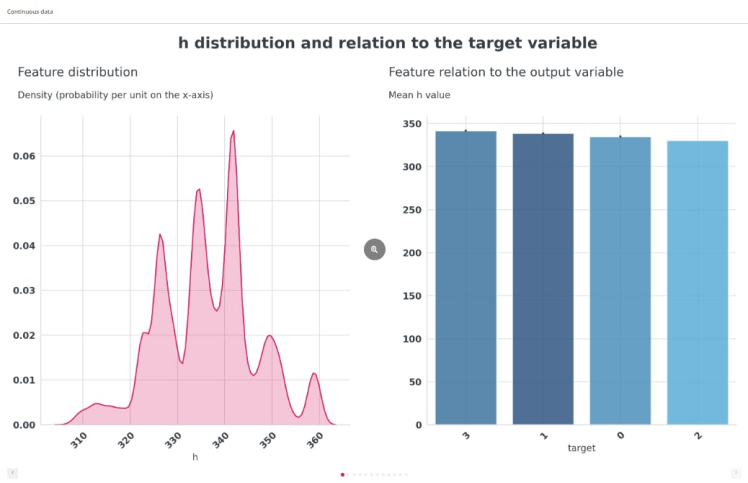
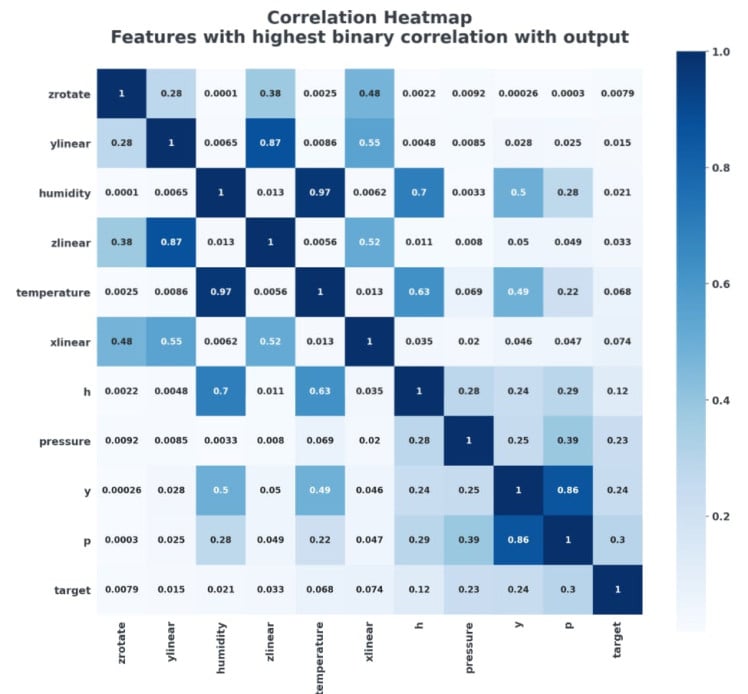
Some minutes after the training begins, we can explore variable-to-target relation features and data analysis charts.
1 / 4
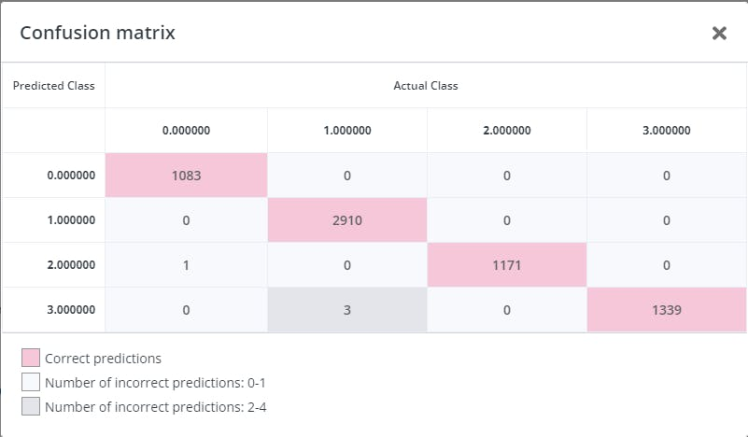
The training looks good – our model has 99% Accuracy. Next, we will download the generated TinyML model C library to use on our RSL10 board IDE
Here’s the confusion matrix:
Click on the Download button.
Step 3: Model deployment and Inference
We will place all our header files in the include folder and C files in the src folder for the downloaded Neuton TinyML C library, see below.
The important function here is neuton_model_set_inputs(inputs), in which all sensor values are fed and once the buffer is full the function returns 0 and is ready for inference.
Build your project, the build writes.elf binary file which is to be flashed on the RSL10 device through J-Link Debugger.
Set build configurations for the RSL10 device, and proceed to the Run button to flash the RSL10 board.
On successful, the console should log the following output
SEGGER J-Link GDB Server V7.58b Command Line Version

JLinkARM.dll V7.58b (DLL compiled Nov 16 2021 15:00:10)

Command line: -if swd -device RSL10 -endian little -speed 1000 -port 2331 -swoport 2332 -telnetport 2333 -vd -ir -localhostonly 1 -singlerun -strict -timeout 0 -nogui
-----GDB Server start settings-----
GDBInit file:                  none
GDB Server Listening port:     2331
SWO raw output listening port: 2332
Terminal I/O port:             2333
Accept remote connection:      localhost only
Generate logfile:              off
Verify download:               on
Init regs on start:            on
Silent mode:                   off
Single run mode:               on
Target connection timeout:     0 ms
------J-Link related settings------
J-Link Host interface:         USB
J-Link script:                 none
J-Link settings file:          none
------Target related settings------
Target device:                 RSL10
Target interface:              SWD
Target interface speed:        1000kHz
Target endian:                 little

Connecting to J-Link...
J-Link is connected.
Firmware: J-Link Lite-Cortex-M V9 compiled Feb  2 2021 16:33:27
Hardware: V9.00
S/N: 519003973
Feature(s): GDB
Checking target voltage...
Target voltage: 2.58 V
Listening on TCP/IP port 2331
Connecting to target...
Connected to target
Waiting for GDB connection...Connected to 127.0.0.1
Reading all registers
Read 4 bytes @ address 0x00000000 (Data = 0x20002000)
Read 2 bytes @ address 0x00000000 (Data = 0x2000)
Received monitor command: speed 1000
Target interface speed set to 1000 kHz
Received monitor command: clrbp
Received monitor command: reset
Resetting target
Received monitor command: halt
Halting target CPU...
...Target halted (PC = 0x00100158)
Received monitor command: regs
R0 = 00100159, R1 = 00000007, R2 = 20008000, R3 = E000ED00
R4 = 00100000, R5 = 00000007, R6 = FFFFFFFF, R7 = 40000E2C
R8 = 4200A700, R9 = 00081A00, R10= BD648BE7, R11= 99F19BFF
R12= 00000001, R13= 20007FFC, MSP= 20007FFC, PSP= 37EBBDB8
R14(LR) = 000002E5, R15(PC) = 00100158
XPSR 61000000, APSR 60000000, EPSR 01000000, IPSR 00000000
CFBP 00000001, CONTROL 00, FAULTMASK 00, BASEPRI 00, PRIMASK 01

Security extension regs:
MSP_S  = 00000000, MSPLIM_S  = 00000000
PSP_S  = 00000000, PSPLIM_S  = 00000000
MSP_NS = 20007FFC, MSPLIM_NS = 00000000
PSP_NS = 37EBBDB8, PSPLIM_NS = 00000000
CONTROL_S  00, FAULTMASK_S  00, BASEPRI_S  00, PRIMASK_S  00
CONTROL_NS 00, FAULTMASK_NS 00, BASEPRI_NS 00, PRIMASK_NS 01

Reading all registers
Received monitor command: speed auto
Select auto target interface speed (2000 kHz)
Received monitor command: flash breakpoints 1
Flash breakpoints enabled
Received monitor command: semihosting enable
Semi-hosting enabled (Handle on BKPT)
Received monitor command: semihosting IOClient 1
Semihosting I/O set to TELNET Client
Received monitor command: SWO DisableTarget 0xFFFFFFFF
SWO disabled successfully.
Received monitor command: SWO EnableTarget 0 0 0x1 0
SWO enabled successfully.
Downloading 16112 bytes @ address 0x00100000 - Verified OK
Downloading 16048 bytes @ address 0x00103EF0 - Verified OK
Downloading 16032 bytes @ address 0x00107DA0 - Verified OK
Downloading 16016 bytes @ address 0x0010BC40 - Verified OK
Downloading 16016 bytes @ address 0x0010FAD0 - Verified OK
Downloading 14888 bytes @ address 0x00113960 - Verified OK
Downloading 8 bytes @ address 0x00117388 - Verified OK
Downloading 548 bytes @ address 0x00117390 - Verified OK
Received monitor command: clrbp
Received monitor command: reset
Comparing flash   [....................] Done.
Erasing flash     [....................] Done.
Programming flash [....................] Done.
Resetting target
Received monitor command: halt
Halting target CPU...
...Target halted (PC = 0x00100158)
Received monitor command: regs
R0 = 00100159, R1 = 00000007, R2 = 20008000, R3 = E000ED00
R4 = 00100000, R5 = 00000007, R6 = FFFFFFFF, R7 = 40000E2C
R8 = 4200A700, R9 = 00081A00, R10= BD648BE7, R11= 99F19BFF
R12= 00000001, R13= 20007FFC, MSP= 20007FFC, PSP= 37EBBDB8
R14(LR) = 000002E5, R15(PC) = 00100158
XPSR 61000000, APSR 60000000, EPSR 01000000, IPSR 00000000
CFBP 00000001, CONTROL 00, FAULTMASK 00, BASEPRI 00, PRIMASK 01

Security extension regs:
MSP_S  = 00000000, MSPLIM_S  = 00000000
PSP_S  = 00000000, PSPLIM_S  = 00000000
MSP_NS = 20007FFC, MSPLIM_NS = 00000000
PSP_NS = 37EBBDB8, PSPLIM_NS = 00000000
CONTROL_S  00, FAULTMASK_S  00, BASEPRI_S  00, PRIMASK_S  00
CONTROL_NS 00, FAULTMASK_NS 00, BASEPRI_NS 00, PRIMASK_NS 01

Reading all registers
Starting target CPU...
To see the output, we can either use the J-Link RTT Viewer or Eclipse IDE terminal viewer. Let's use Terminal in Eclipse OnSemi IDE
We can see the inference output on the terminal,
Have a look at the model footprint on the device.
The Neuton TinyML model and RSL10 device have proved to be a working mission-critical solution for the compressor pumps industry. With such accurate and reliabletinyML models, there is still ample space left for all other networking and DSP operations. The inference is faster than any existing tinyML solutions
Note about TensorFlow Lite for MCU
Meanwhile, I created a model using the TensorFlow Lite solution for the Microcontrollers framework. I spent some hours on manual searching for optimal architecture, and I got Accuracy=0.935300 and Model Size=12.94kB. Unfortunately, I found that RSL10 SDK does not support C++, hence we cannot run TensorFlow Lite models on this device.
Conclusion
Through this project, I showcased how such tiny sensor-rich low-powered devices can improve lives for the better. Predictive maintenance of compressor water pumps can really save much money for the common man, farmers, and even companies.
Code