Learn how to connect a microSD module to a Raspberry Pi Pico via SPI — instantly enable file read/write, sensor logging, and offline data storage.
Introduction: Why Add External Storage to the Pico?
The Raspberry Pi Pico is a tiny powerhouse — dual-core RP2040, tons of GPIO, flexible I/O, and a price that makes it irresistible for Makers. But there’s one limitation every project eventually hits: you run out of space.
Whether you're logging sensor data, storing configuration files, keeping offline IoT records, or even creating simple data-driven gadgets, the internal flash of the Pico can only take you so far.
That’s where an SD card module changes everything.
With a simple SPI connection, the Pico gains massive, removable, non-volatile storage — from a few megabytes to 32GB or more. And thanks to wide library support, you can read, write, delete, and manage files just like on a tiny, embedded filesystem.
This guide walks you through exactly how to interface an SD-card module with the Raspberry Pi Pico, test file operations using a simple on-serial menu, and explore real Maker-grade project ideas you can build
Interfacing SD Card Module with Raspberry Pi Pico
Hardware Overview: Understanding the SD Module
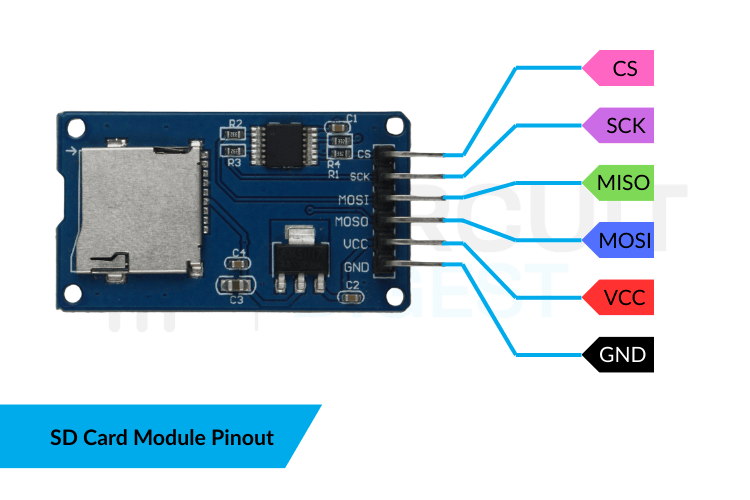
Consumer microSD cards operate at 3.3V, and their data lines require proper level shifting when talking to microcontrollers. Most off-the-shelf modules designed for Arduino or Pico include:
- A 3.3V voltage regulator
- Level shifters to protect the card from 5V signals
- Onboard pull-ups on the SPI lines
- A standard microSD slot
Because the Raspberry Pi Pico is natively 3.3V, you can safely use these modules without additional circuitry — making the wiring incredibly straightforward.
SD Card Module Pin Configuration
Parts You'll Need
- Raspberry Pi Pico or Pico W
- microSD card module (common: HW-125, Catalex, LC Studio-style)
- microSD card (4–32GB recommended)
- Jumper wires
- Breadboard
- USB cable for uploading code and interacting via Serial Monitor
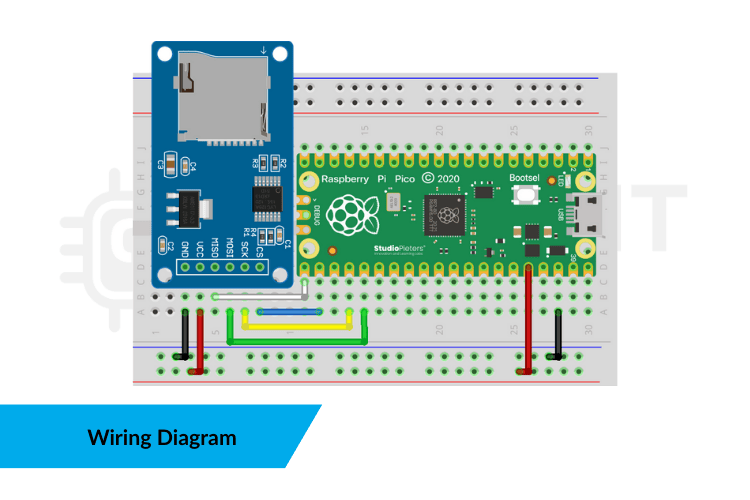
Wiring Diagram: Pico ↔ SD Card Module
The SD card communicates using the SPI interface. On the Pico, any SPI port works, but we'll use the default SPI0 pins:
SD Module PinRaspberry Pi Pico PinVCC3.3V (not 5V!)GNDGNDMOSIGP19 (SPI0 TX)MISOGP16 (SPI0 RX)SCKGP18 (SPI0 SCK)CSGP17
Important Notes:
- Never use the Pico’s 5V pin — microSD cards are strictly 3.3V only.
- Keep wires short; long SPI lines can cause unreliable reads.
Preparing the microSD Card
For best compatibility, format your card using:
- FAT32 filesystem
- MBR partition table
- Allocation size 32KB (optional but recommended)
Windows users can use SD Card Formatter.
Linux/macOS users can use mkfs.fat -F 32.
Troubleshooting tip:
If your card refuses to initialize, the filesystem is almost always the culprit.
Test Sketch: Menu-Driven SD File Operations (Arduino-Pico Core)
This example gives you a simple Serial Monitor menu so you can instantly test:
- Create a file
- Write to a file
- Read a file
- Delete a file
- Check card initialization
Copy/paste into the Arduino IDE with Raspberry Pi Pico support installed.
#include <SPI.h>
#include <SD.h>

const int SD_CS = 17;  // Chip select pin

void setup() {
  Serial.begin(115200);
  while (!Serial) {}

  Serial.println("Initializing SD card...");

  if (!SD.begin(SD_CS)) {
    Serial.println("SD initialization FAILED!");
    while (1);
  }

  Serial.println("SD card ready.\n");
}

void loop() {
  Serial.println("=== SD Card Menu ===");
  Serial.println("1. Create File");
  Serial.println("2. Write to File");
  Serial.println("3. Read File");
  Serial.println("4. Delete File");
  Serial.println("5. List Files");
  Serial.print("Enter choice: ");

  while (!Serial.available()) {}
  int choice = Serial.parseInt();
  Serial.read(); // consume newline

  switch (choice) {
    case 1: createFile(); break;
    case 2: writeFile(); break;
    case 3: readFile(); break;
    case 4: deleteFile(); break;
    case 5: listFiles(); break;
    default: Serial.println("Invalid choice.");
  }

  Serial.println();
}

void createFile() {
  Serial.print("Enter filename: ");
  String fname = Serial.readStringUntil('\n');

  File file = SD.open(fname, FILE_WRITE);
  if (file) {
    Serial.println("File created successfully.");
    file.close();
  } else {
    Serial.println("Failed to create file.");
  }
}

void writeFile() {
  Serial.print("Enter filename: ");
  String fname = Serial.readStringUntil('\n');

  File file = SD.open(fname, FILE_WRITE);
  if (!file) {
    Serial.println("File not found.");
    return;
  }

  Serial.print("Enter text to write: ");
  String text = Serial.readStringUntil('\n');

  file.println(text);
  file.close();
  Serial.println("Write complete.");
}

void readFile() {
  Serial.print("Enter filename: ");
  String fname = Serial.readStringUntil('\n');

  File file = SD.open(fname);
  if (!file) {
    Serial.println("File not found.");
    return;
  }

  Serial.println("--- File Contents ---");
  while (file.available()) {
    Serial.write(file.read());
  }
  file.close();
  Serial.println("\n--- End ---");
}

void deleteFile() {
  Serial.print("Enter filename: ");
  String fname = Serial.readStringUntil('\n');

  if (SD.remove(fname)) {
    Serial.println("File deleted.");
  } else {
    Serial.println("Failed to delete file.");
  }
}

void listFiles() {
  Serial.println("Files on SD:");

  File root = SD.open("/");
  File entry = root.openNextFile();

  while (entry) {
    Serial.println(entry.name());
    entry = root.openNextFile();
  }
}
Upload, open the Serial Monitor at 115200 baud, and you’re ready to interact with your SD card.
Troubleshooting & Common Pitfalls
1. “SD initialization FAILED!”
- Card not FAT32
- Wrong CS pin
- Loose jumper wires
- Trying to power module from 5V
2. File write fails randomly
- SD module undervoltage
- Cheap modules with linear regulators overheating
- Ground connection too long
3. Read/Write corruption at high speed
SD.begin(SD_CS, SPI, 10000000); // 10 MHz
Real Maker-Grade Applications
This SD-card interface unlocks serious capability on the Pico:
✔ Environmental Data Logger
Record temperature/humidity every few seconds for weeks — perfect for greenhouse monitoring.
✔ Portable GPS Tracker
Store NMEA sentences on SD and analyze the route later.
✔ IoT Node with Offline Buffer
Keep storing data even if WiFi or LoRa drops.
✔ Retro-style File-based Games
Store level data, sprites, or saved games on SD.
✔ Configuration-driven Devices
Load settings from a simple .txt file so users can tweak behavior without re-uploading firmware.
Once you master SD operations, the Pico can behave like a proper embedded computer with dynamic, persistent storage — a huge leap for advanced Maker builds.
Expansion Ideas for Your Next Build
You can extend this project into bigger, audience-friendly Maker Pro articles:
- Add sensors (DHT11, BME280, DS18B20) for a full data logger
- Build a web dashboard (Pico W) that serves logs from the SD card
- Create a CSV logger readable by Excel/Google Sheets
- Add a small OLED or TFT display
- Build a “Black Box Recorder” for your robot or drone
Each one of these can become a full tutorial, backlinking to your SD-card guide for even more traffic and authority.
Conclusion
Interfacing SD module with Raspberry Pi Pico is one of those rare projects that is:
- beginner-friendly
- ultra-useful
- inexpensive
- and the gateway to advanced embedded builds
You’ve added gigabytes of storage, gained the ability to store complex data, and opened up countless real-world project opportunities.