This article provides an introduction to the wonderful world of HTTP and some common commands including GET and POST.
The internet is an amazing system that connects many billions of devices together, but how the internet actually works remains a mystery to most. In this article, we learn about HTTP and why it is so brilliant!
Simplifying the Internet
When any two electronic devices need to communicate with each other, they have to use a common protocol or messaging system. If one device tries to send a message using protocol A while another device is using protocol B, the two can never exchange data (they would see each other’s messages as garbage). So for the internet to function, devices have to use common protocols to communicate, and this is where IP, or internet protocol, comes in.
IP itself is rather complex and consists of frames, headers, locations, etc., but luckily for us, most internet controllers such as Ethernet ICs and Wi-Fi adaptors handle the protocol automatically. This usually means that the user only needs to send simple commands such as “Open socket to IP device” and “Send this data package”.
However, IP merely handles the physical communication link by opening sockets on the sender and the receiver (so binary data can be transmitted). A simple way to understand this is to see IP as a system that physically links two devices (such as connecting two computers with an Ethernet cable), so when one device sends out two bits of data, the other device will see those same two identical bits. For two devices to understand what those bits actually mean, we need to use a messaging protocol. While there are many protocols used on the internet, the most common one is called HTTP.
HTTP, or HyperText Transfer Protocol, defines how to interpret data sent/received over a socket between two devices. HTTP (HTTPS is the encrypted secure version), is the protocol that is used on every single website in existence and is incredibly simple. But HTTP is not limited to just websites. We can use it for IoT applications as well, which is why YOU NEED TO LEARN IT NOW!
Why HTTP is so Amazing
HTTP is an amazing protocol for several reasons:
- All the messages are in ASCII text format (fantastic for data size and ease of use)
- All lines are terminated with carriage return line feed (0x0A 0x0D or \r \n)
- All messages are “as is” and there is no adulteration at all (i.e. raw text)
- Can easily be implemented in code using string data types
When a client (such as a PC or tablet) wants to open up a webpage (for example, index.html), the client first needs to open a socket to connect to the server in question on port 80.
For this article, we will use MicroPython code from The Gentleman Maker: IoT Teapot project found on All About Circuits. This section of code is not HTTP, but instead IP, and is what gets our client and server connected together.
The first line creates a socket object called sock, the second line gets the IP address of the website that we want to connect to on port 80 (since this can dynamically change), and the last line creates an address object that consists of the IP address of the server and the port number. The only parameter you need to change is “iot.yourwebsite.co.uk” to whatever website you want to connect to.
With the IP address known, it's time to open the connection between the client and the server. This is easy to do with the command shown below:
If all goes to plan, you should now have established a link between the client and server. At this point, you can send data over the socket using sock.send(your data here), but if the server does not understand the data, it will respond with error codes. So, let’s learn how to request data using the GET command!
**NOTE: Make sure that any data you send over the socket is encoded into a binary format since sockets in MicroPython only send binary data!
The GET Command
GET is the command used to request a webpage or contents of a file such as .html, .htm, and .txt. The GET message consists of at least three lines (all of which are terminated with carriage return line feed):
- GET <file you want here> HTTP/1.1\r\n
- Host: <the website domain> \r\n
- \r\n
The first line starts with GET, then the file that is needed. For example, if we wanted the index.html file, we would replace the text shown above with /index.html. The second line is the host domain, such as maker.pro, but does NOT include http or www. The last line is an empty line and MUST be empty! This signifies the end of the message, and the server will recognize that it now needs to process the GET request. The complete message and the code that makes it work are shown below.
HTTP Response
Once the request has been sent, the server will process the message and then send a response. The response will consist of three main parts:
- Success/error code
- Metadata
- The requested file contents
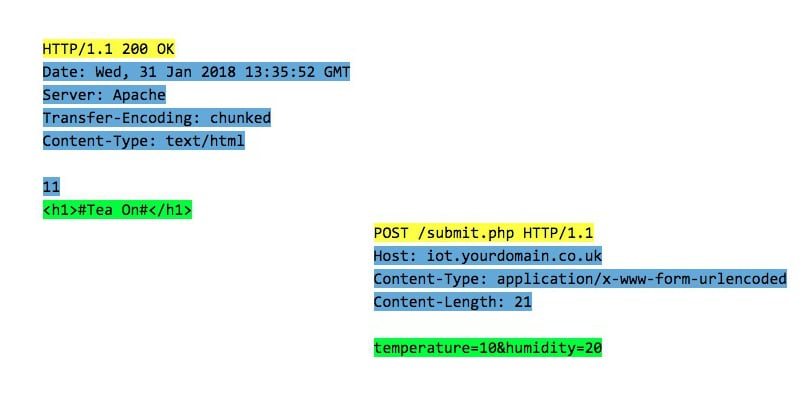
To better understand the response content, let’s look at the GET request for the teapot project.
The success/error code is the first line highlighted in yellow and informs the client if the request was a success or failure. The second number on this line (200 in this case) is the response code, and can be used to determine if something went wrong (a very common error code is 404, which means the requested file does not exist). So let’s look at some of the common error codes.
- 200 – OK — everything went well :)
- 400 – Bad Request
- 401 – Unauthorized access
- 403 – Forbidden
- 404 – Not Found
- 408 – Request timeout
- 429 – Too Many Requests
- 500 – Internal server error
- 502 – Bad gateway
The next section of data (highlighted in blue) is metadata, which includes information such as the current date/time, the server type, the encoding method, data type, and the length of data. The last chunk of data (highlighted in green) is the contents of the requested file.
The POST Command
The second command that we will look at is the POST command, which is used to send data to a server. This is very useful when dealing with IoT devices that need to upload sensor data or commands to control other devices. Normally, POST is used to send data to a php script file, which in turn can then perform an action based on the value of the submitted data. So let’s see how we can send some variables to a php page!
Like before, the first line has the POST command and the page that we are sending data to. The next few lines (highlighted in blue) are metadata, which include the type of content that is being sent and its size (remember, there needs to be one empty line after the content length), and the last line is the data we are sending. In this case, the php script will receive two variables called temperature (whose value is 10) and humidity (whose value is 20).
Conclusion
This article merely scrapes at the surface of HTTP’s power. By coding websites in PHP, adding login pages, and learning about error codes, we can make just about any internet-enabled device obtain information from the internet AND upload data to websites.