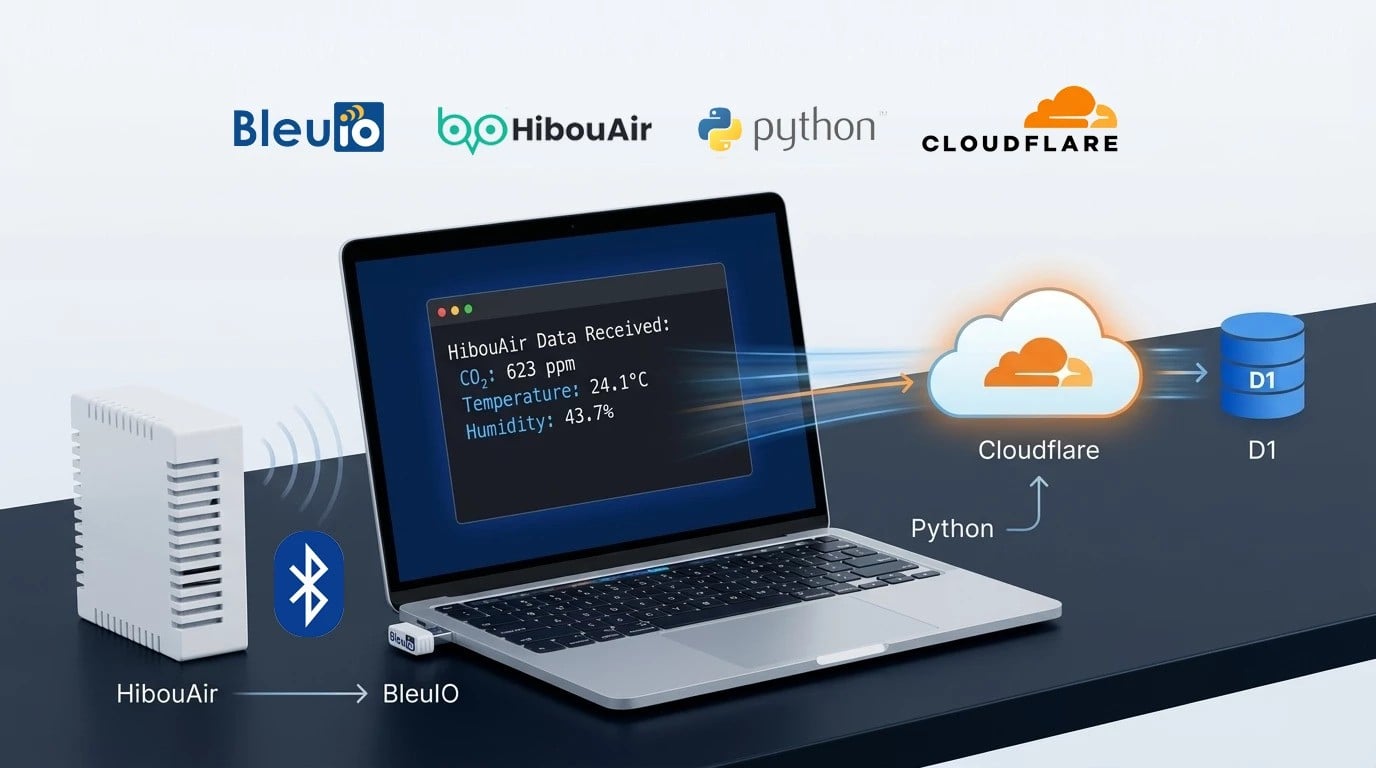
In this tutorial, we will build a simple BLE-to-cloud air quality gateway using HibouAir, BleuIO, Python, Cloudflare Workers, and Cloudflare D1.
A HibouAir sensor will advertise its air quality measurements over Bluetooth Low Energy. BleuIO, connected to a computer through USB, will scan for a specific HibouAir device and provide the BLE advertising data to a Python application through the serial port. The Python application will decode CO2, temperature, and humidity, display the measurements in the terminal, and upload them to a Cloudflare Worker. The Worker will then store the measurements in a Cloudflare D1 database.
This project is intentionally kept simple. It demonstrates how BleuIO can act as the Bluetooth interface for a desktop or gateway application without requiring the application itself to manage a Bluetooth stack.
Why Cloudflare D1?
Cloudflare D1 is a serverless SQL database built on SQLite. It works particularly well with Cloudflare Workers, allowing us to create a small HTTP API without running our own server.
For a project like this, there are several advantages:
- No database server to install or maintain
- No local web server required
- HTTPS is handled automatically
- Cloudflare Workers can communicate directly with D1
- D1 supports regular SQL
- A useful free tier is available
- The database remains accessible even when the Computer running the BLE gateway is offline
This makes it convenient for prototypes, BLE gateways, environmental monitoring projects, demonstrations, and small IoT applications.
For this example, the Computer only needs to run the Python gateway application. Everything after the HTTP request is handled in the cloud.
Requirements
For this project, you will need:
Hardware
Software and services
- Python 3
- A free Cloudflare account
pyserialrequests
For this example, the HibouAir sensor has the board ID:
220069
and BleuIO appears on the Mac at:
/dev/cu.usbmodem4048FDEBA6D01
Your serial port depends on operating system and HibouAir board ID may be different.
Step 1: Create a Cloudflare D1 Database
First, log in to your Cloudflare account.
From the Cloudflare dashboard, go to the D1 database section and create a new database.
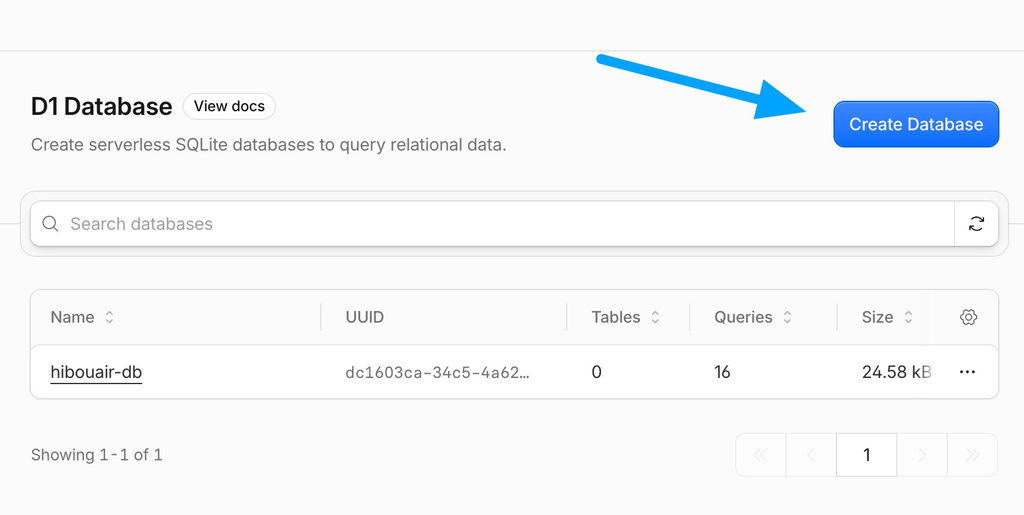
For this tutorial, we will call it:
hibouair-db
Once the database has been created, open its SQL Console.
Run the following SQL:
CREATE TABLE IF NOT EXISTS readings (
    id INTEGER PRIMARY KEY AUTOINCREMENT,
    board_id TEXT NOT NULL,
    measured_at TEXT NOT NULL DEFAULT CURRENT_TIMESTAMP,
    co2 INTEGER NOT NULL,
    temperature REAL NOT NULL,
    humidity REAL NOT NULL
);

CREATE INDEX IF NOT EXISTS idx_readings_board_time
ON readings(board_id, measured_at);
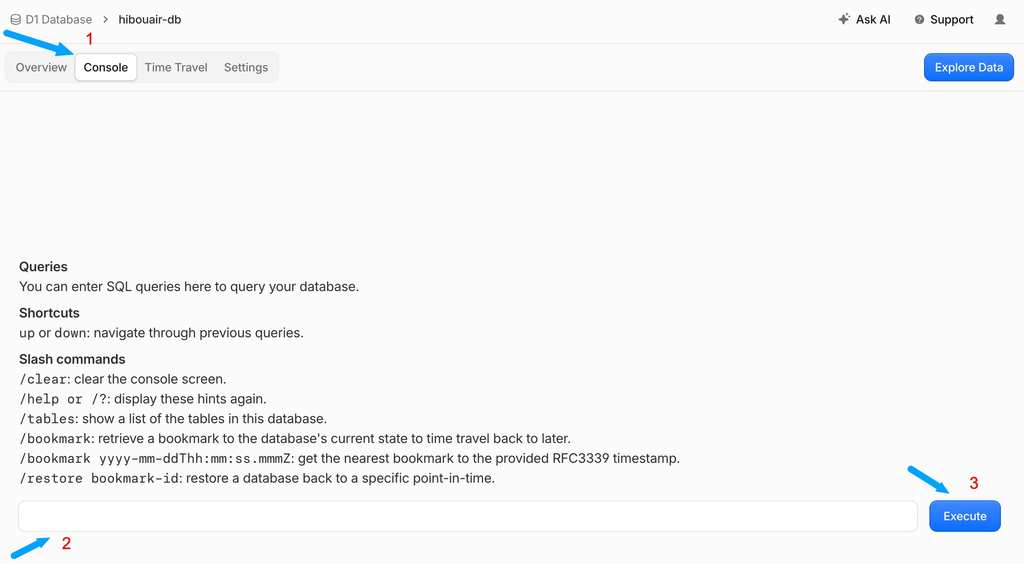
This creates a simple table containing:
- Database ID
- HibouAir board ID
- Timestamp
- CO₂
- Temperature
- Humidity
The measured_at field is generated automatically by D1 when the reading is inserted.
A stored record will look conceptually like this:
id          1
board_id    220069
measured_at 2026-10-05 14:42:30
co2         623
temperature 24.1
humidity    43.7
Step 2: Create the Cloudflare Worker
Next, create a Cloudflare Worker.
Now go to:
Workers & Pages → Create application
Create a basic Worker. ( you can choose “Start with Hello world”)
The Worker will sit between our Python application and the D1 database.
For this project, we can name it:
hibouair-api
and then press deploy.
After creating the Worker, open the code editor and replace the default code with the following :
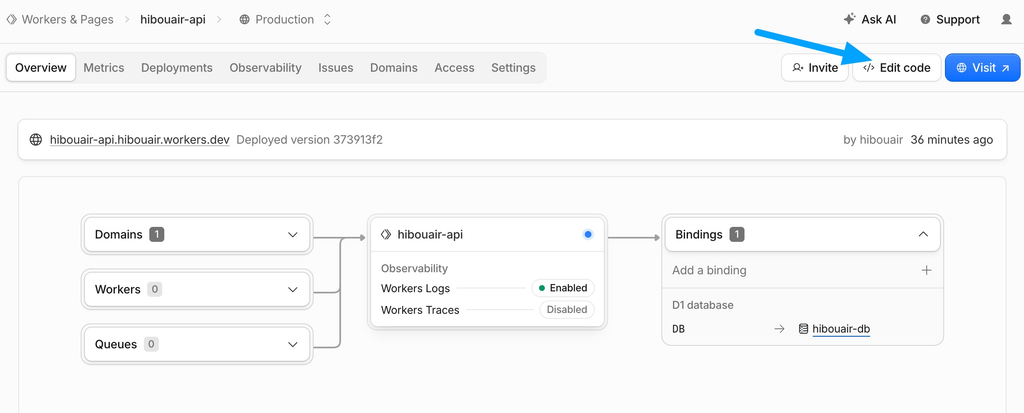
export default {
  async fetch(request, env) {
    const url = new URL(request.url);

    // API status
    if (url.pathname === "/" && request.method === "GET") {
      return Response.json({
        service: "HibouAir Cloud API",
        status: "online"
      });
    }

    // Store a new sensor reading
    if (url.pathname === "/api/readings" && request.method === "POST") {
      const suppliedKey = request.headers.get("X-API-Key");

      if (!suppliedKey || suppliedKey !== env.API_KEY) {
        return Response.json(
          {
            success: false,
            error: "Unauthorized"
          },
          {
            status: 401
          }
        );
      }

      let data;

      try {
        data = await request.json();
      } catch {
        return Response.json(
          {
            success: false,
            error: "Invalid JSON"
          },
          {
            status: 400
          }
        );
      }

      const boardId = String(data.board_id || "").trim();
      const co2 = Number(data.co2);
      const temperature = Number(data.temperature);
      const humidity = Number(data.humidity);

      if (!boardId) {
        return Response.json(
          {
            success: false,
            error: "board_id is required"
          },
          {
            status: 400
          }
        );
      }

      if (
        !Number.isFinite(co2) ||
        !Number.isFinite(temperature) ||
        !Number.isFinite(humidity)
      ) {
        return Response.json(
          {
            success: false,
            error: "Invalid sensor values"
          },
          {
            status: 400
          }
        );
      }

      const result = await env.DB
        .prepare(`
          INSERT INTO readings (
            board_id,
            co2,
            temperature,
            humidity
          )
          VALUES (?, ?, ?, ?)
        `)
        .bind(
          boardId,
          co2,
          temperature,
          humidity
        )
        .run();

      return Response.json({
        success: true,
        message: "Reading stored",
        board_id: boardId,
        co2: co2,
        temperature: temperature,
        humidity: humidity,
        meta: result.meta
      });
    }

    // Return the latest reading
    if (
      url.pathname === "/api/readings/latest" &&
      request.method === "GET"
    ) {
      const boardId =
        url.searchParams.get("board_id") || "220069";

      const reading = await env.DB
        .prepare(`
          SELECT
            id,
            board_id,
            measured_at,
            co2,
            temperature,
            humidity
          FROM readings
          WHERE board_id = ?
          ORDER BY id DESC
          LIMIT 1
        `)
        .bind(boardId)
        .first();

      if (!reading) {
        return Response.json(
          {
            success: false,
            error: "No readings found"
          },
          {
            status: 404
          }
        );
      }

      return Response.json({
        success: true,
        reading: reading
      });
    }

    return Response.json(
      {
        success: false,
        error: "Not found"
      },
      {
        status: 404
      }
    );
  }
};
Deploy the Worker.
At this stage, the Worker exists, but it is not yet connected to the D1 database.
Step 3: Bind the D1 Database to the Worker
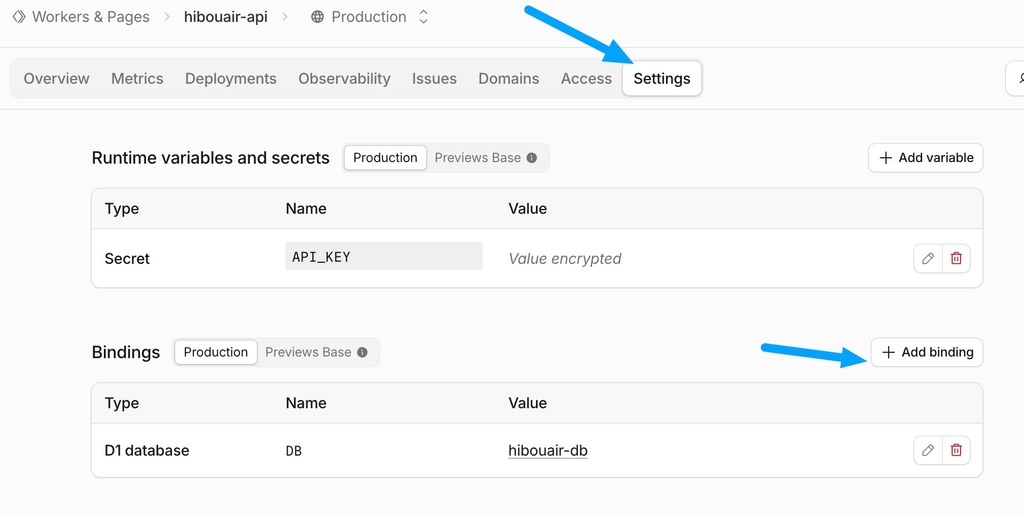
Open the settings for the hibouair-api Worker.
Add a D1 database binding.
Use:
Variable name: DB Database: hibouair-db
The variable name must be:
DB
because the Worker accesses the database through:
env.DB
For example:
await env.DB .prepare("SELECT * FROM readings") .all();
Once the binding has been added, deploy the Worker again if necessary.
Step 4: Add an API Key
Our Python application will be publicly connected to the Cloudflare Worker over HTTPS.
We therefore do not want anybody who discovers the Worker URL to be able to insert arbitrary sensor measurements.
We can protect the write endpoint using a simple API key.
On the Computer, generate a random key:
python3 -c "import secrets; print(secrets.token_hex(32))"
This will generate a long random value.
Copy it.
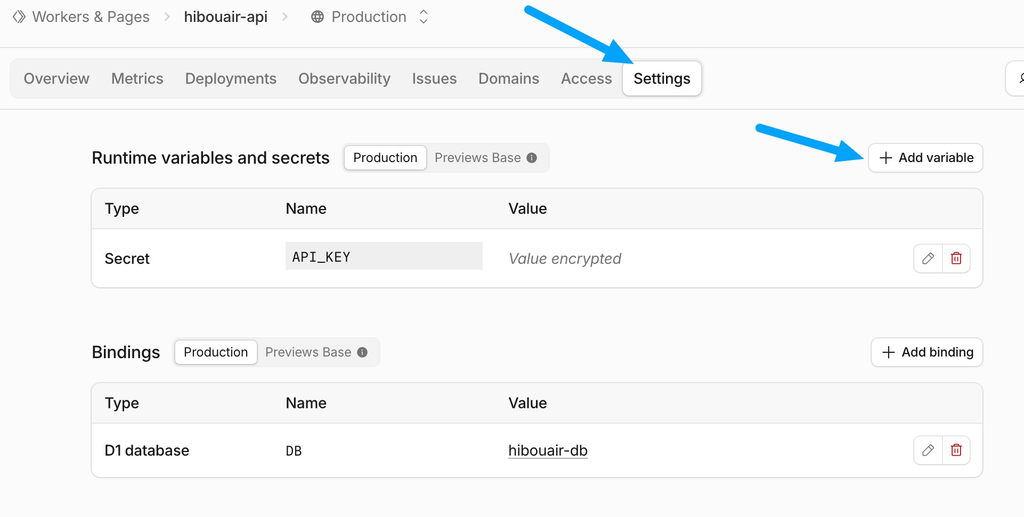
Now create a Worker secret environment variable named:
API_KEY
and paste the generated value as its value.
The Python application will include this key in every request using:
X-API-Key
The Worker checks:
const suppliedKey = request.headers.get("X-API-Key");
and compares it against:
env.API_KEY
Step 5: Test the Worker
Cloudflare will provide a Worker URL similar to:
https://hibouair-api.your-account.workers.dev
Open the base Worker URL in a browser.
You should receive something similar to:
{
  "service": "HibouAir Cloud API",
  "status": "online"
  }
If you see this response, the Worker is running.
Our Python application will send measurements to:
https://hibouair-api.your-account.workers.dev/api/readings
The latest stored reading can later be retrieved from:
https://hibouair-api.your-account.workers.dev/api/readings/latest
Step 6: Download the Python Project
The source code for the BleuIO Python gateway is available on GitHub:
GitHub: https://github.com/smart-sensor-devices-ab/bleuio-cloudflare-d1-database
Clone the repository:
git clone https://github.com/smart-sensor-devices-ab/bleuio-cloudflare-d1-database
Then enter the project directory:
cd bleuio-cloudflare-d1-database
The project structure is intentionally small:
bleuio-cloudflare-d1/
│
├── main.py
├── info.example.txt
├── requirements.txt
└── .gitignore
The Python application handles:
- Connecting to BleuIO
- Sending BleuIO AT commands
- Searching for the HibouAir board ID
- Reading BLE advertising data
- Decoding CO2, temperature, and humidity
- Displaying the measurement in the terminal
- Sending the measurement to Cloudflare
- Repeating the process at a configurable interval
Step 7: Install the Python Dependencies
It is recommended to create a Python virtual environment.
Run:
python3 -m venv .venv
Activate it:
source .venv/bin/activate
Then install the required libraries:
pip install -r requirements.txt
The application only requires:
pyserial requests
pyserial is used to communicate with BleuIO through the USB serial port.
requests is used to send the decoded measurements to the Cloudflare Worker over HTTPS.
Step 8: Configure the Project
The repository includes:
info.example.txt
Copy it:
cp info.example.txt info.txt
Then open:
info.txt
The configuration looks like this:
BLEUIO_PORT=/dev/cu.usbmodem4048FDEBA6D01
HIBOUAIR_SENSOR_ID=220069

SCAN_INTERVAL_SECONDS=30

CLOUDFLARE_API_URL=https://hibouair-api.YOUR-SUBDOMAIN.workers.dev/api/readings
CLOUDFLARE_API_KEY=YOUR_REAL_API_KEY
You need to update the values for your own environment.
BLEUIO_PORT
On our Mac, BleuIO is available at:
/dev/cu.usbmodem4048FDEBA6D01
Your port may be different.
You can normally find USB serial devices with:
ls /dev/cu.*
Look for the device corresponding to BleuIO.
On windows , look for COM port on device manager.
HIBOUAIR_SENSOR_ID
For this project, our HibouAir board ID is:
220069
Replace this with the board ID of the HibouAir device you want to monitor.
SCAN_INTERVAL_SECONDS
This determines how often the application starts a new HibouAir scan.
For this tutorial:
SCAN_INTERVAL_SECONDS=30
means approximately one scan every 30 seconds.
You can later change this without modifying the Python source code.
For example:
SCAN_INTERVAL_SECONDS=60
for approximately one reading per minute.
Or:
SCAN_INTERVAL_SECONDS=300
for approximately one reading every five minutes.
CLOUDFLARE_API_URL
Replace this with the URL of the Worker created earlier:
CLOUDFLARE_API_URL=https://hibouair-api.YOUR-SUBDOMAIN.workers.dev/api/readings
CLOUDFLARE_API_KEY
Enter the same secret that was configured in the Cloudflare Worker:
CLOUDFLARE_API_KEY=YOUR_REAL_API_KEY
The info.txt file should not be committed to GitHub because it contains the API key.
Step 9: How the HibouAir Data Is Read
BleuIO communicates with our Python application using simple AT commands over the serial port.
The application first connects to BleuIO and places it in central mode.
It then searches for our HibouAir board ID using:
AT+FINDSCANDATA=220069=5
Here:
220069
is the HibouAir board ID, and:
5
defines the scan duration.
BleuIO handles the Bluetooth Low Energy scanning and returns the matching BLE advertising information over serial.
This means the Python application does not need to directly communicate with the operating system’s native Bluetooth API.
BleuIO then returns the advertising data to Python.
Step 10: Decode the HibouAir Advertisement
The Python application searches the advertising payload for the HibouAir data section:
5B070
For the HibouAir advertisement used in this example, the application extracts the three measurements needed for this project. Temperature, Humidity and CO2. The result becomes a normal Python structure similar to:
{
  "co2": 623,
  "temperature": 24.1,
  "humidity": 43.7
  }
The application also performs basic validation before uploading the measurements.
For example, obviously invalid temperature, humidity, or CO2 values are rejected instead of being stored in the database.
Step 11: Sending the Measurement to Cloudflare
Once a valid advertisement has been decoded, Python prepares a JSON request.
For example:
{
  "board_id": "220069",
  "co2": 623,
  "temperature": 24.1,
  "humidity": 43.7
  }
This is sent using an HTTP POST request to:
/api/readings
The API key is included in the request header:
X-API-Key
The Cloudflare Worker validates the key and inserts the measurement into D1.
The Python application therefore never connects directly to the database.
Step 12: Run the Application
Before running the project, make sure no other program is currently using the BleuIO serial port.
For example, close any active BleuIO connection in:
- BleuIO application
screen- serial monitor
- terminal program
- other Python application
Then run:
python3 main.py
The application should connect to BleuIO.
You should see output similar to:
BleuIO + HibouAir + Cloudflare D1
---------------------------------

BleuIO port : /dev/cu.usbmodem4048FDEBA6D01
HibouAir ID : 220069
Scan interval: 30 seconds

Trying BleuIO on /dev/cu.usbmodem4048FDEBA6D01 at 115200 baud...

BleuIO connected successfully.

Setting BleuIO to central mode...
Ready.
The application will then start scanning:
Scanning for HibouAir 220069...
Command: AT+FINDSCANDATA=220069=5
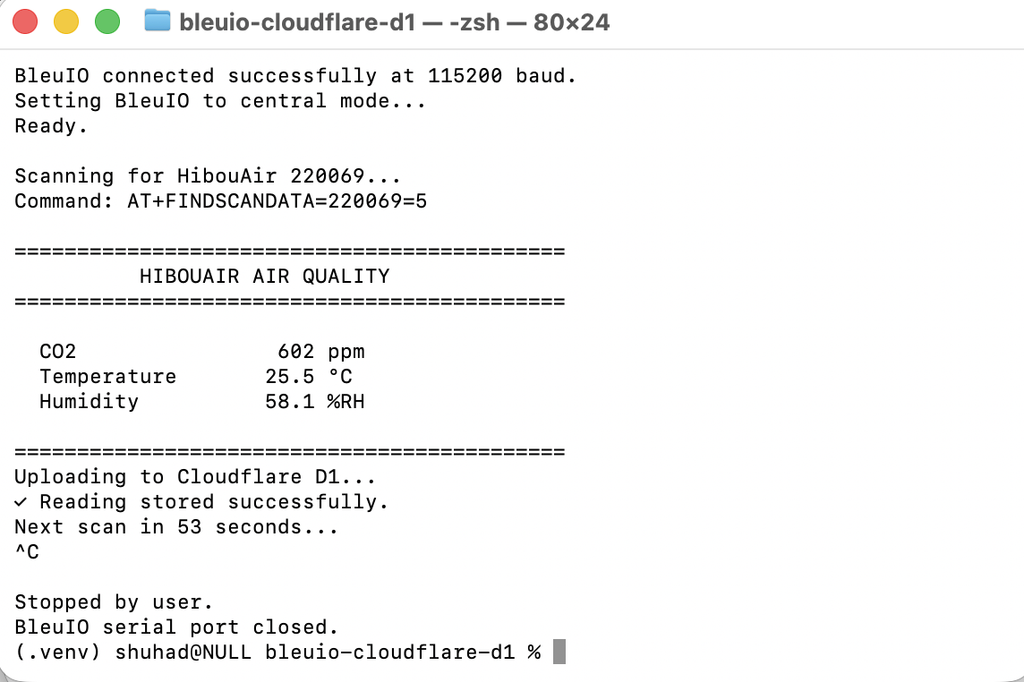
When a valid HibouAir advertisement is received and decoded, the terminal will display something similar to:
============================================
          HIBOUAIR AIR QUALITY
============================================

  CO2                623 ppm
  Temperature       24.1 °C
  Humidity          43.7 %RH

============================================

Uploading to Cloudflare D1...
✓ Reading stored successfully.

Next scan in 23 seconds...
There is no need to restart it for each measurement.
To stop the application, press:
Ctrl + C
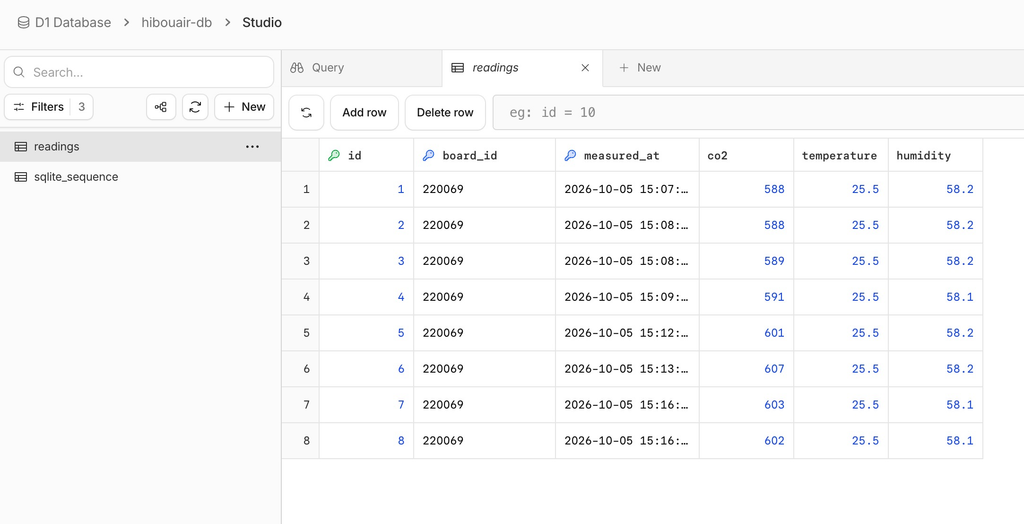
Step 13: Check the Data in Cloudflare D1
Now return to the Cloudflare D1 database console.
Run:
SELECT * FROM readings ORDER BY id DESC LIMIT 10;
You should see the measurements coming from HibouAir.
For example:
id  board_id  measured_at          co2  temperature  humidity

12  220069    2026-10-05 14:58:20  618  24.1         43.8
11  220069    2026-10-05 14:57:50  621  24.1         43.8
10  220069    2026-10-05 14:57:20  623  24.1         43.7
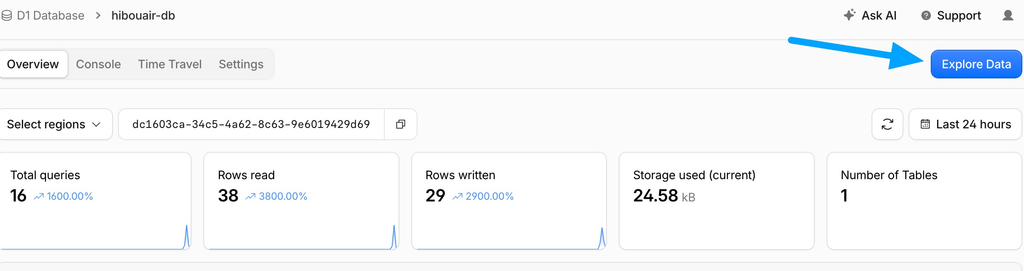
You can also explore the data from your database.
Step 14: Check the Latest Reading Through the API
We also created a simple read endpoint.
Open:
https://YOUR-WORKER.workers.dev/api/readings/latest
The Worker will query D1 and return the latest measurement.
For example:
{
  "success": true,
  "reading": {
    "id": 12,
    "board_id": "220069",
    "measured_at": "2026-10-05 14:58:20",
    "co2": 618,
    "temperature": 24.1,
    "humidity": 43.8
  }
}
Building a Dashboard Later
This tutorial intentionally stops at the database and API level.
The objective is to demonstrate the complete BLE-to-cloud data path while keeping the example easy to understand.
At this point, the data is already available in the cloud.
A developer could later build a dashboard showing:
Current CO₂
Current Temperature
Current Humidity

CO₂ history
Temperature history
Humidity history
A dashboard could request historical readings through additional Worker API endpoints.
It could also display thresholds, warnings, averages, minimum/maximum measurements, or other analytics.
Those features are deliberately outside the scope of this example because the main goal is to demonstrate how easily BLE data can be brought into a serverless cloud architecture using BleuIO.
We kept the project intentionally simple so that the individual parts are easy to understand and modify.
From here, the project can be expanded in many directions. Multiple HibouAir sensors could be monitored, additional air quality parameters could be stored, historical API endpoints could be created, and a complete cloud dashboard could be built on top of the existing data.