In this project, I will be showing how to automate your house using your voice with Amazon Alexa device.
One of the most common hobby projects you will come across the internet is HomeAutomation. There you will be controlling devices in your house through your smartphone via wifi/Bluetooth. But here we won't be using any smartphone. we will be using our own voice for it. No need to take phone everytime to control any device. Just say "Alexa turn on the device" and it will automatically do it for you.
WHAT IS ALEXA? WHO IS SHE ??
Amazon Alexa is a virtual assistant developed by Amazon. This assistant is used in Amazon speaker(Echo, Echo dot, Plus). This virtual assistant do many things like play music, read the flash news and much more if you want to know more about it then read this article
LET'S GET STARTED
Creating Virtual Smart Home Devices
For interfacing NodeMCU and Amazon Alexa, we will be using an Amazon skill called Sincric
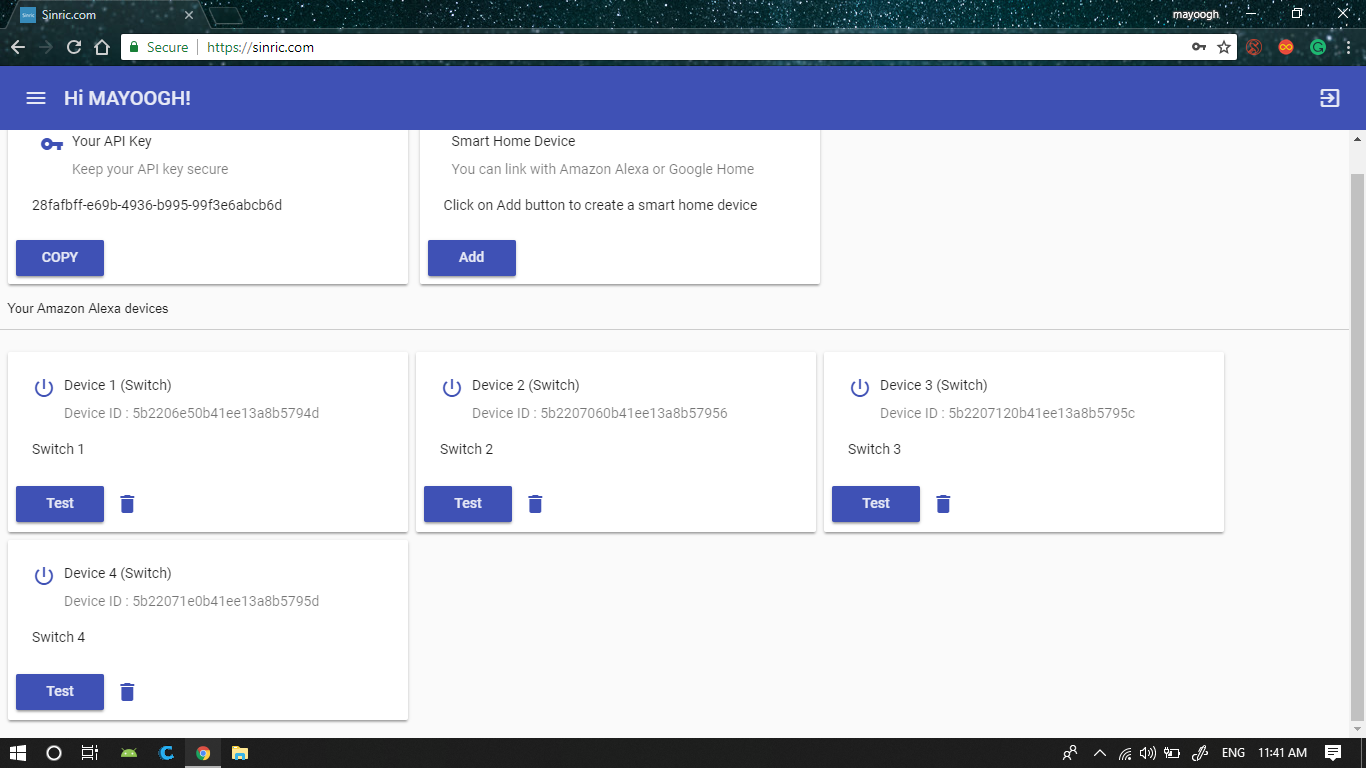
- First of all, you need to create an account in Sinric . Sinric is a website which allows linking your development boards like RaspberryPi, ESP8226, ESP32 or Arduino with Amazon Alexa.
- Once the account is created login into it. Then click on the Smart Home Device Add button to create a new smart home device.
Creating Virtual Smart home Devices
- Create as many devices which you want to control. In my case, I have created 4 Smart Home Devices.
- For this project, we will be using NodeMCU wifi module. So for programming the board using Arduino IDE you need to download some additional boards. I have written a separate article showing how to do it
- Download the example sinric code from Github by kakopappa
- Download and install WebSocketsClient.h and ArduinoJson.h library
- Now open switch_example.ino example from the downloaded file
Do the following changes in the code.
- Enter your unique API key from the Sinric website, In my case, it was something like this db8d0309-84ce-485b-8957-xxxxxxxxxxxx
- Enter your wifi network name here (case sensitive), your Amazon echo device should be in this same network.
#define MyWifiPassword ""
- Enter your wifi network password (case sensitive).
void turnOn(String deviceId)
{
  if (deviceId == "xxxxxxxxxx") // Device ID of device 1
  {
    Serial.print("Turn on device id: ");
    Serial.println(deviceId);
    digitalWrite(device1, HIGH);
  }
- In the If condition enter your device 1 ID from Sinric website. In my case, it was 5b13a012870d4c3a139be009
- Do the same for all the devices in both turnOn and turnOn function
int device1 = 5;
int device2 = 4;
int device3 = 0;
int device4 = 2;
#include <Arduino.h>
#include <ESP8266WiFi.h>
#include <ESP8266WiFiMulti.h>
#include <WebSocketsClient.h> // get it from https://github.com/Links2004/arduinoWebSockets/releases
#include <ArduinoJson.h> // get it from https://arduinojson.org/ or install via Arduino library manager
#include <StreamString.h>

ESP8266WiFiMulti WiFiMulti;
WebSocketsClient webSocket;
WiFiClient client;

#define MyApiKey "" // TODO: Change to your sinric API Key. Your API Key is displayed on sinric.com dashboard
#define MySSID "" // TODO: Change to your Wifi network SSID
#define MyWifiPassword "" // TODO: Change to your Wifi network password

#define HEARTBEAT_INTERVAL 300000 // 5 Minutes

uint64_t heartbeatTimestamp = 0;
bool isConnected = false;

void setPowerStateOnServer(String deviceId, String value);
void setTargetTemperatureOnServer(String deviceId, String value, String scale);

// deviceId is the ID assgined to your smart-home-device in sinric.com dashboard. Copy it from dashboard and paste it here

void turnOn(String deviceId) {
 if (deviceId == "") // Device ID of device 1
 {
 Serial.print("Turn on device id: ");
 Serial.println(deviceId);
 digitalWrite(device1, HIGH);
 }
 else if (deviceId == "") // Device ID of device 2
 {
 Serial.print("Turn on device id: ");
 Serial.println(deviceId);
 digitalWrite(device2, HIGH);
 }
 else if (deviceId == "") // Device ID of device 3
 {
 Serial.print("Turn on device id: ");
 Serial.println(deviceId);
 digitalWrite(device3, HIGH);
 }
 else if (deviceId == "") // Device ID of device 4
 {
 Serial.print("Turn on device id: ");
 Serial.println(deviceId);
 digitalWrite(device4, HIGH);
 }
 else
 {
 Serial.print("Turn on for unknown device id: ");
 Serial.println(deviceId);
 }
}

void turnOff(String deviceId) {
 if (deviceId == "") // Device ID of device 1
 {
 Serial.print("Turn off Device ID: ");
 Serial.println(deviceId);
 digitalWrite(device1, LOW);
 }
 else if (deviceId == "") // Device ID of device 2
 {
 Serial.print("Turn off Device ID: ");
 Serial.println(deviceId);
 digitalWrite(device2, LOW);
 }
 else if (deviceId == "") // Device ID of device 3
 {
 Serial.print("Turn off Device ID: ");
 Serial.println(deviceId);
 digitalWrite(device3, LOW);
 }
 else if (deviceId == "") // Device ID of device 4
 {
 Serial.print("Turn off Device ID: ");
 Serial.println(deviceId);
 digitalWrite(device4, LOW);
 }
 else
 {
 Serial.print("Turn off for unknown device id: ");
 Serial.println(deviceId);
 }
}

void webSocketEvent(WStype_t type, uint8_t * payload, size_t length) {
 switch(type) {
 case WStype_DISCONNECTED:
 isConnected = false;
 Serial.printf("[WSc] Webservice disconnected from sinric.com!\n");
 break;
 case WStype_CONNECTED: {
 isConnected = true;
 Serial.printf("[WSc] Service connected to sinric.com at url: %s\n", payload);
 Serial.printf("Waiting for commands from sinric.com ...\n");
 }
 break;
 case WStype_TEXT: {
 Serial.printf("[WSc] get text: %s\n", payload);
 // Example payloads

// For Switch or Light device types
 // {"deviceId": xxxx, "action": "setPowerState", value: "ON"} // https://developer.amazon.com/docs/device-apis/alexa-powercontroller.html

// For Light device type
 // Look at the light example in github

 DynamicJsonBuffer jsonBuffer;
 JsonObject& json = jsonBuffer.parseObject((char*)payload);
 String deviceId = json ["deviceId"];
 String action = json ["action"];

 if(action == "setPowerState") { // Switch or Light
 String value = json ["value"];
 if(value == "ON") {
 turnOn(deviceId);
 } else {
 turnOff(deviceId);
 }
 }
 else if (action == "SetTargetTemperature") {
 String deviceId = json ["deviceId"];
 String action = json ["action"];
 String value = json ["value"];
 }
 else if (action == "test") {
 Serial.println("[WSc] received test command from sinric.com");
 }
 }
 break;
 case WStype_BIN:
 Serial.printf("[WSc] get binary length: %u\n", length);
 break;
 }
}

void setup()
{
 pinMode (device1, OUTPUT);
 pinMode (device2, OUTPUT);
 pinMode (device3, OUTPUT);
 pinMode (device4, OUTPUT);


Serial.begin(115200);

 WiFiMulti.addAP(MySSID, MyWifiPassword);
 Serial.println();
 Serial.print("Connecting to Wifi: ");
 Serial.println(MySSID);

// Waiting for Wifi connect
 while(WiFiMulti.run() != WL_CONNECTED) {
 delay(500);
 Serial.print(".");
 }
 if(WiFiMulti.run() == WL_CONNECTED) {
 Serial.println("");
 Serial.print("WiFi connected. ");
 Serial.print("IP address: ");
 Serial.println(WiFi.localIP());
 }

// server address, port and URL
 webSocket.begin("iot.sinric.com", 80, "/");

// event handler
 webSocket.onEvent(webSocketEvent);
 webSocket.setAuthorization("apikey", MyApiKey);

 // try again every 5000ms if connection has failed
 webSocket.setReconnectInterval(5000); // If you see 'class WebSocketsClient' has no member named 'setReconnectInterval' error update arduinoWebSockets
}

void loop() {

 webSocket.loop();

 if(isConnected) {
 uint64_t now = millis();

 // Send heartbeat in order to avoid disconnections during ISP resetting IPs over night. Thanks @MacSass
 if((now - heartbeatTimestamp) > HEARTBEAT_INTERVAL) {
 heartbeatTimestamp = now;
 webSocket.sendTXT("H");
 }
 }
}

// If you are going to use a push button to on/off the switch manually, use this function to update the status on the server
// so it will reflect on Alexa app.
// eg: setPowerStateOnServer("deviceid", "ON")
void setPowerStateOnServer(String deviceId, String value) {
 DynamicJsonBuffer jsonBuffer;
 JsonObject& root = jsonBuffer.createObject();
 root["deviceId"] = deviceId;
 root["action"] = "setPowerState";
 root["value"] = value;
 StreamString databuf;
 root.printTo(databuf);

 webSocket.sendTXT(databuf);
}

//eg: setPowerStateOnServer("deviceid", "CELSIUS", "25.0")
void setTargetTemperatureOnServer(String deviceId, String value, String scale) {
 DynamicJsonBuffer jsonBuffer;
 JsonObject& root = jsonBuffer.createObject();
 root["action"] = "SetTargetTemperature";
 root["deviceId"] = deviceId;

 JsonObject& valueObj = root.createNestedObject("value");
 JsonObject& targetSetpoint = valueObj.createNestedObject("targetSetpoint");
 targetSetpoint["value"] = value;
 targetSetpoint["scale"] = scale;

 StreamString databuf;
 root.printTo(databuf);

 webSocket.sendTXT(databuf);
}
- Once everything is done. Select the correct board and upload the sketch.
- The NodeMCU will automatically connect to the wifi network.
- Make sure your wifi is turned ON and your Echo device is connected to same.
CONFIGURING SMARTHOME IN ALEXA APP
- Open the Alexa App in your smartphone
- Go to the Skills & Games section and search for Sinric skill and enable it
- Now search for devices or just ask say "Alexa, discover devices"
- It will show the number of available devices (In my case four).
- You can Rename the device name to whatever you want like fan, light ...
- The circuit is very simple, but be careful while connecting AC load to relay.
Always turn OFF the mains before opening any switchboard.
Now Almost everything is done. All you need is connect the AC loads to relay and sit back and enjoy the automation. Feel your self as Tony Stark ; )
Feel free to ask any queries.
Subscribe to blog for more DIY projects
http://igniteinnovateideas.wordpress.com