In this tutorial, I will describe how to make your own electronic shelf labels and manage them using the software I made specifically for that purpose.
Supplies
Supplies for the ESL manager:
Supplies for one ESL:
- ESP32 x1
- Either 2.4 Inch TFT LCD with ILI9341 or 1.5 Inch OLED with SSD1351 x1
Supplies that can be shared by several ESLs:
- Access Point x1
- 5V Power Supply x1
How Electronic Shelf Label Management System Works
The ESL management system demonstrated in this tutorial incorporates the electronic shelf labels and the ESL management software.
An electronic shelf label is a device that displays relevant product information, they’re usually attached to the front edge of retail shelving. A typical ESL consists of a display and a simple microcontroller that controls the display.
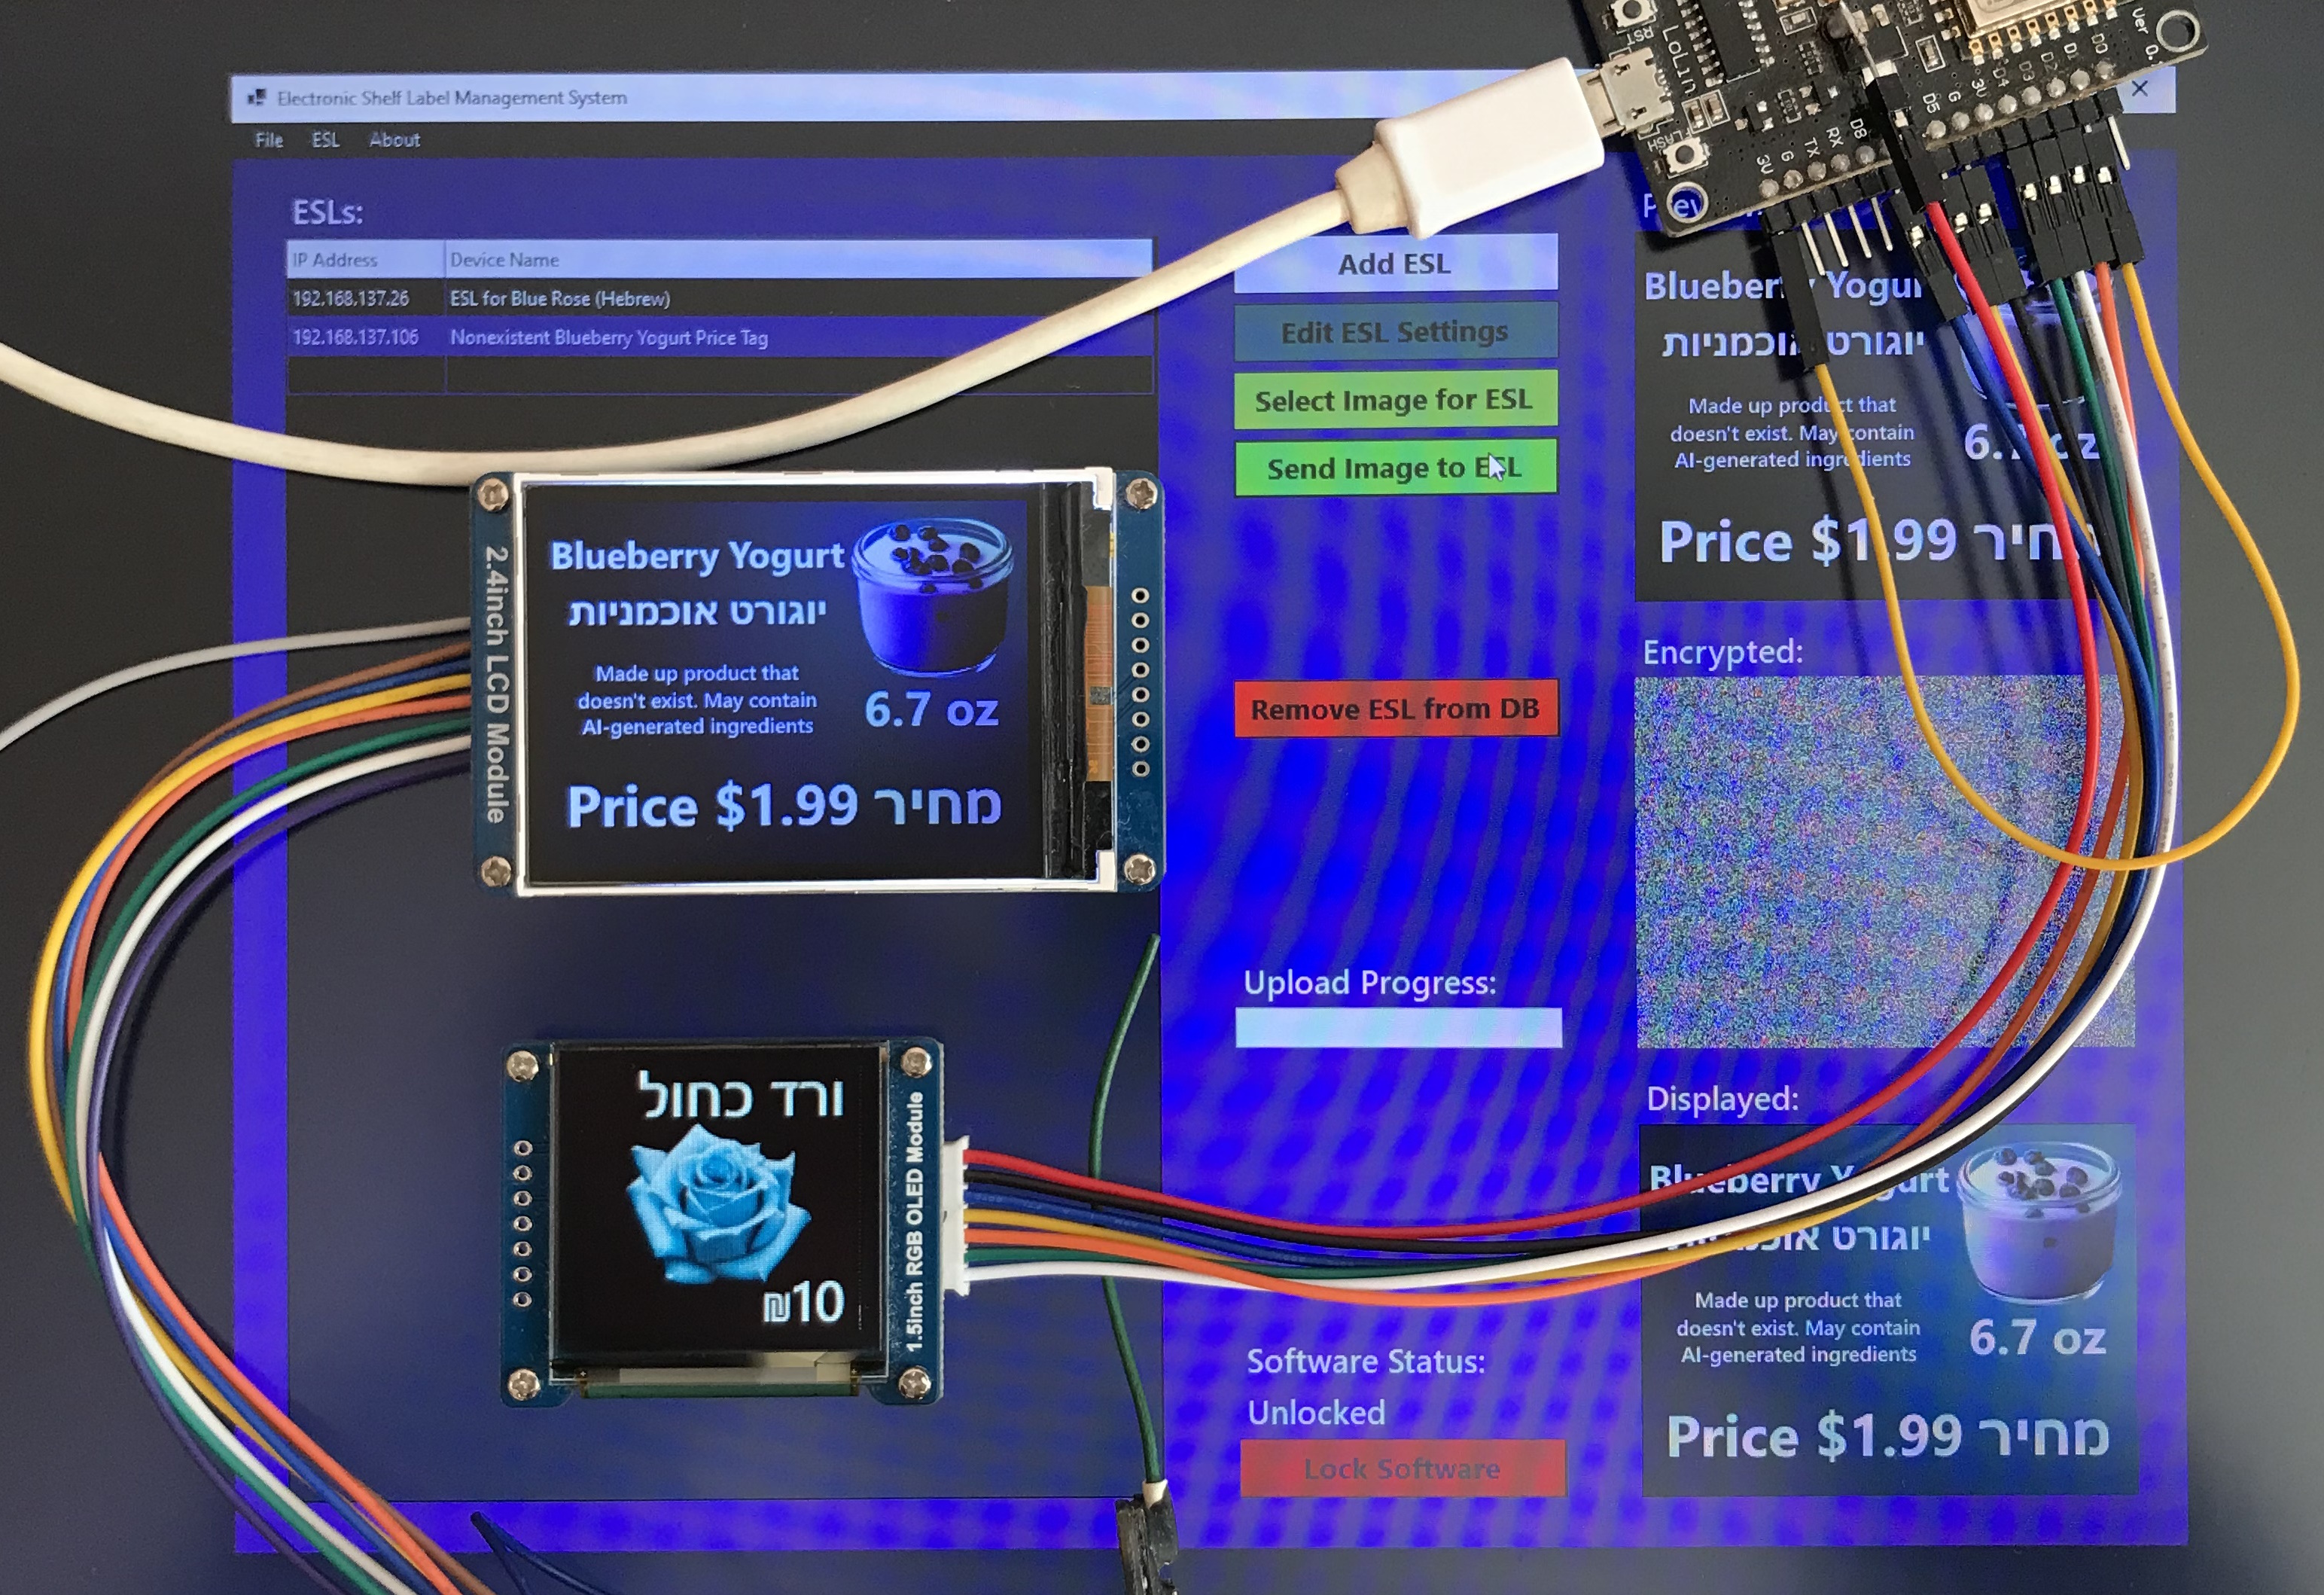
The ESL management software enables you to manage your electronic shelf labels. It accomplishes this by maintaining a database that stores the credentials of each ESL along with the last image that was sent to it. When you choose the image to be displayed on the ESL and hit the “Send Image To ESL” button, the software encrypts that image, sends it to the specified ESL over Wi-Fi using the UDP protocol, and then saves it to the database.
Moreover, all ESL-relevant information stored in the ESL Management Software is encrypted with AES-256 in CBC mode (not to be confused with the Serpent in CBC mode which only encrypts the data that’s sent over the air).
Algorithm for Image Encryption
When you send an image over the air using ESL Management Software, each pixel of the transmitted image is encrypted using the Serpent encryption algorithm in CBC mode. Serpent is a symmetric block cipher that encrypts data in 128-bit blocks and supports a key size of 128, 192, or 256 bits. Even though Serpent is slower than AES, it has a higher security margin and offers a substitution-permutation network that has 32 rounds, which is more than the 10, 12, and 14 rounds offered by AES.
As for the encryption process itself: When you click the “Send Image To ESL” button, ESL Management Software extracts the image from the picture box line by line. It then converts each 888-color pixel to a 565-color one and splits the resulting 16-bit color into two 8-bit values. These values are passed to the Serpent encryption algorithm, which treats them as plaintext and encrypts them in CBC mode. Once the encryption is complete, the software sends the packet with the encrypted line to the ESL. The ESL decrypts the packet upon receiving it, combines the two 8-bit values into a 16-bit color, and sets that color to the appropriate display. Additionally, the ESL saves each decrypted line to its built-in memory so it can display the full image when powered up in operating mode.
Prepare the Software *Optional
If you’ve never flashed ESP8266 before you’ll need to configure Arduino IDE and install drivers to upload the firmware to the boards, you can find drivers here:
CH340 driver: https://sparks.gogo.co.nz/ch340.html
CP210x driver: https://www.silabs.com/developers/usb-to-uart-bridge-vcp-drivers
In case you don’t have Arduino IDE, you can download it here:
https://www.arduino.cc/en/software/
Configuring IDE isn’t a part of this tutorial, you can read about it here:
https://randomnerdtutorials.com/how-to-install-esp8266-board-arduino-ide/
Download and Unpack Project Archive
Download the project archive either from SourceForge or Github and unpack its content to the folder of your choosing.
Here are the download links for you:
https://sourceforge.net/projects/esl-management-system/
https://github.com/Northstrix/Electronic-Shelf-Label-Management-System
Download and Install the Required Libraries
ESPAsyncUDP: https://github.com/me-no-dev/ESPAsyncUDP
Adafruit-GFX-Library: https://github.com/adafruit/Adafruit-GFX-Library
Adafruit_ILI9341: https://github.com/adafruit/Adafruit_ILI9341
Adafruit-SSD1351-library: https://github.com/adafruit/Adafruit-SSD1351-library
Adafruit_BusIO: https://github.com/adafruit/Adafruit_BusIO
The process of unpacking libraries is typical. You can unpack the content of the archive into the folder: …\Arduino\libraries. Or open the Arduino IDE, click to the Sketch -> Include Library -> Add .ZIP Library… and select every archive with libraries.
Other required libraries are already present in one way or another.
Install ESP8266 Filesystem Uploader

The primary purpose of the ESP8266 Filesystem Uploader is to let you upload files into ESP’s filesystem. In this tutorial, the purpose of this tool is to upload an empty SPIFFS image into ESP.
Download the archive called ESP8266FS-0.5.0.zip from https://github.com/esp8266/arduino-esp8266fs-plugin/releases
And then extract the content of that archive into the “…\Arduino\Tools\” folder.
After that, restart the Arduino IDE.
Format ESP8266’s Built-In Flash Memory
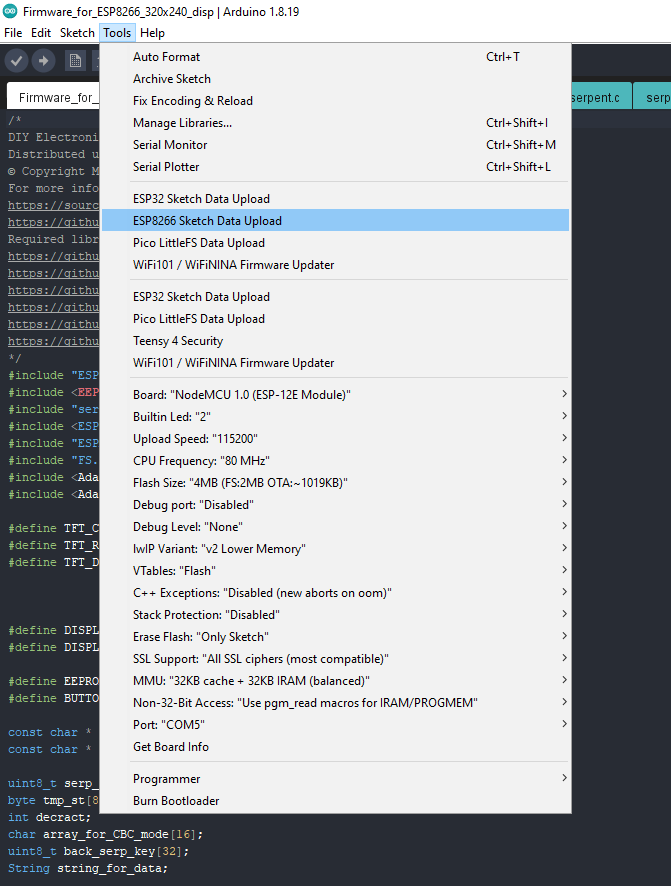
Click Tools -> ESP8266 Sketch Data Upload. Then click Yes in the pop-up window. The program is going to format the built-in flash memory.
Modify Firmware

Open the .ino file with the firmware for ESP8266 and replace my access point credentials with yours.
Flash ESP8266

Upload the modified firmware to the ESP8266.
Don’t forget to allocate some memory for the file system.
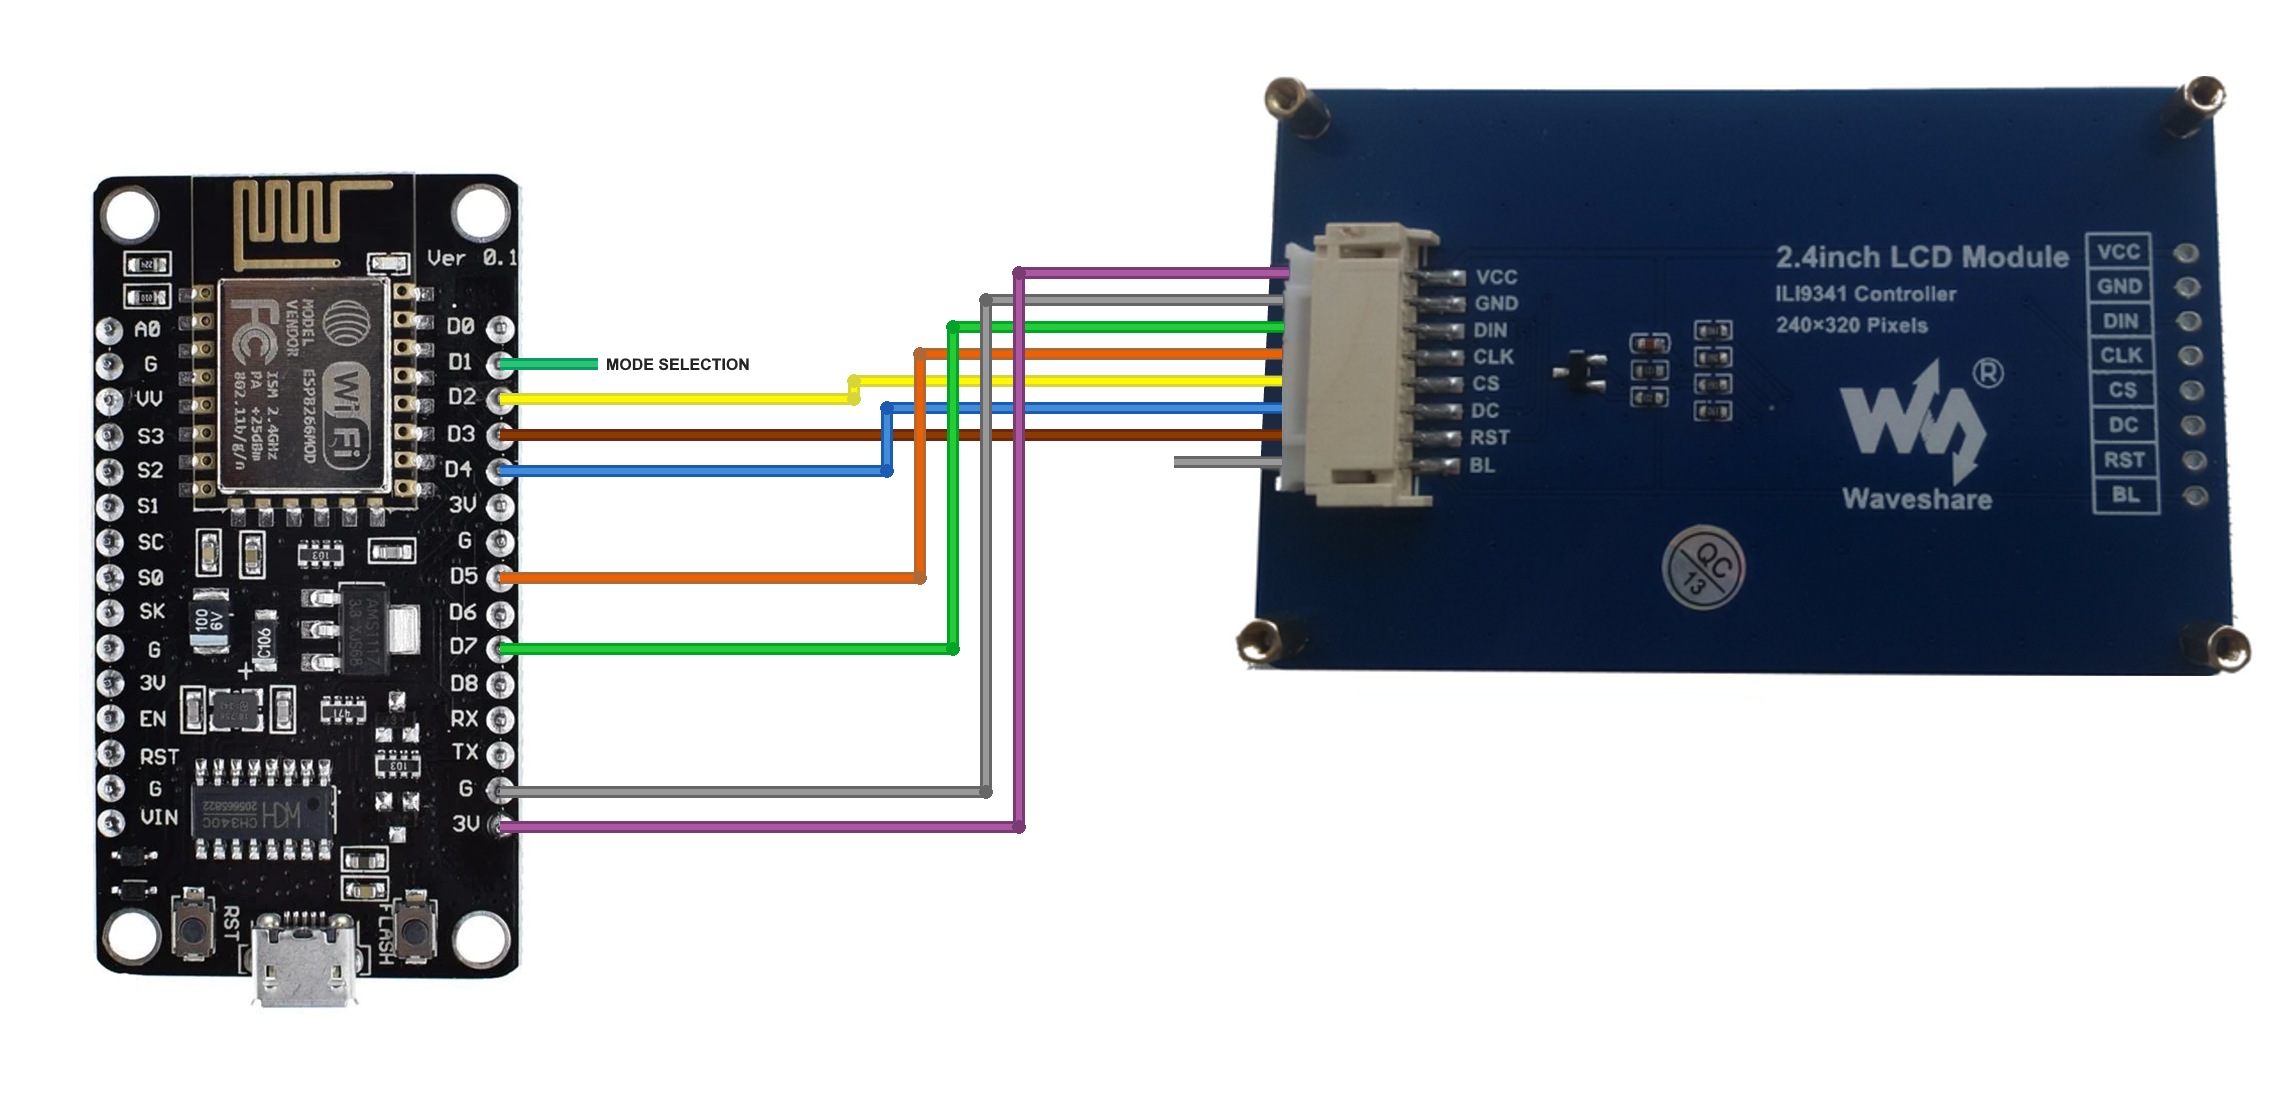
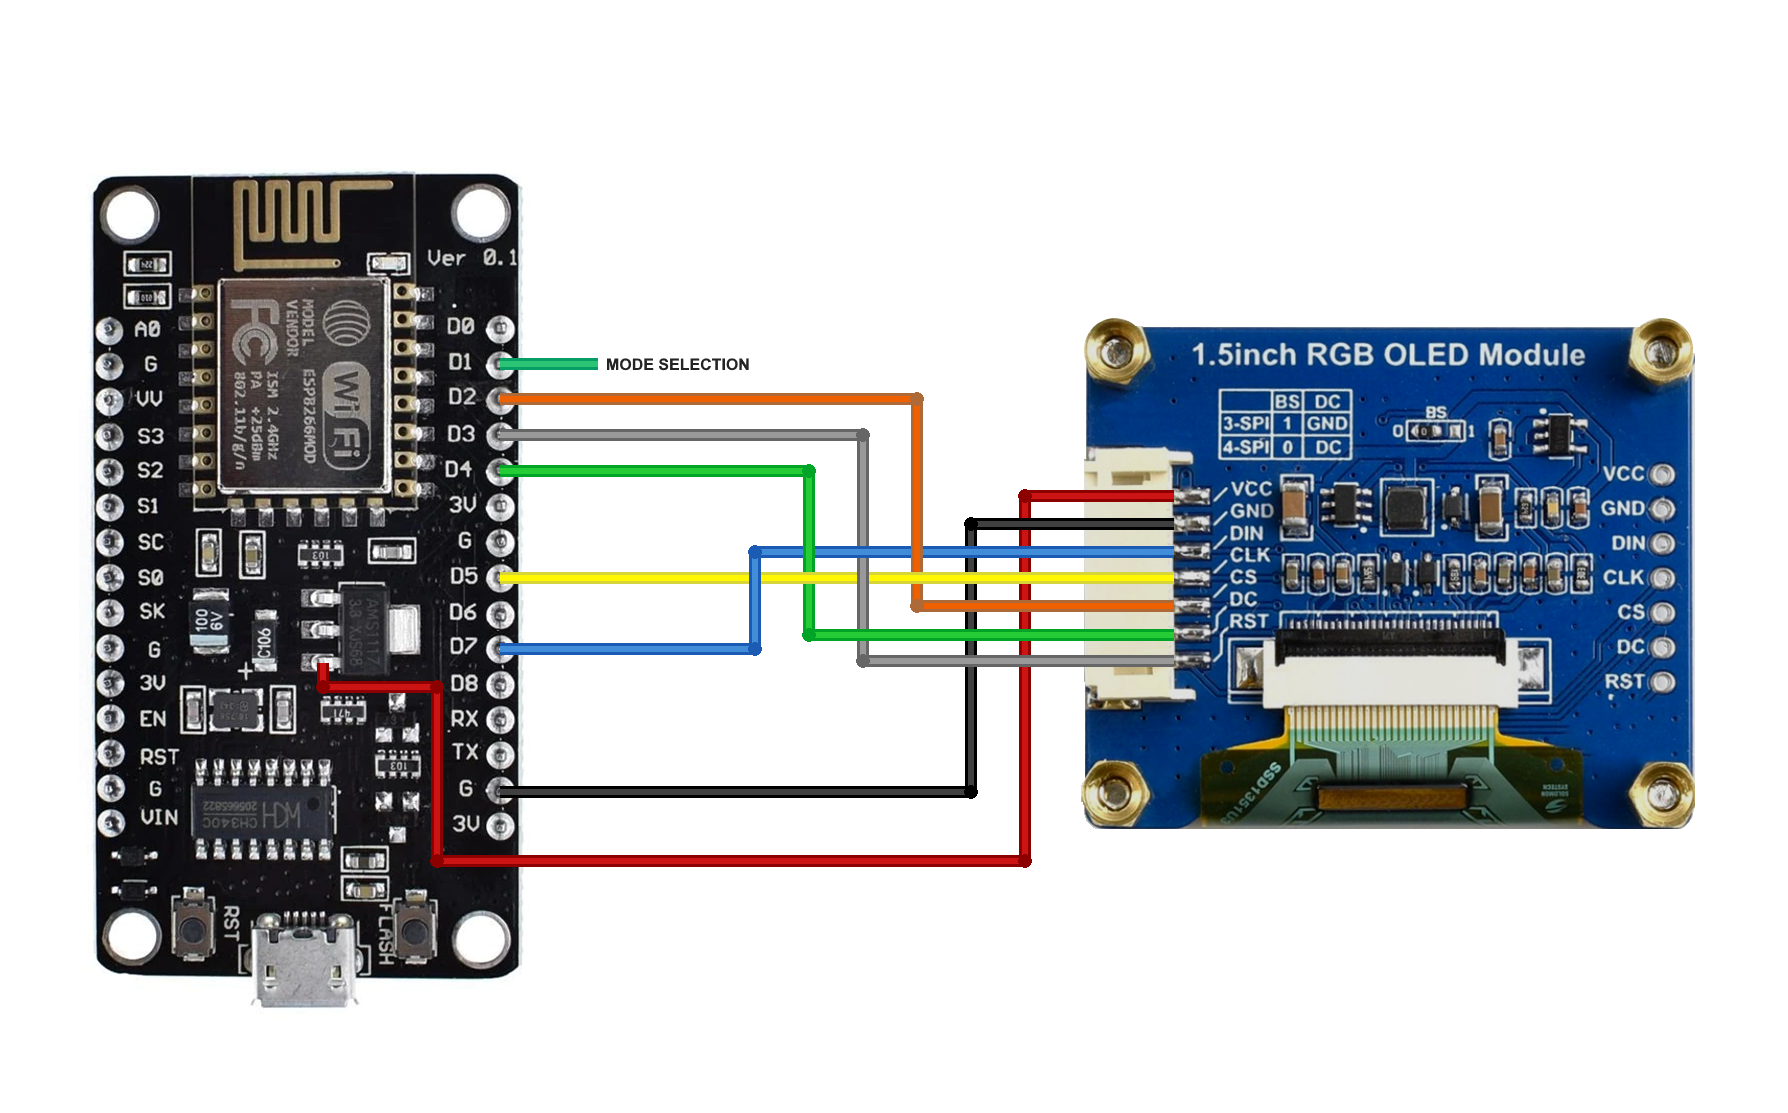
Assemble ESL
Assembling the circuit shouldn’t be hard, you only need to connect the display to the ESP8266.
Also, save a jumper wire for the mode selection.
Launch the ESL Management Software and Set Your Password


Launch the “ESL Management System.exe” file from the “…\V1.0\ESL Management Software\bin\Debug\net6.0-windows” and set the password to the software.
Note that the cryptographic keys used to encrypt and decrypt data are derived directly from your password. As a result, you will not be able to change your password once it has been set. Additionally, if you lose your password, the data stored in the database will be inaccessible, as the software won’t be able to decrypt it.
Power Up the ESL in Configuration Mode
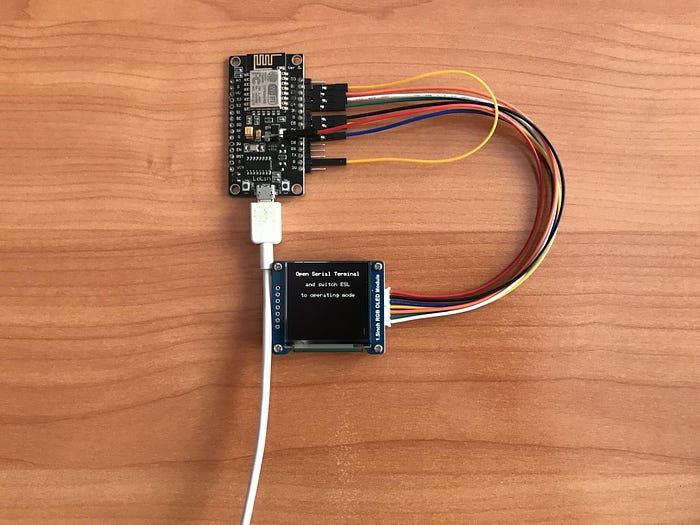
Put a jumper wire between the “D1” and “G” pins and connect the ESP8266 to the USB Port.
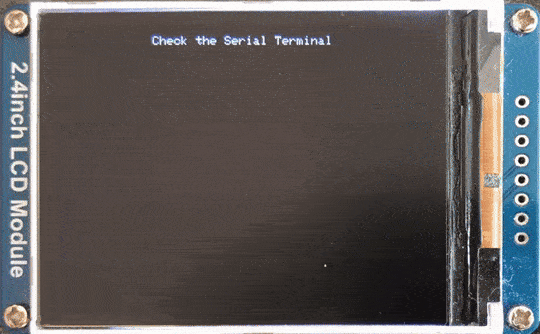
Get ESL Credentials
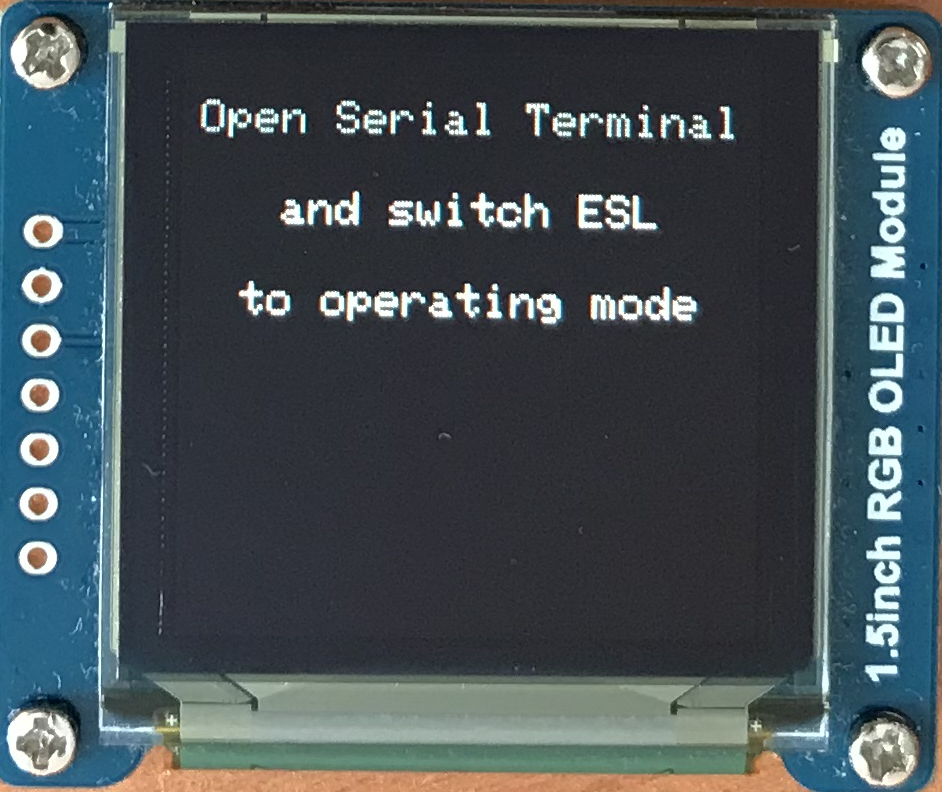

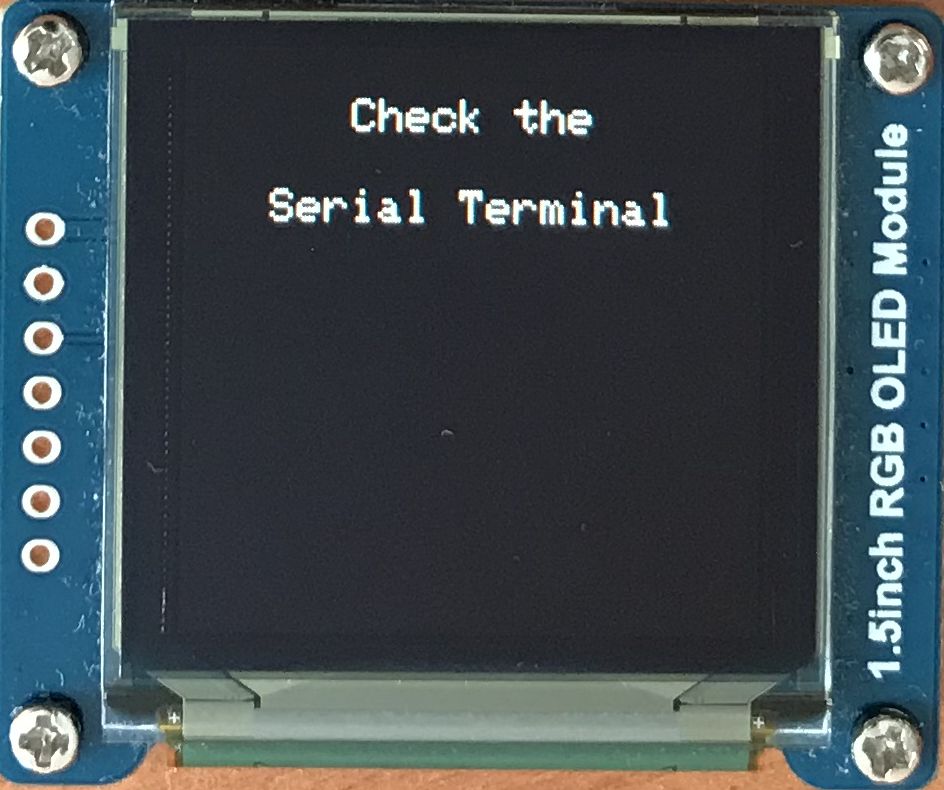

After powering up the ESL in configuration mode and opening the Serial Terminal, switch the ESL to the operating mode by disconnecting the “D1” pin from the ground and connecting it to the “3V” pin.
After doing so, you should get the ESL’s encryption key and the UDP port. Once the ESL connects to your access point, you should also get its IP address.
Add ESL Credentials to ESL Management Software


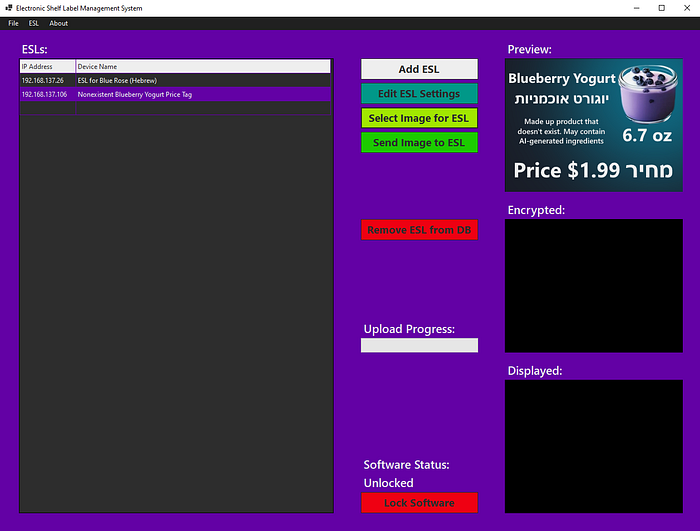
To add an ESL to the ESL Management Software database:
- Click the “Add ESL” button.
- Copy the ESL credentials from the Serial Terminal.
- Paste the encryption key, UDP port, and IP address into the appropriate fields in the pop-up window.
- Name the ESL and select the resolution.
- Click the “Add” button to complete the process.
As you can see on the second screenshot, I’ve added two ESLs to the database.
Make Images for the ESLs


It’s entirely up to you how to make the images for the ESLs.
To avoid accidentally using copyrighted images, I asked Craiyon to generate a few images and spent several minutes in paint.net making price tags with these images.
*All products and product-related information demonstrated in this tutorial are entirely fictitious. Any similarity to actual products and product-related information is purely coincidental.
Select the ESL You Would Like to Display Image On

Select the ESL you would like to display the image on by clicking on its name.
Select the Image to Be Displayed on ESL
Click the “Select Image for ESL” button, navigate to the folder with the image you want to display on the ESL, select that image, and click the “Open” button.
Hit the “Send Image to ESL” Button


At that point, click the “Send Image to ESL” button and wait ‘till the image is transferred to the ESL.
Enjoy the Result
Although it takes approximately 80 seconds for an image to be completely transferred to the ESL, this flaw is well compensated by the fact that each pixel of the image is encrypted using the Serpent encryption algorithm in CBC mode. Additionally, the system enables you to manage as many ESLs as your access point(s) can handle.
I guess with a basic DHCP server configuration, this system can even be deployed in a small store with a couple of hundred items.