Maker Pro
Maker Pro

a/c led indicator circuit

g223

Sep 27, 2011
11
Joined
Sep 27, 2011
Messages
11
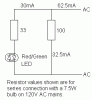
I have a question about using a led as a indicator light in a a/c circuit, any info would be a big help.I built a box to house welding rod, with a 7.5w bulb installed in the box as a heat source to keep the rods dry. I wanted to put an indicator on the outside of the box to tell me if the bulb is burnt out without opening the door. I bought a red 120v a/c LED from radio shack wired it in series. it works the way i intended, with the exception that my bulb will no longer light! not sure whats goin on here.:(
 

duke37

Jan 9, 2011
5,364
Joined
Jan 9, 2011
Messages
5,364
The neon will take far less current than the bulb so the bulb will not light up. The current the bulb takes is about 62.5mA. If you put a low voltage bulb (6 0 or12V) in series with a rated current of 100mA it should work, otherwise make a window.
 

duke37

Jan 9, 2011
5,364
Joined
Jan 9, 2011
Messages
5,364
Normal LEDs take a maximum of 20mA but you could use multiple ones or a current sharing resistor. A diode would be needed to prevent a reverse voltage appearing on the LEDs on the 'other' half of the cycle.
 

daddles

Jun 10, 2011
443
Joined
Jun 10, 2011
Messages
443
I agree with Duke37 -- the easiest solution is to put in a window where you can see if the bulb is on or not.

However, if you want some external device to come on when the bulb's filament opens up, then you need to detect the AC current through the bulb and turn on an indicator based on the magnitude of the current. This isn't terribly hard, but will involve building some relatively simple electronics. You could also use an AC SPDT relay if you could find one that operates at the same current the bulb needs. Then put the relay coil in series with the bulb. You may want to up the bulb's power rating a bit to recover some of the power you'll lose. Then an indicator would be connected to the relay's NC contacts; when the bulb burns out, the relay relaxes, turning on the indicator.
 

g223

Sep 27, 2011
11
Joined
Sep 27, 2011
Messages
11
thank you for your help. i thought this would be a simple thing.
 

Resqueline

Jul 31, 2009
2,848
Joined
Jul 31, 2009
Messages
2,848
The other suggestions you've got there are both sound and simple, but here's a suggestion for a circuit using ordinary LED's and resistors anyway.
If you can't get your hands on one of those two-color LED's with only two pins you can make it yourself from two separate LED's or one LED and one ordinary diode.
Or as suggested - to keep it super simple: make a small window in the box, or use a 6V 80-100mA (0.5-0.6W) signal lamp in a small holder.
 

Attachments

  • Mains LED.GIF
    Mains LED.GIF
    3.3 KB · Views: 565

g223

Sep 27, 2011
11
Joined
Sep 27, 2011
Messages
11
circuit

This is what i was working on doing before I saw your post. not sure if im thinking right!
 

Attachments

  • CURRENT FLOW INDICATOR.jpg
    CURRENT FLOW INDICATOR.jpg
    20.4 KB · Views: 386

g223

Sep 27, 2011
11
Joined
Sep 27, 2011
Messages
11
the resistor is 680 ohms it is inside my led housing
the 3 diodes are all 3amp 400v 1N5404
 

g223

Sep 27, 2011
11
Joined
Sep 27, 2011
Messages
11
I got a chance to build and try it. It works! it burnt the internal resistor, but it worked for a few seconds.
 

duke37

Jan 9, 2011
5,364
Joined
Jan 9, 2011
Messages
5,364
Perhaps it overheated because it was so small!

62.5mA through 680 ohms dissipates 2.6W. Why not try Resqueline's circuit with only 100 ohms.
Your diodes are plenty big enough.
 

g223

Sep 27, 2011
11
Joined
Sep 27, 2011
Messages
11
do you mean use only a 100 ohm resistor with one 3amp 400v diode and a LED?
 

duke37

Jan 9, 2011
5,364
Joined
Jan 9, 2011
Messages
5,364
Yes, the diode can go across the LED or the entire circuit. The 33 ohm resistor controls the current through the LED from the voltage drop primarily produced by the 100 ohm resistor. Don't forget the 33 ohm resistor.

If the diode is placed across the entire circuit, the dissipation will be about halved.

Since the circuit is passing only 62.5mA your diodes are loafing along.

Duke
 

Resqueline

Jul 31, 2009
2,848
Joined
Jul 31, 2009
Messages
2,848
Not sure why your circuit burned. Either your diodes were dud or connected the wrong way around. If it had been made as drawn it would not have lit the LED though.
A red LED requires at least 1.8V to start glowing, your design would have only provided 1.2V. Your "canvas" was a 2344 x 2300 & 91kB jpeg with an image of only 370 x 220.
If 12V LED's is all you have you'll need to use a 12V Zener as shown in my revision of your diagram. It's now only a 460 x 340 & 24kB png image btw..
 

Attachments

  • CURRENT FLOW INDICATOR.PNG
    CURRENT FLOW INDICATOR.PNG
    24.1 KB · Views: 2,185

g223

Sep 27, 2011
11
Joined
Sep 27, 2011
Messages
11
I ended up using your circuit Resqueline. it works very well! If i want to ever use a higher watt bulb (say 40) would i down grade the 100 ohm resistor? I don't know what the difference is, voltage wise but, i was using a green LED. i'll try to post some pics of the box, i'm very pleased with it.
 

Resqueline

Jul 31, 2009
2,848
Joined
Jul 31, 2009
Messages
2,848
Pleased to hear that. A green LED runs at only a few tenths higher voltage than the red ones so it doesn't matter much.
Aim for 3-4V across the "100 ohm" resistor. The LED(s) then subtracts 30-60mA from the "100 ohm" resistor current.
4V / ((40W / 120V) - 60mA) = 4V / (333mA - 60mA) = 4V / 273mA = 15 ohms 1W.
Replacing the 100 ohm resistor with a 3-4V 1W zener diode (like shown above) will allow the use of any lamp up to 40W without needing any changes to the circuit.
Keep in mind that components dissipating 1W does get quite hot so keep it an inch or so away from the LED.
Exact calculations are actually a little more complicated than shown. This is due to AC & diodes being involved, but I'm sure it'll work well enough.
 

g223

Sep 27, 2011
11
Joined
Sep 27, 2011
Messages
11
welding rod box!

Pics of the finshed product. thank you for the help!
 

Attachments

  • weldbox1.jpg
    weldbox1.jpg
    4.8 KB · Views: 182
  • weldbox2.jpg
    weldbox2.jpg
    7.6 KB · Views: 174
  • weldbox3.jpg
    weldbox3.jpg
    6.8 KB · Views: 181
Top