Maker Pro
Maker Pro

Reversing AC motor

ThomsTools

Jan 26, 2023
9
Joined
Jan 26, 2023
Messages
9
I've got this 1948 1/3 HP craftsman capacitor start motor. Through an access plate you can transpose two wires (reverse the polarity) and the motors start windings will spin the rotor in the opposite direction. I want to achieve this with a DPDT switch. Sometimes however what appears logical is not what it seems. In theory this will work but I would like to know from an expert if this will work as I have laid out.

Thank you.
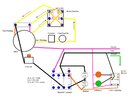
20230126_120856.jpg
 

Minder

Apr 24, 2015
3,479
Joined
Apr 24, 2015
Messages
3,479
IF it is a PSC, Permanent Start Cap motor, all you need is a SPDT switch in order to reverse.
Measure both windings, if they are the same then it is PSC and I can post you a simple DWG.
 

ThomsTools

Jan 26, 2023
9
Joined
Jan 26, 2023
Messages
9
IF it is a PSC, Permanent Start Cap motor, all you need is a SPDT switch in order to reverse.
Measure both windings, if they are the same then it is PSC and I can post you a simple DWG.
No its not a PSC
It has start and run windings
They have different levels of resistance. One is 1.5 ohms and the other is 14.8 ohms
 

Minder

Apr 24, 2015
3,479
Joined
Apr 24, 2015
Messages
3,479
OK then you just need to reverse one or the other windings.
One winding remains the same connection.
 

ThomsTools

Jan 26, 2023
9
Joined
Jan 26, 2023
Messages
9
The start windings are connected to a 114uf capacitor and a centrifugal switch. The start windings disengages at around 80% power.
 

Minder

Apr 24, 2015
3,479
Joined
Apr 24, 2015
Messages
3,479
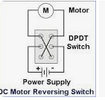
Here is a simple DWG, the M (motor) would represent one of the windings, the other stays connected the same way., always stop before reversing.
This is for a simple DC motor but the switch action is the same for one winding.
1674771137636.png
 

ThomsTools

Jan 26, 2023
9
Joined
Jan 26, 2023
Messages
9
Here is a simple DWG, the M (motor) would represent one of the windings, the other stays connected the same way., always stop before reversing.
This is for a simple DC motor but the switch action is the same for one winding.
View attachment 57802
Thank you! That's just how I configured it in my diagram. I just don't want to damage this. Its 75 years old.
 

Minder

Apr 24, 2015
3,479
Joined
Apr 24, 2015
Messages
3,479
Looks like a nice job!
Do you have any plans for it?
 

ThomsTools

Jan 26, 2023
9
Joined
Jan 26, 2023
Messages
9
Looks like a nice job!
Do you have any plans for it?
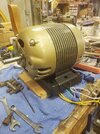
Thank you. Now if it starts up ill do a back flip. And I'm 58

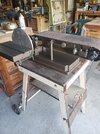
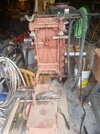
I'm connecting it to this vintage belt sander that I also dolled up
After...
20230123_112552.jpg
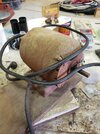
Before...
20221229_143351.jpg
 

Bluejets

Oct 5, 2014
7,057
Joined
Oct 5, 2014
Messages
7,057
Looks good....now did you revarnish the windings or just make the outside look pretty...??
1948 motor, windings would be pretty flaky on the insulation side.
 

ThomsTools

Jan 26, 2023
9
Joined
Jan 26, 2023
Messages
9
Looks good....now did you revarnish the windings or just make the outside look pretty...??
1948 motor, windings would be pretty flaky on the insulation side.
The windings were re-varnished. They were then tested. All numbers were good.
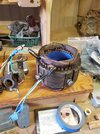
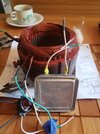
I re-wired the stator too.
before...
20230111_172354.jpg

After...
20230113_115725.jpg
 

Bluejets

Oct 5, 2014
7,057
Joined
Oct 5, 2014
Messages
7,057
Looks like sprayed ...doesn't get into the slots...better to use insulating varnish and heat the whole lot before and after....no idea what you mean about "rewired the stator too"....that IS the stator.
 

ThomsTools

Jan 26, 2023
9
Joined
Jan 26, 2023
Messages
9
Looks like sprayed ...doesn't get into the slots...better to use insulating varnish and heat the whole lot before and after....no idea what you mean about "rewired the stator too"....that IS the stator.
It is all good. Thanks for the feedback.
 
Top