This tutorial will show you how to use the Intel Edison single board computer to automate your home.
HAT: Home Automation Tweeter
At DIYhacking, we love movies, especially the ones that have Tony Stark in them. After watching IronMan, we would always love to have a house that understands you and acts accordingly. Guess what! Intel has now brought you a step closer to automating your house (and make you feel like the guy below). Check out this awesome tutorial which will let you do home automation using the Intel Edison single board computer.
Inspiration for Home Automation
Intel Edison is a cool development platform like the Arduino and the possibilities of building stuff with this are endless. And the best part is that they keep getting smaller day by day. Monumental thanks to Intel for awarding an Edison to our Star Maker Geeve George.
Edison is perhaps the world’s smallest open source development board. Small enough to Power up the IOT ( Internet of things) and be a gate to unlimited productivity. Just like the Nixie drone which is powered by the Edison as well.
If you are a beginner to this, you can always check out our beginner tutorial first: Intel Edison for Beginners.
HAT (Home Automation Tweeter) is a system which can tweet data from your home using the intel edison on to Twitter. Here, it is being used to tweet values of light intensity in my home to Twitter. Similarly, you can also modify this project to tweet whatever you want automatically. Perhaps, you can use it to tweet when there is an intruder in your home or when your pet walks out the door. Pump up your imagination and use it to build cool stuff.
How Does It Work?
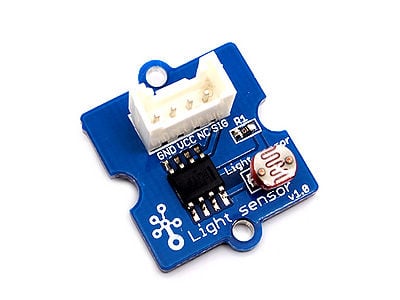
This system senses the light intensity by using
photoresistors or LDR (Light Dependent Resistors) on the grove light sensor. The Edison recognizes the intensity of the light coming from the sensor via the grove shield. Which is then tweeted via Twitter. And to build something using it, check this
tutorial.
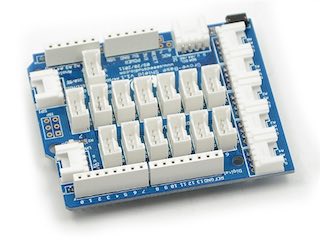
Parts of the project: Intel Edison, Grove Shield and Grove sensor
HAT gives out the values of the intensity of the light in the rooms where it is installed and uploads it on twitter. As you can see in the demo video at the bottom of this tutorial. When tweeting the light status, the value of the photoresistor is also specified. This is done because twitter has a filtration system for identical tweets, we can’t tweet the same data multiple times. Therefore in this project, I came up with the ingenious idea of tweeting the light status along with the value of the photoresistor.
Connecting the Parts for the Home Automation System
- Firstly Connect your Edison to the power source using the USB cable so that it’s powered.
- Plug the Groove base shield to the Edison Single Board Computer.
- Using one 26awg Groove Cable connect the Groove shield to the Groove Light Sensor.
- Connect the Cable to A0 pin in the Groove Shield.
- That's all for the hardware setup folks (Check out the picture below and also the video for the connections).
Setting Up the Software for Home Automation
Setting a Wi-Fi connection to your Intel Edison Board is essential and a must. So in case you need some enlightenment on the setting up the Wi-Fi connection for your Intel Edison (board) you can check the step 5 of Intel's "
Get started with the Intel Edison" tutorial.
After setting up the Wi-Fi, next your prime objective would be to download the libraries:
- The Twitter Library and the token key as well.
- Wi-Fi library (Present in the Arduino IDE by Default).
- SPI library (Present in the Arduino IDE by Default as well).
Everything Done? Time to crack you fingers. It’s coding time! Download the .ino (
Arduino Sketch File to be simple).
And, a small request to our splendid readers. Please reverse engineer the code and make amazing stuff for a better world, a better tomorrow.
Tests and Final Results
After all the coding and the bleep blops you should be able to get the big picture. If not then you might love to do some more reading. Check out the final demo video at the bottom.
This project is very useful, as a user can put up this technology in his home and can monitor activities via their Twitter account. This is perhaps the most efficient, cheap and swift way to monitor home electronics while you are away. It can be used to monitor the state of all the devices at home which can save electricity efficiently!
So Good luck and Keep making! If you have any issues or doubts leave a comment below! I’ll be more than happy to respond to them :) More projects coming soon in the HAT Series so stay tuned!
Lets see the working of this project from the video below! Sit back and enjoy!: