The M5Stick-V is an AIOT (AI + IOT) camera with machine vision capabilities.
Brief overview
The M5StickV is a tiny AI + IOT camera almost the size in diameter of 2 coins, the price is around $27.00 which for some could seem expensive for such a tiny camera but it does pack some decent specs. The camera is powered by incredibly powerful machine learning AI chip Kendryte K210, an edge computing system-on-chip with dual-core 64bit RISC-V CPU and state-of-art neural network processor, which makes it perfect and ready-to-use for:
- Face recognition/detection
- Object detection/classification
- Obtaining size and coordinates of the target in real time
- Obtaining a type of detected target in real time
- Shape recognition
- Game simulator
The M5StickV comes in a nice package containing the M5StickV itself and USB-A to USB-C cable.
Hardware specification can be found on the package.
Hardware features
- SoC – Kendryte K210 dual-core 64-bit RISC-V processor @ 400MHz with dual independent double-precision FPU, 8MB on-chip SRAM, Neural Network Processor (KPU) @ 0.8Tops, Field-Programmable IO Array (FPIOA), and more
- Storage – 16MB flash, microSD card slot
- Display - 1.14″ SPI display with 240×135 resolution ( ST7789 driver)
- Camera – VGA (640×480) camera via OV7740 sensor
- Audio – MAX98357 mono audio amplifier, speaker
- Sensor – MPU6886 3-axis gyroscope, 3-axis accelerometer
- USB – 1x USB-C port for power and programming
- Misc – Front and side buttons (A / B), power button, RGBW LED
- Expansion – 4-pin “CONNEXT” port
- Power Supply
- 200 mAh battery
- AXP192 PMIC
A more detailed specification can be found in official website of M5Stack.
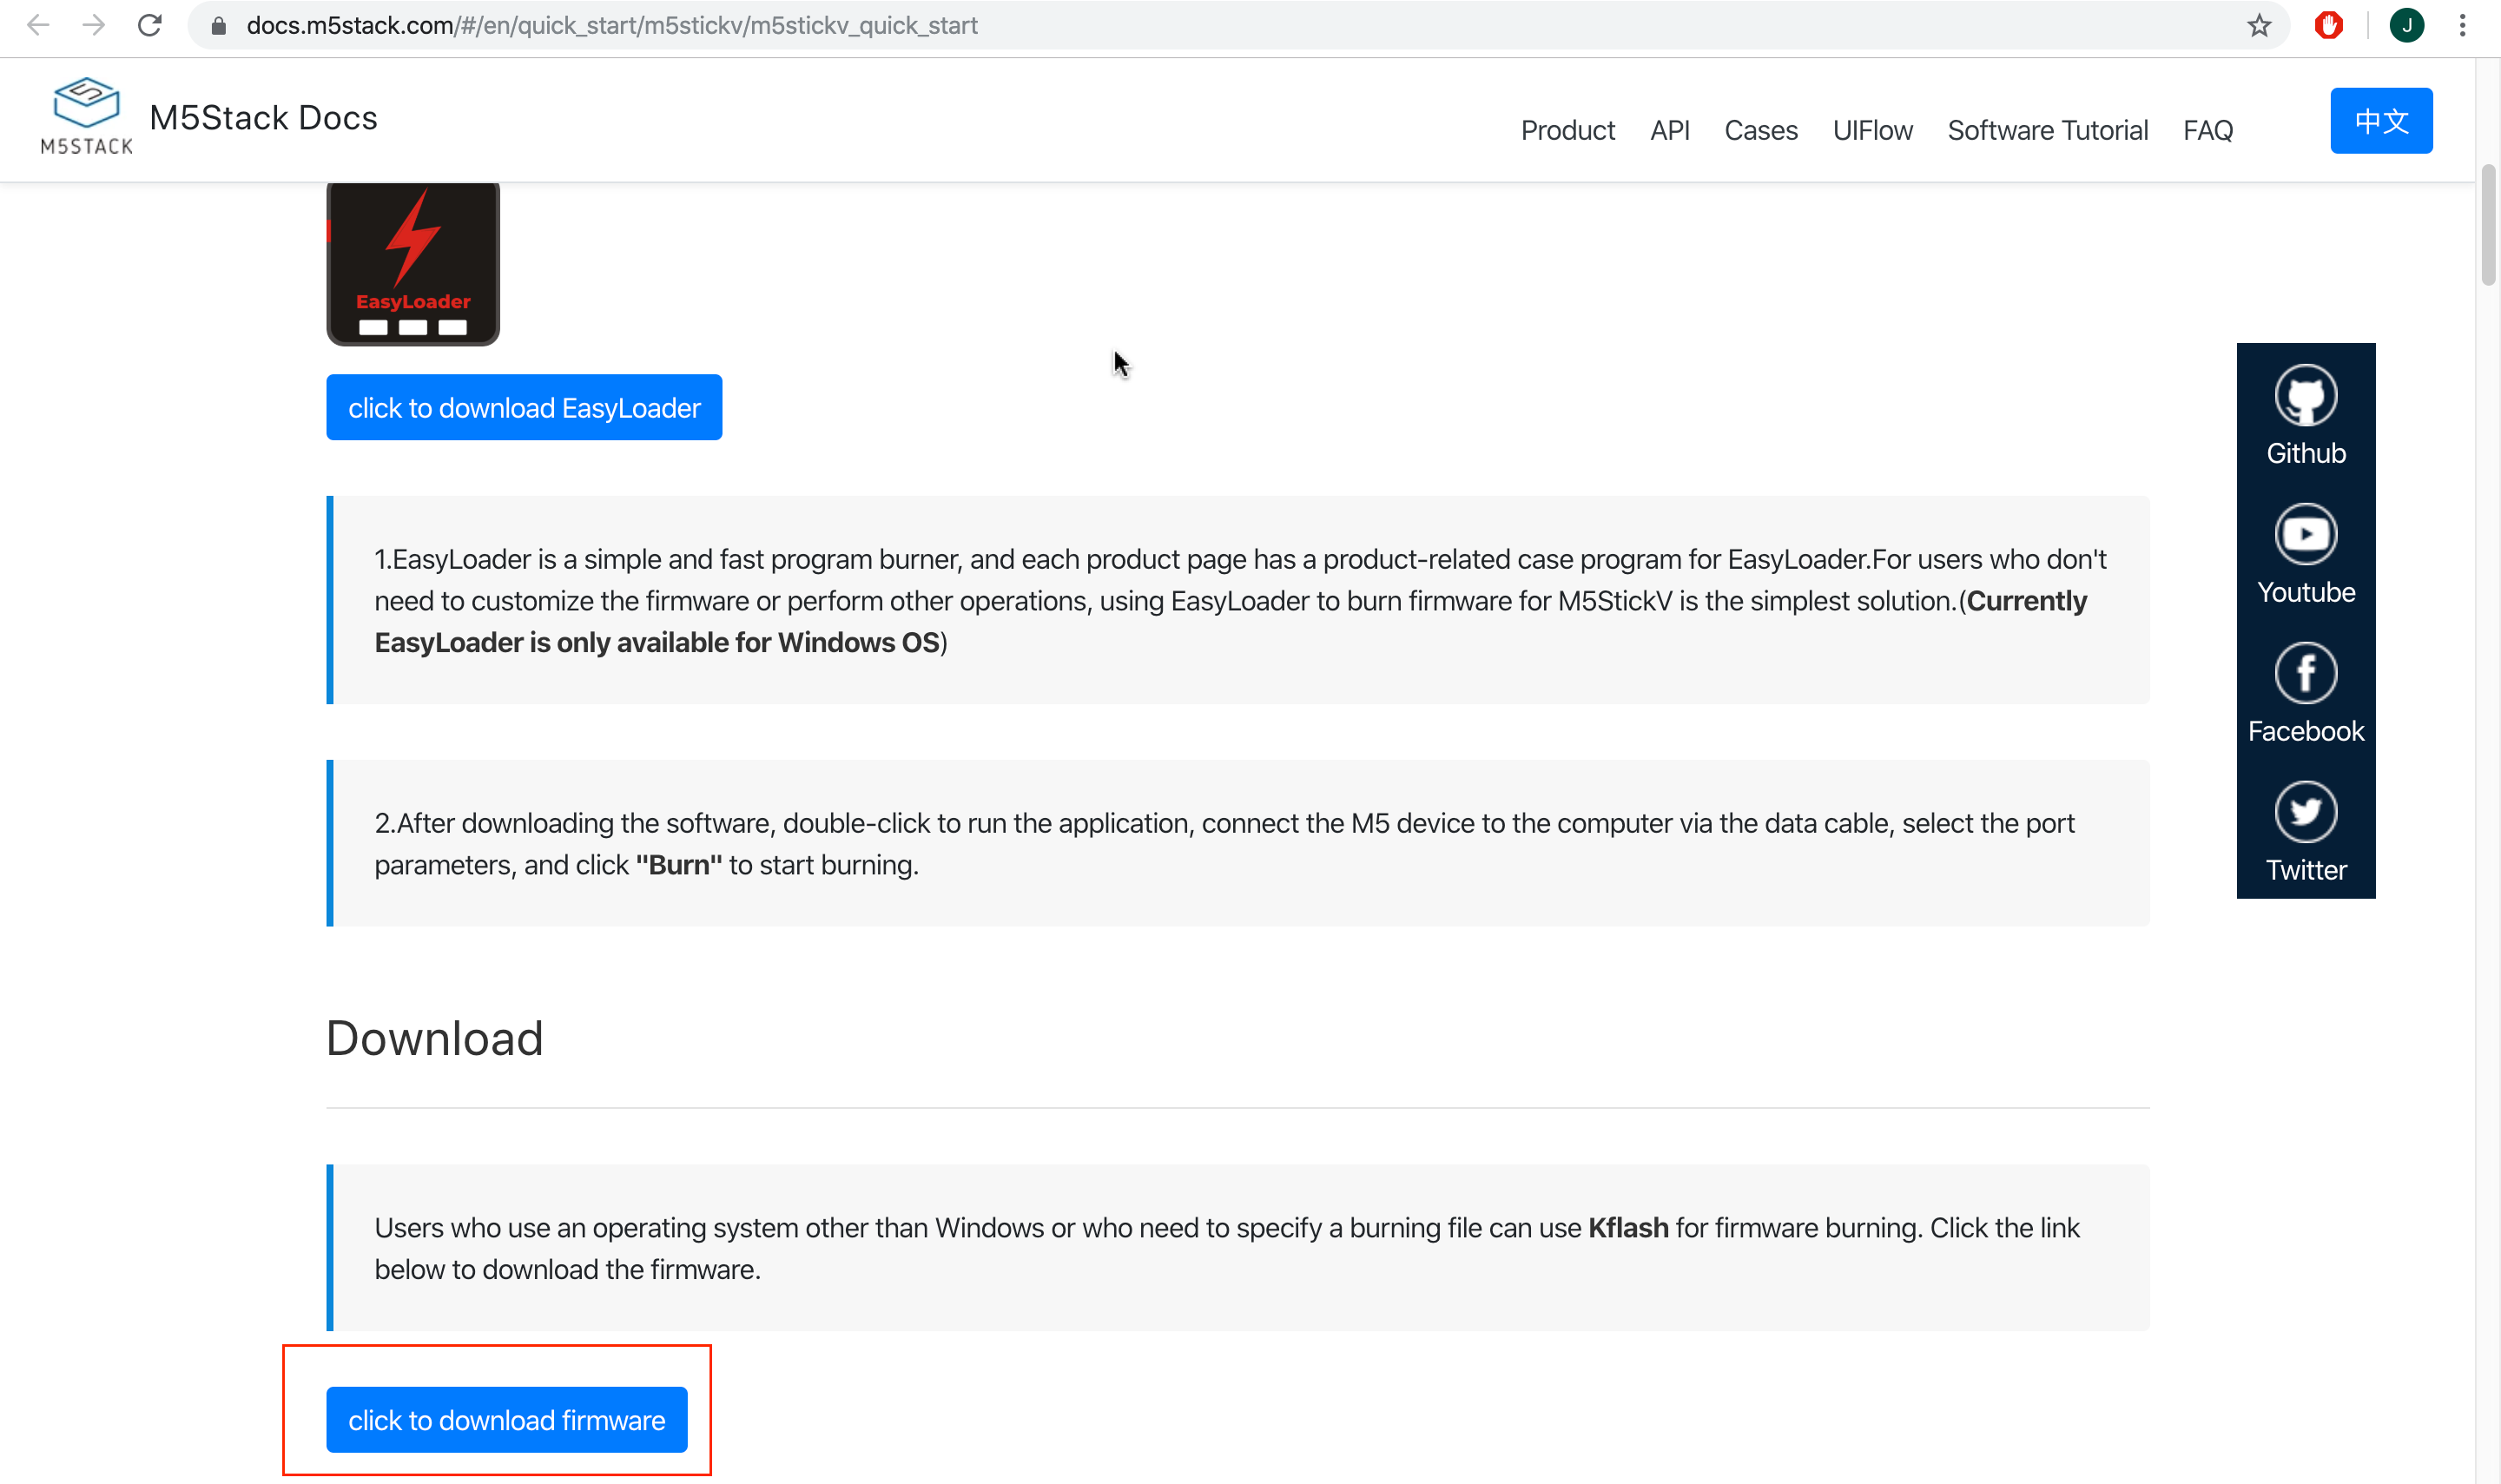
How to Burn Firmware on M5StickV
- Connect the M5StickV to the computer through the Type-C cable.
- Download the latest firmware for M5StickV from this link.
For Windows:
There are 3 methods to burn firmware for Windows OS:
Using EasyLoader tool
- Select proper COM port (in my case it was COM3)
- Press Burn
- After completion of updating firmware, you will see that it was Successfully burned.
Using Kflash GUI
- Open downloaded firmware using Open File button
- Select board as M5StickV
- Click Download
Using command prompt
- Check the COM port for your M5StickV at the Device Manager of Windows.
- On Windows, you need to have Python3 with pip3 installed and the pyserial package as well. You can download the latest version of Python from the official website.
- Open command prompt as administrator and type the following command
After finishing installation, run the following command
kflash.exe -p COM3 M5StickV_Firmware_1022_beta.kfpkg
[32m�[1m[INFO]�[0m COM Port Selected Manually: COM3 �[0m
�[32m�[1m[INFO]�[0m Default baudrate is 115200 , later it may be changed to the value you set. �[0m
�[32m�[1m[INFO]�[0m Trying to Enter the ISP Mode... �[0m
._
�[32m�[1m[INFO]�[0m Automatically detected goE/kd233 �[0m
�[32m�[1m[INFO]�[0m Greeting Message Detected, Start Downloading ISP �[0m
Downloading ISP: |=====================================================================================| 100.0% 8kiB/s
�[32m�[1m[INFO]�[0m Booting From 0x80000000 �[0m
�[32m�[1m[INFO]�[0m Wait For 0.1 second for ISP to Boot �[0m
�[32m�[1m[INFO]�[0m Boot to Flashmode Successfully �[0m
�[32m�[1m[INFO]�[0m Selected Flash: On-Board �[0m
�[32m�[1m[INFO]�[0m Initialization flash Successfully �[0m
�[32m�[1m[INFO]�[0m Extracting KFPKG ... �[0m
�[32m�[1m[INFO]�[0m Writing maixpy.bin into 0x00000000 �[0m
Programming BIN: |=====================================================================================| 100.0% 9kiB/s
�[32m�[1m[INFO]�[0m Writing m5stickv_resources.img into 0x00d00000 �[0m
Programming BIN: |=====================================================================================| 100.0% 10kiB/s
�[32m�[1m[INFO]�[0m Writing facedetect.kmodel into 0x00300000 �[0m
Programming BIN: |=====================================================================================| 100.0% 9kiB/s
�[32m�[1m[INFO]�[0m Rebooting... �[0m
For Linux:
Run the following command on terminal:
Using Kflash burn firmware image
sudo kflash -b 1500000 -B goE M5StickV_Firmware_1022_beta.kfpkg
You will see the similar following output as above.
For MacOS:
Open terminal and run the following command
If you receive an error after installation, try the following command:
sudo python -m pip install kflash
sudo python3 -m pip install kflash
sudo pip install kflash
sudo pip2 install kflash
Enter the following command
sudo kflash -b 1500000 -B goE M5StickV_Firmware_1022_beta.kfpkg
You must see the same output as above on Linux section.
Booting the M5stickV for the first time
For MacOS and Linux:
- Open terminal
- Install screen utility for MacOS and Linux. It can be installed by the following command:
sudo apt-get install screen
Using screen utility connect to M5stickV via serial communication
sudo screen /dev/ttyUSB0 115200
[MAIXPY]Pll0:freq:832000000
[MAIXPY]Pll1:freq:398666666
[MAIXPY]Pll2:freq:45066666
[MAIXPY]cpu:freq:416000000
[MAIXPY]kpu:freq:398666666
[MAIXPY]Flash:0xc8:0x17
open second core...
gc heap=0x80215060-0x80295060
[MaixPy] init end
__  __              _____  __   __  _____   __     __
|  \/  |     /\     |_   _| \ \ / / |  __ \  \ \   / /
| \  / |    /  \      | |    \ V /  | |__) |  \ \_/ /
| |\/| |   / /\ \     | |     > <   |  ___/    \   /
| |  | |  / ____ \   _| |_   / . \  | |         | |
|_|  |_| /_/    \_\ |_____| /_/ \_\ |_|         |_|
M5StickV by M5Stack : https://m5stack.com/
M5StickV Wiki       : https://docs.m5stack.com
Co-op by Sipeed     : https://www.sipeed.com
[MAIXPY]: result = 0
[MAIXPY]: numchannels = 1
[MAIXPY]: samplerate = 44100
[MAIXPY]: byterate = 88200
[MAIXPY]: blockalign = 2
[MAIXPY]: bitspersample = 16
[MAIXPY]: datasize = 158760
init i2c2
[MAIXPY]: find ov7740
When connected, it will automatically enter Maixpy UI. Now the device is running the default program code, you can terminate it by Ctrl+C.
For Windows
- Download PuTTY - a free SSH and telnet client for Windows
- Install and Open PuTTY
- Select COM port and baud rate
- Click Open button and you will the same screen output as above.
- Terminate it by Ctrl+C.
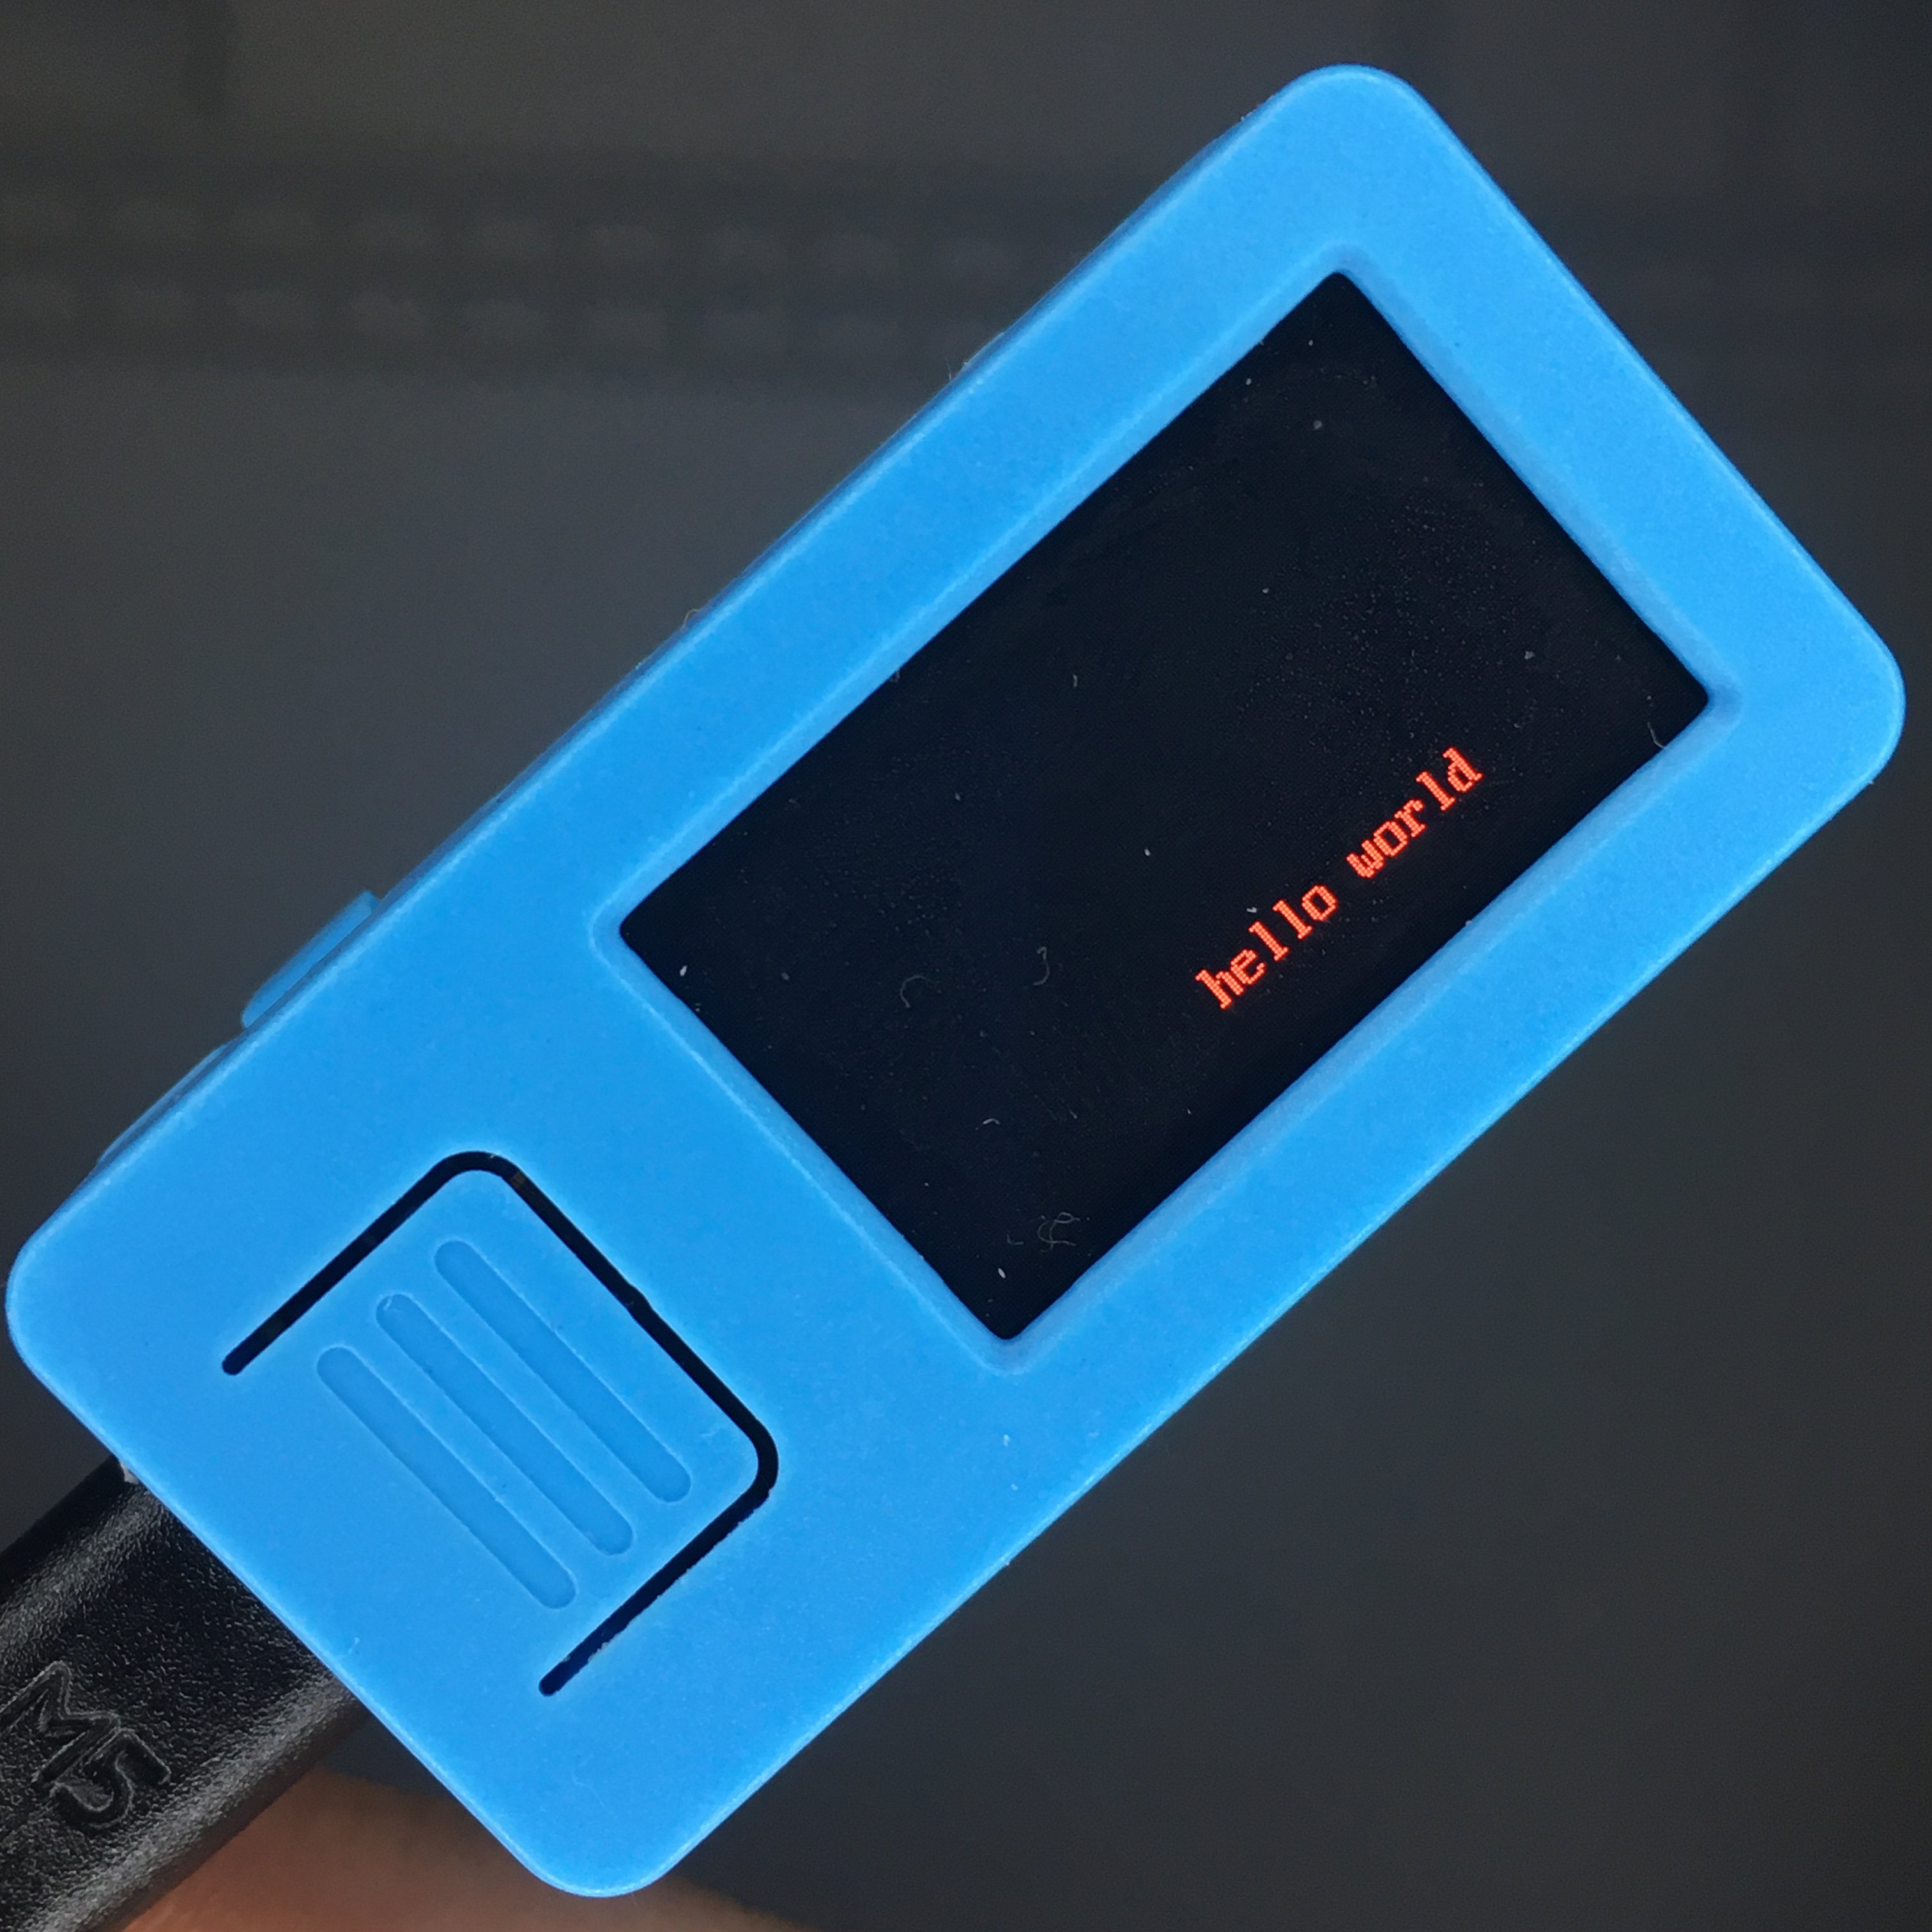
Print Hello World example on display of M5StickV
Enter the following commands in your terminal of MacOS and Linux. For Windows use PuTTY.
import lcd
lcd.init()
lcd.draw_string(100, 100, "hello world", lcd.RED, lcd.BLACK)
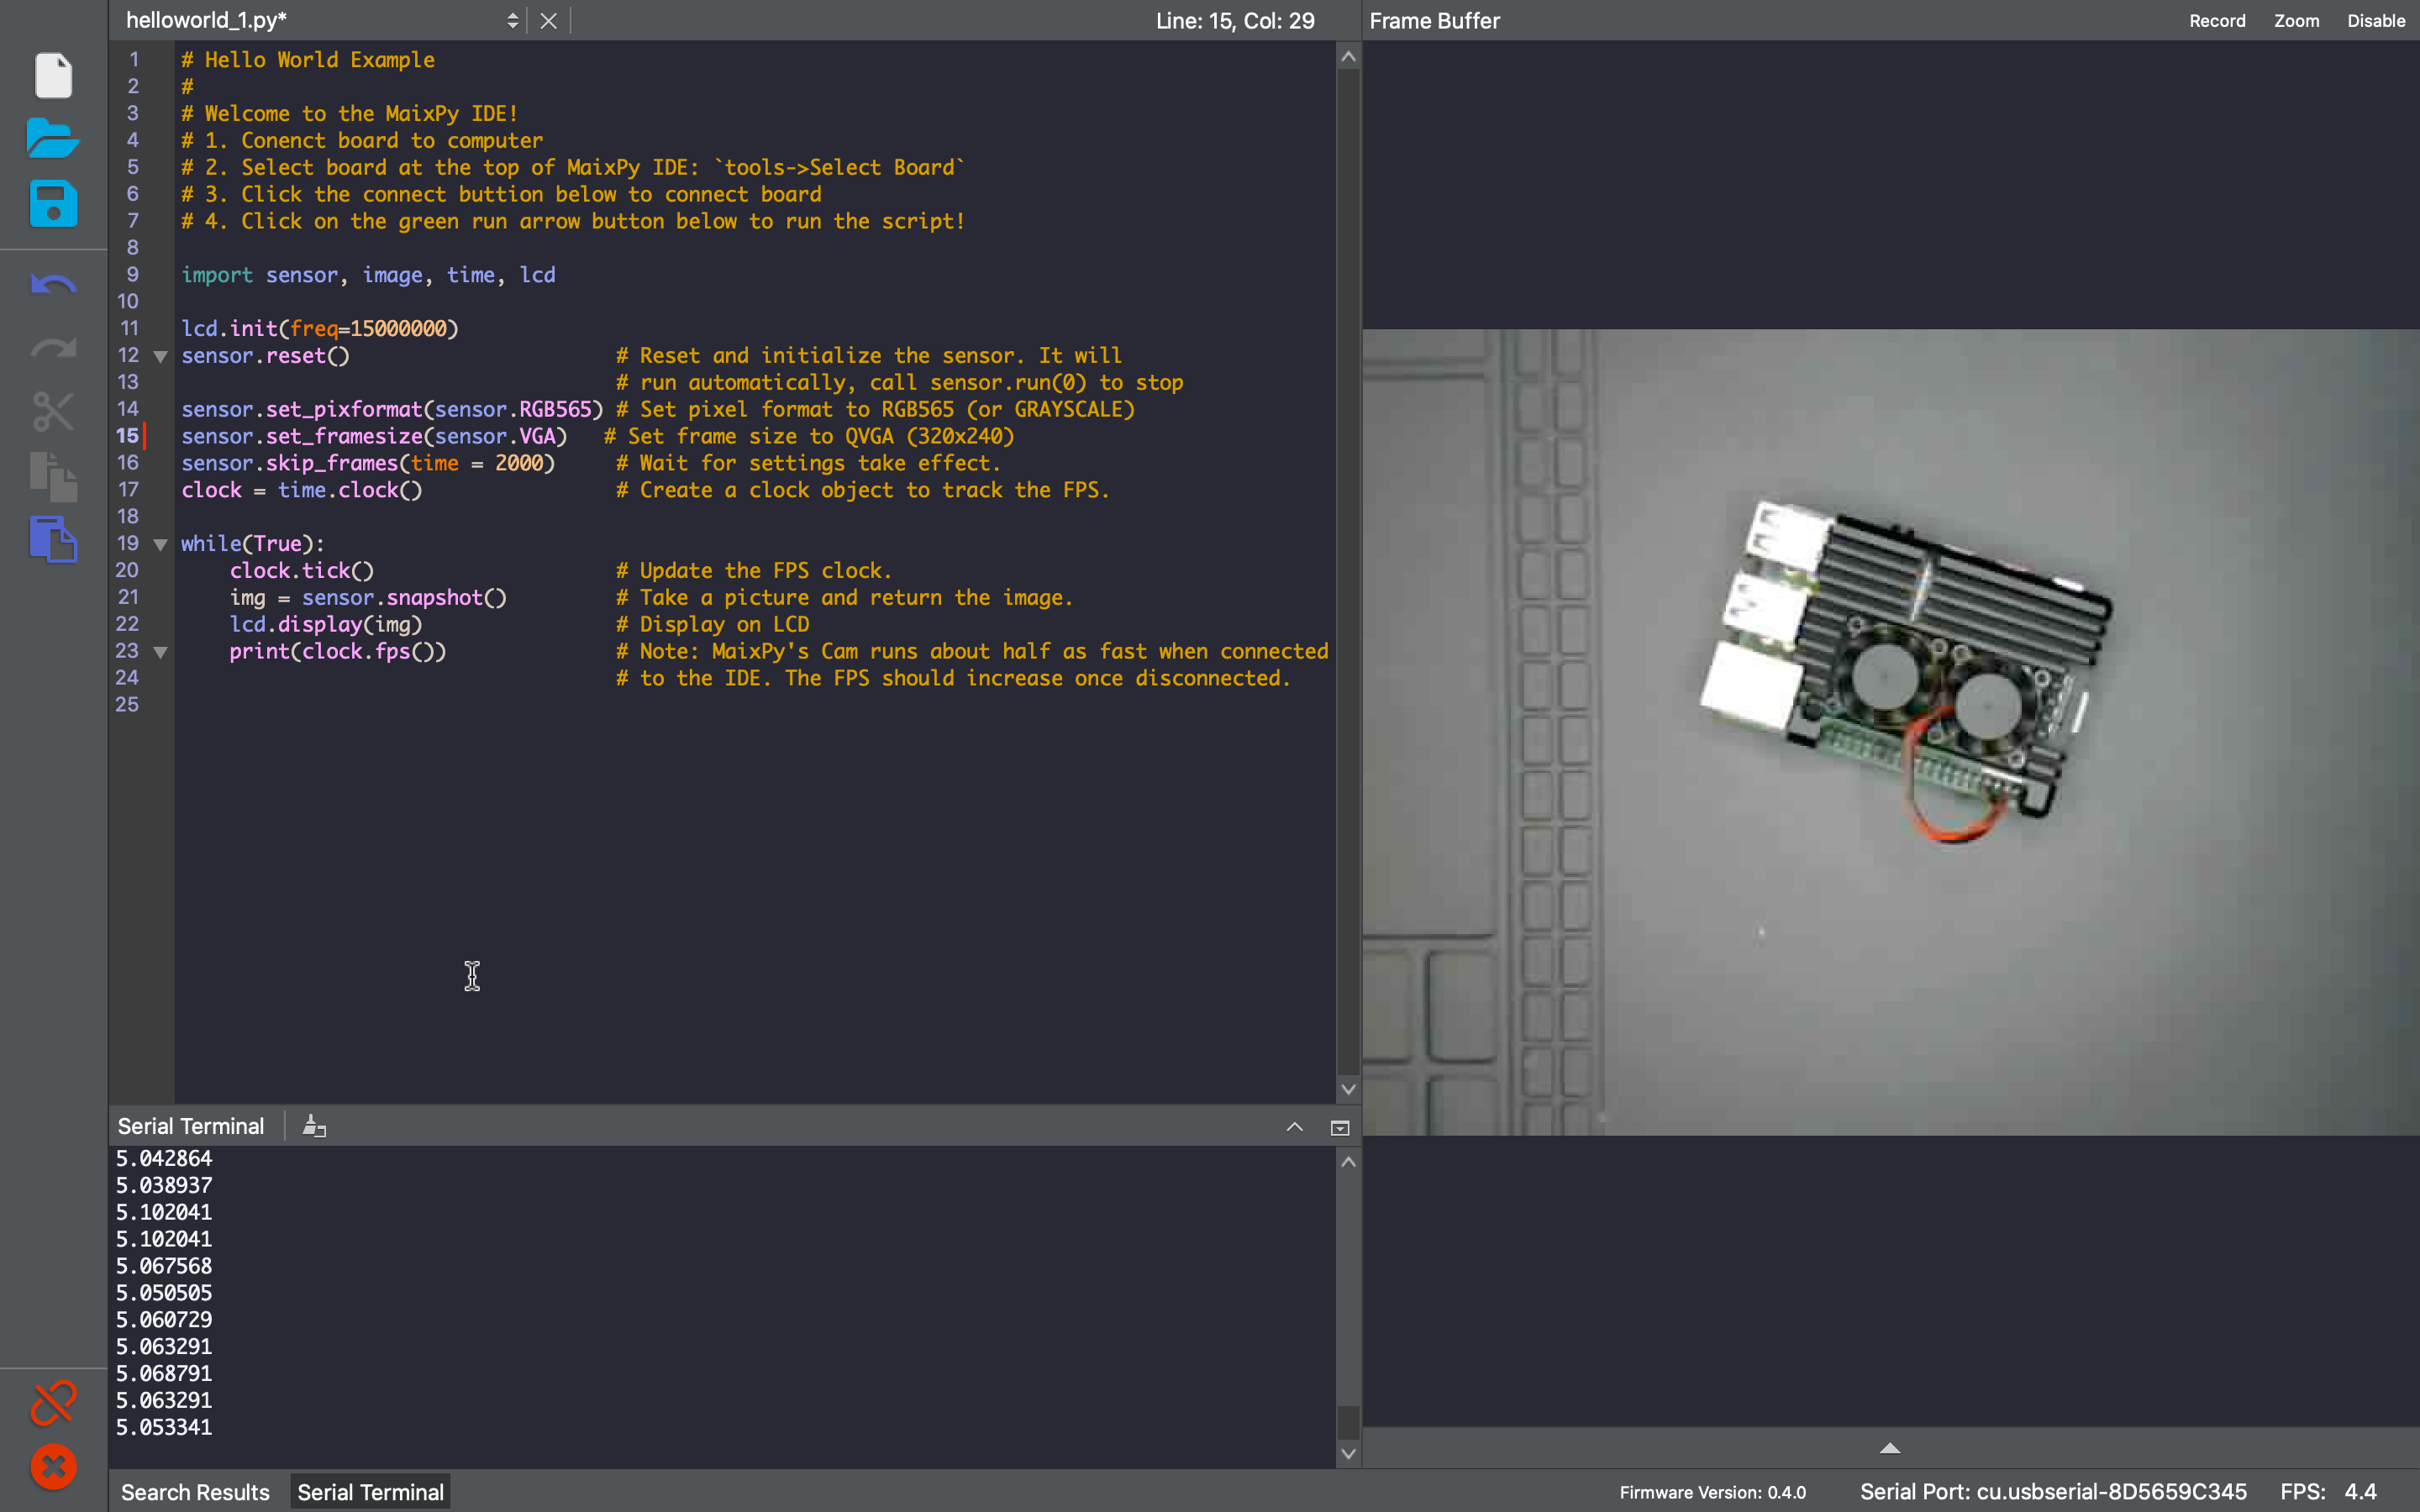
MaixPy IDE
The MaixPY IDE is a cloned version of the OpenMV IDE. M5StickV supports the OpenMV and MicroPython development environments.
- Download MaixPy IDE from here.
- Install MaixPy IDE
- Launch the MaixPy IDE
- Select the model of the development board - Tools-> Select Board-> M5StickV.
- Click the green Connect link button in the lower left corner and select the USB serial connection port, click OK.
- When the connection button changes from green to red, it has been connected successfully.
- Click the Run button in the lower left corner to execute the code and verify it.
- Click the serial terminal tab below.
- Finally, you will see the following output:
Face Detection using M5StickV
By default face detection model and program code was already preinstalled. Here's how it works.
- The face detection example works pretty good.
- In order to be able to use the another models, we need to burn it into the flash memory of the M5StickV using kflash_gui. Other models can be downloaded from here. There is a pre-trained model, the mobilenet, which is pre-trained to recognize 1000 objects. It can detect many everyday objects with ease.
- Copy the below code into MaixPy IDE.
import sensor
import image
import KPU as kpu
sensor.reset()
sensor.set_pixformat(sensor.RGB565)
sensor.set_framesize(sensor.QVGA)
sensor.run(1)
task = kpu.load(0x300000)
anchor = (1.889, 2.5245, 2.9465, 3.94056, 3.99987, 5.3658, 5.155437, 6.92275, 6.718375, 9.01025)
a = kpu.init_yolo2(task, 0.5, 0.3, 5, anchor)
while(True):
    img = sensor.snapshot()
    code = kpu.run_yolo2(task, img)
    if code:
        for i in code:
            print(i)
            a = img.draw_rectangle(i.rect())
a = kpu.deinit(task)
Press the Run button, and the board displays live video from the camera to the MaixPy IDE.
The accuracy is pretty good considering we are running it on a $27 board. This is truly impressive and revolutionary.
Conclusion
This board is not ideal though, it lacks analog inputs, microphone, WiFi, and Bluetooth. However, it is a great camera with AI capabilities that can be used for face recognition, object or shape detection and many other detection activities. Also, this is an awesome dev kit to get started with the Kendryte K210 RISC-V core.
I hope you found this guide useful and thanks for reading. If you have any questions or feedback? Leave a comment below. Stay tuned!