By doing this project, you can know the COVID-19 data in real-time without going to the Internet anymore.
Using MicroPython Program to update the COVID-19 Data in Real-Time, use MakePython ESP32 to get the global latest outbreak date.
Story
This is a project I made a month ago, today I want to share here.
As the outbreak of COVID-19, up to now(22th, Apr 2020) the globally confirmed cases are over 256, 5000! The world health organization (WHO) has declared the new coronavirus pneumonia outbreak to be a global pandemic. The COVID-19 also affects the hearts of millions, Everyone's daily life is affected, and people in many areas are restricted from going out and isolated from home.
I was very anxious about this outbreak, and I had to go online every day to check the latest outbreak data, but it was very inconvenient and a large amount of COVID-19's news on the internet makes me more worrisome. As a team of engineers, Makerfabs made a project with MicroPython Program to update the coronavirus Disease(COVID-19) Data in Real-Time, we use MakePython ESP32 to get the global latest outbreak data in real-time, and keep us to know the latest situation in time without seeing much frustrating news.
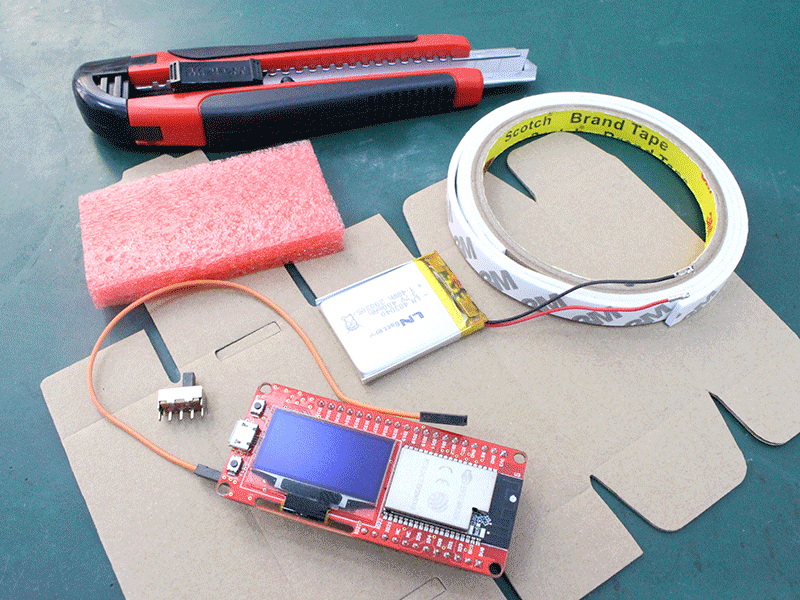
Step 1: Supplies
MicroPython-Program-Project-Supplies
Devices
- MakePython ESP32
- Lithium battery
- USB cable
- Toggle switch
Tools
- Foamboard
- Knife
- Carton box
- Soldering iron
- Hot melt glue gun
- Double-sided tape
Software
Step 2: UPyCraft Direction for Use
UPyCraft-Direction-for-Use
Download the Get Started MicroPython ESP32 file, which is detailed in the MicroPython Development Tools section of the file, which will help you download and install the uPyCraft IDE and use it. It also helps you get started with MicroPython programming.
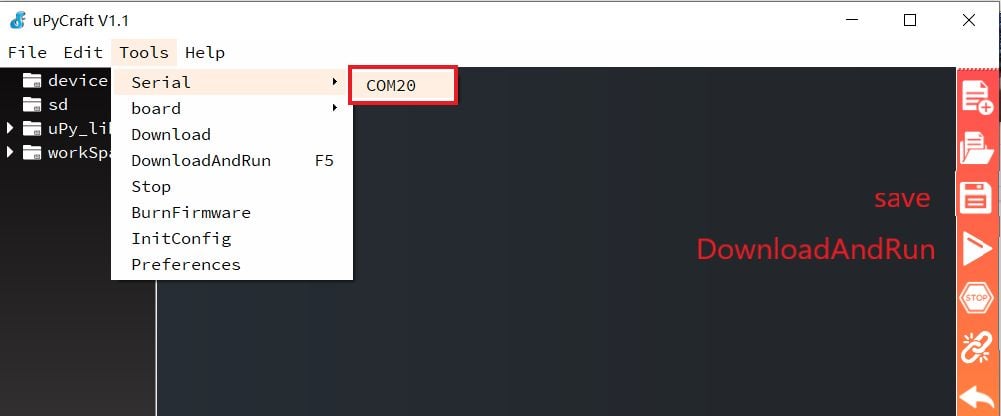
Step 3: Connect
Connect-MakePython-ESP32-to-PC
- Connect MakePython ESP32 to PC using a USB cable, Open device manager (Simply search for "device" in the Windows search box). When expanded, the port section should display something like the above. Make a note of the port number, such as COM20 in my case. If no port appears, try downloading the USB drive.
- Open uPyCraft and click Tools →board → esp32. Then click Tools → Serial → COM20(Your port).
Step 4: The Codes Download
Download the codes:boot.py, ssd1306.py andmain.pyfiles. Open and click DownloadAndRun to load it into MakePython ESP32.
- Open the boot.py file and change the ssid and password to your local network name and password, so that the module can be connected to WIFI for information after power.
ssid = "Makerfabs"
password = "20160704"
If you find that your country outbreak information is not displayed, please tell me to add it, or you can modify it by yourself. The method is as follows: open the main.py file, find CountryName[], add your CountryName (need to be translated into Chinese) on it, and change the number in range() to the corresponding number of countries, and run after saving it.
Step 6: Make the Mould
MicroPython-Program-Project-Make-the-Mold
Next, we started to make the shell of our own mold:
Use a knife to cut a small hole in the paper box to place the toggle switch, and a long hole to put the display screen.
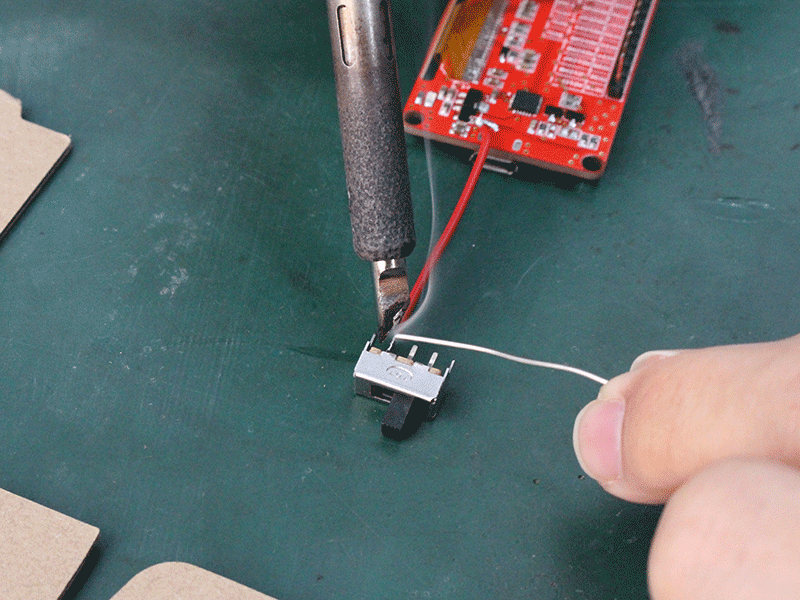
Step 7: Soldering, manually
MicroPython-Program-Project-Soldering
The left pin of the toggle switch is welded to the power input of the MakePython ESP32 module with an electric soldering iron. The positive pole of the lithium battery is connected to the middle of the toggle switch, and the negative pole is connected to the GND of the module.
Step 8: Assembly
- Attach the module to the foam board with double-sided adhesive tape and the lithium battery to the other side of the foam board.
- Attach toggle switch to carton hole and fix with a hot glue gun.
- The paper cover is folded into a cardboard box, the display screen is inserted into the long cardboard box hole, and other parts are put into the cardboard box.
Step 9: Complete
By flipping the switch on the carton, MakePython ESP32 connects to the Internet automatically when powered on, and the screen displays the latest outbreak data information.
Step 10: Display
Look at the information on the screen, there are so many people infected with the coronavirus. Hope they get better soon! We should also protect ourselves, wash our hands frequently and gather less. It displays the number of confirmed people, current people, cured people, and dead people. We do believe in the next days, the number of cured people will be more and more, and the current number to be 0. May the virus end soon, and hope our daily life back to normal soon.