Monitor your home’s air quality and CO2 levels automatically controlling a room's air purifier to remove TVOCs and CO2.
Monitor your home’s air quality and co2 levels automatically controlling the room’s air purifier to remove TVOCs and a fan to exhaust co2.
Code
A GitHub repository for this project can be found here.
Video
A video presentation of the project.
Project Overview
People spend most of their day at home, they wake up, go to work, then come back and stay until the next day. We all try to beautify our home environment through the addition of sometimes extravagant furniture and flowers. But we do not pay that much attention to the air inside our home.
Studies show that indoor air we breathe in most of the day is 3 to 4 times more polluted than the air outside our house. This refers to the higher amount of carbon dioxide as well as volatile organic compounds (VOCs) which are harmful for our lives.
Studies show that the presence of carbon dioxide in excessive amounts can lead to a lower level of concentration, this is because a higher level of carbon dioxide would replace the oxygen that should be present in the air reducing the oxygenation of the brain leading to reduced brain function.
VOCs also have an impact on human health. Studies show that over 30% of households have excessive levels of VOCs. These can lead to problems such as difficulty breathing, and lengthened exposure can lead to nasal cancer.
So, what can we do to make our home environment healthier? Air purifiers can filter the VOCs out of the air easily, but there is a catch; the cost of modern air purifiers can be quite high. But we do not want to have an air purifier that would run all the time because that would waste energy. We need our devices to be connected to the internet and run without the need for us to press buttons and plug them in.
Smart air purifiers are the solution! These devices purify the air automatically whenever excessive impurities were detected. But the cost of implementing solutions like this are excessive, and on top of that, there is very little information given to the user about air quality.
So, what about carbon dioxide? Well, simple ventilators and fans can redirect the impurities outside but running them all day can use up a significant amount of energy. So, what if you could automate both an air purifier and a fan to ensure that the air quality indoors is optimal at all times?
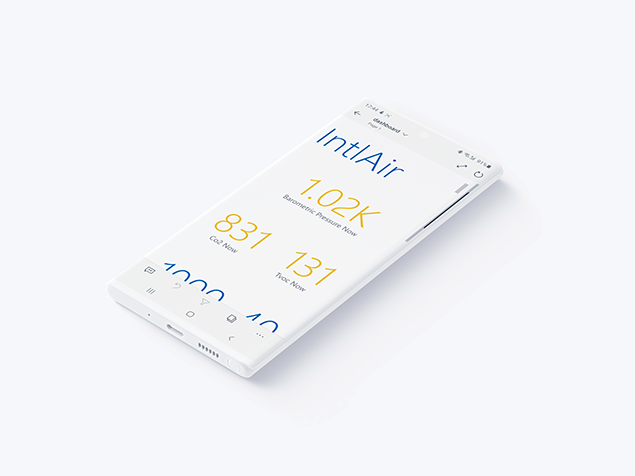
This is where IntlAir comes in, IntlAir is a device powered by the Azure Sphere board which monitors the indoor air quality by reading the TVOC and carbon dioxide levels and turning on the air purifier and/or the fan, respectively. The device also monitors barometric pressure to ensure that the atmosphere is optimum.
Figure 1: A mockup of the dashboard illustrating the data collected by the WaterAid device
This way, any fan system and purifier can be modernised and brought into the age of IoT in minutes, no need to purchase new, expensive systems. IntlAir can significantly reduce the amount of energy used by these devices and provides the user with a comprehensive dashboard and application where they can visualise both the air quality in the home, and when the purifier was running.
This gives the user full control over the data and ensures that the air in their home is always clean. Bring your home into the future with a smart, cost-effective implementation.
Figure 2: A mockup of the mobile version of the dashboard
TVOCs and Carbon Dioxide Explained
As previously mentioned, it is important to monitor the levels of these compounds in the air. Sadly, because of the cost of solutions that monitor these parameters, most homes will not be equipped with such sensors.
The term TVOC refers to the Total amount of Volatile Organic Compounds in the atmosphere. There are many VOCs such as ethanol and butanol. The TVOC level is calculated by counting the concentration of a few of these VOCs together getting the total level VOCs in the atmosphere.
Both TVOCs and CO2 are calculated in either particles per billion (ppb) or particles per meter (ppm). These measurements are the same and represent the concentration (amount) of these compounds in the atmosphere in respect to 1 billion air particles.
After conducting research in the field, I managed to put together some tables with the effects of different concentrations of TVOCs and carbon dioxide on the health of the inhabitants, these are shown below:
CO2 Levels
250-400ppm | Normal background concentration in outdoor ambient air
|
|---|
400-1,000ppm
| Concentrations typical of occupied indoor spaces with good air exchange |
1,000-2,000ppm
| Complaints of drowsiness and poor air. |
2,000-5,000 ppm
| Headaches, sleepiness and stagnant, stale, stuffy air. Poor concentration, loss of attention, increased heart rate and slight nausea may also be present. |
5,000
| Workplace exposure limit (as 8-hour TWA) in most jurisdictions. |
>40,000 ppm | Exposure may lead to serious oxygen deprivation resulting in permanent brain damage, coma, even death. |
TVOC Levels
Source | Concentration | Associated Period of Exposure | Health Effect(s) |
|---|
Based on sensory irritation | | | |
California Environmental Protection Agency (EPA) | 44 ppb | 1 hour | Eye and airway irritation |
Health Canada | 100 ppb | 1 Hour | Eye irritation |
National Institute for Occupational Safety and Health | 100 ppb** | 15 minutes | ** |
Occupational Safety and Health Administration | 750 ppb | 8-hour PEL-TWA | Cancer and skin/eye/ respiratory irritation |
World Health Organization | 81 ppb | 30 minutes | Sensory irritation |
World Health Organization | 10 ppb | Short- and long-term | Sensory irritation |
Based on respiratory and asthma-like symptoms | | | |
Agency for Toxic Substances and Disease Registry | 40 ppb, 30 ppb, 8ppb | Daily: 1 - 13 Days, 15 - 364 days, > 1 year | Respiratory |
California EPA | 7 ppb | 8-hour annual average | Respiratory symptoms in children |
Health Canada | 40 ppb (target) | 8 hours | Respiratory symptoms in children |
Based on cancer risk | | | |
National Institute for Occupational Safety and Health | 16 ppb | 8 hours | Nasal cancer |
Occupational Safety and Health Administration | 750 ppb | 8-hour PEL-TWA | Cancer and skin/eye/ respiratory irritation |
World Health Organization | 100 ppb | Long-term | Nasal cancer |
After analysing this data, I set the values at which the fan and purifier would turn on at 1,000ppm of CO2 for the fan and 40ppm of TVOCs for the purifier. This way the room can be cleaned if the concentration of impurities exceeds this limit.
Frontend
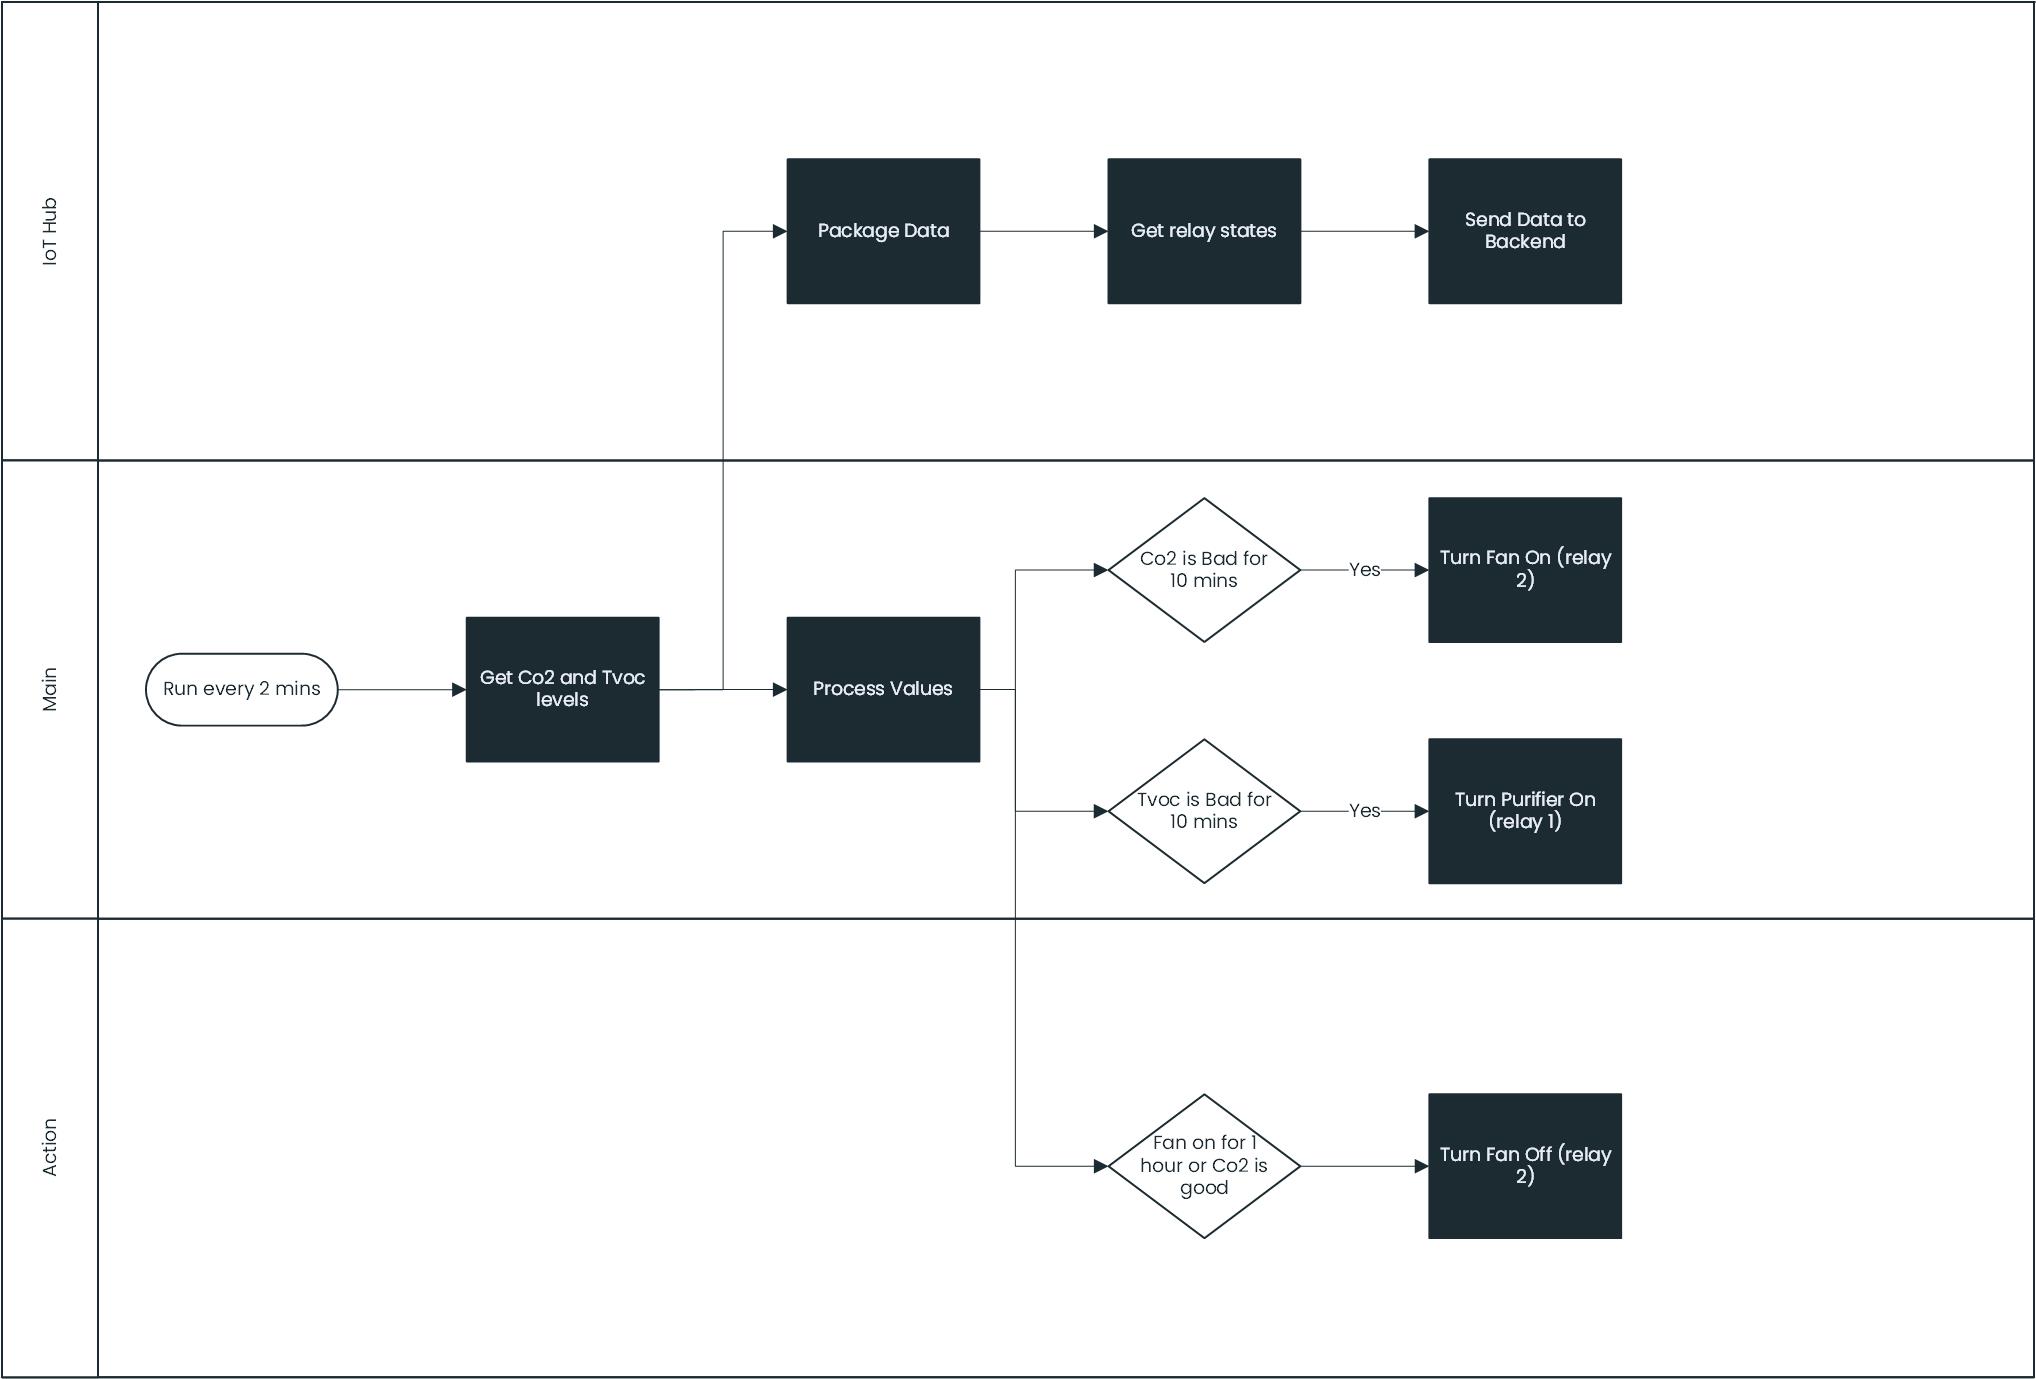
Figure 3: A diagram depicting the frontend architecture of the project
The frontend of the project refers to the device that controls the purification system. The diagram above shows this process. As seen above, the device will turn on every 2 minutes (sleeping in between).
The device will collect the TVOC and Co2 data from the click modules attached and will then process it to see if the values are abnormal. If this is the case, the relay controlling the fan and the one controlling the purifier will be toggled. The device will also pack all this data and send it to the cloud.
Managing the Relays
The system was designed to turn on the fan and/or the purifier until the air is clean. To prevent the device from running the purifier excessively, it will turn off after 1 hour of running if the air is still not clean.
The device will prevent the purifier/fan from turning on for one hour to let the air in the room circulate and if the air is still dirty afterwards, the purifier/fan will turn on again.
Security
Because this is a home automation project, I believe that security is of upmost importance to ensure that the application is running smoothly and undisturbed by outside sources. The Azure Sphere device is as secure as it gets when it comes to IoT. From the Pluton chip ensuring that the device’s code can only be modified by users with access to the specificity needed in the app manifest, this device will ensure that the application is running smoothly and securely.
Backend
Figure 4: A diagram showing the background architecture of the project
The backend of the project refers to the cloud infrastructure implemented to deal with the telemetry data sent by the device as well as the Power Bi dashboard which the end user will be able to access from anywhere.
Automatic connection and Integration with Azure Services
The Azure Sphere is limited to connecting to the Azure Cloud which ensures data is sent in a safe environment. I personally use the Azure cloud for my projects, honestly mainly because of the brilliant interface so it is great to see that the Azure Sphere makes the connection easier.
Message Routing
A DPS (device provisioning service) connects the device to the IoT Hub. This feature allows for the connection of thousands of devices if needed without human interference making connection seamless.
The messages are then placed in the IoT Hub. They are then extracted by a Stream Analytics job and forwarded into a Power Bi dashboard and mobile app. The data is displayed live in the dashboard.
The Dashboard and App
Figure 5: A side view of a mockup showing the dashboard of the project
Aesthetically pleasing UI is essential for a modern application targeted at individuals. A dashboard which shows the user all the information they need in an orderly and beautiful fashion is just as important as the data collected by the device.
I leveraged the powerful capabilities of Power Bi to develop a stunning dashboard which is available to the user in the cloud so they can see the data from anywhere at any time. I also converted it into a mobile application using Power Bi’s powerful phone layout so that users can carry their data in their pockets being able to check the air quality at work, on the bus, and everywhere in between.
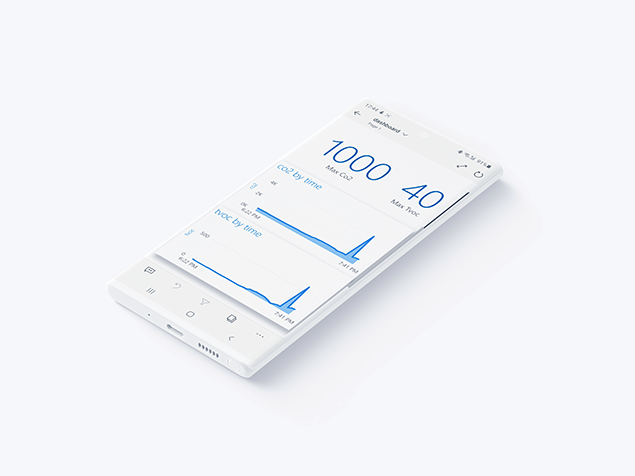
Figure 6: The mobile dashboard of the project showing the Co2 and TVOC levels over time in the home
The dashboard shows the user the current levels of TVOCs and Co2 in the home as well as the barometric pressure. This data is also shown on graphs over time. The user can also see within the app if the purifier and/or fan is running even if they are at work putting the data in the user’s hands.
Going Further
I want to note that this project can still work if only an air purifier or a fan is connected and not both.
While developing this project. I kept notes of ways in which this project can develop further in next versions. Below is a list of developments of the project:
- Adding alerts so that the user can know when the purifier/fan is turned on and off and if the air is not clean in the home.
- Storing the data in Cosmos DB to allow multiple applications to use it in the backend if needed.
- Azure Functions can be used to route messages from the IoT Hub into the Power Bi report. This will dramatically reduce the cost of development.
Market Research
Market research was conducted for this project to gain an insight into the users that would use it as well as the competition for the product.
Target Market
The target market for this product is described under the following headings:
- Age: The product can help people of any age but is aimed at families because they will tend to care more about the air quality in their home because of their children.
- Economic Background: The device is aimed to middle and lower-class households because of its low cost and because it is easily implementable.
- Lifestyle: The product is aimed at people that care about their health indoors and want to live a healthy lifestyle.
Competition
The main competition that has been encountered when researching similar products was a range of air purifiers known as “smart air purifiers”. These devices turn on automatically when they sense impurities in the air.
Although these devices already exist, their price point starts from €100 for the cheapest models. These products also offer a very small amount of control over the purification of the air which is not appropriate.
Unique Selling Points
There are multiple advantages and USPs that this product has over others that already exist in the market. These are listed below.
- Cheaper than most of these devices
- Any air purifier can be turned into a smart one
- A dashboard well designed providing the user with more information than typical models would
- Azure Sphere’s security integration
User Persona
Zara and James are a couple with 2 children. They have recently read about the importance of air quality and are wondering if they can improve the air quality in their home. They searched for smart air purifiers online, but the expense of a quality product is too high. Instead, they decide to purchase a normal purifier and use IntlAir to turn it into a smart air purifier saving money and energy. They have also connected their pre-existing fan system to the device to further save energy.
Project Conduct
This section will walk through the steps needed to construct the project and some tips on getting everything together.
Getting everything you need
The BOM above details the parts you need for this project. Please make sure that you purchase the correct versions of the MikroE modules.
Figure 7: An image showing all the components needed to construct the project
Some prerequisites before we get started
Before we can start with this project there are a couple of steps that have to be taken to set up our development environment. You will be needing a PC and an Azure Sphere device to get started so we can set things up.
- Download Visual Studio (VS Code works too) and ensure you download the C++ development environment.
- Ok, the next thing we need to do is download the Azure Sphere SDK. You can get it here.
- Please note that you must download both the Azure Sphere SDK and the Extension for it. You will now need to download the extension from this page.
- The next thing we will need to do is claim the device to our tenant. You will need to create one first using your Microsoft account. Everything you need is at this link, ensure to read through it all.
- Great, and lastly, we need to connect the device to your WiFi network. This link will guide you through the process.
Getting everything connected
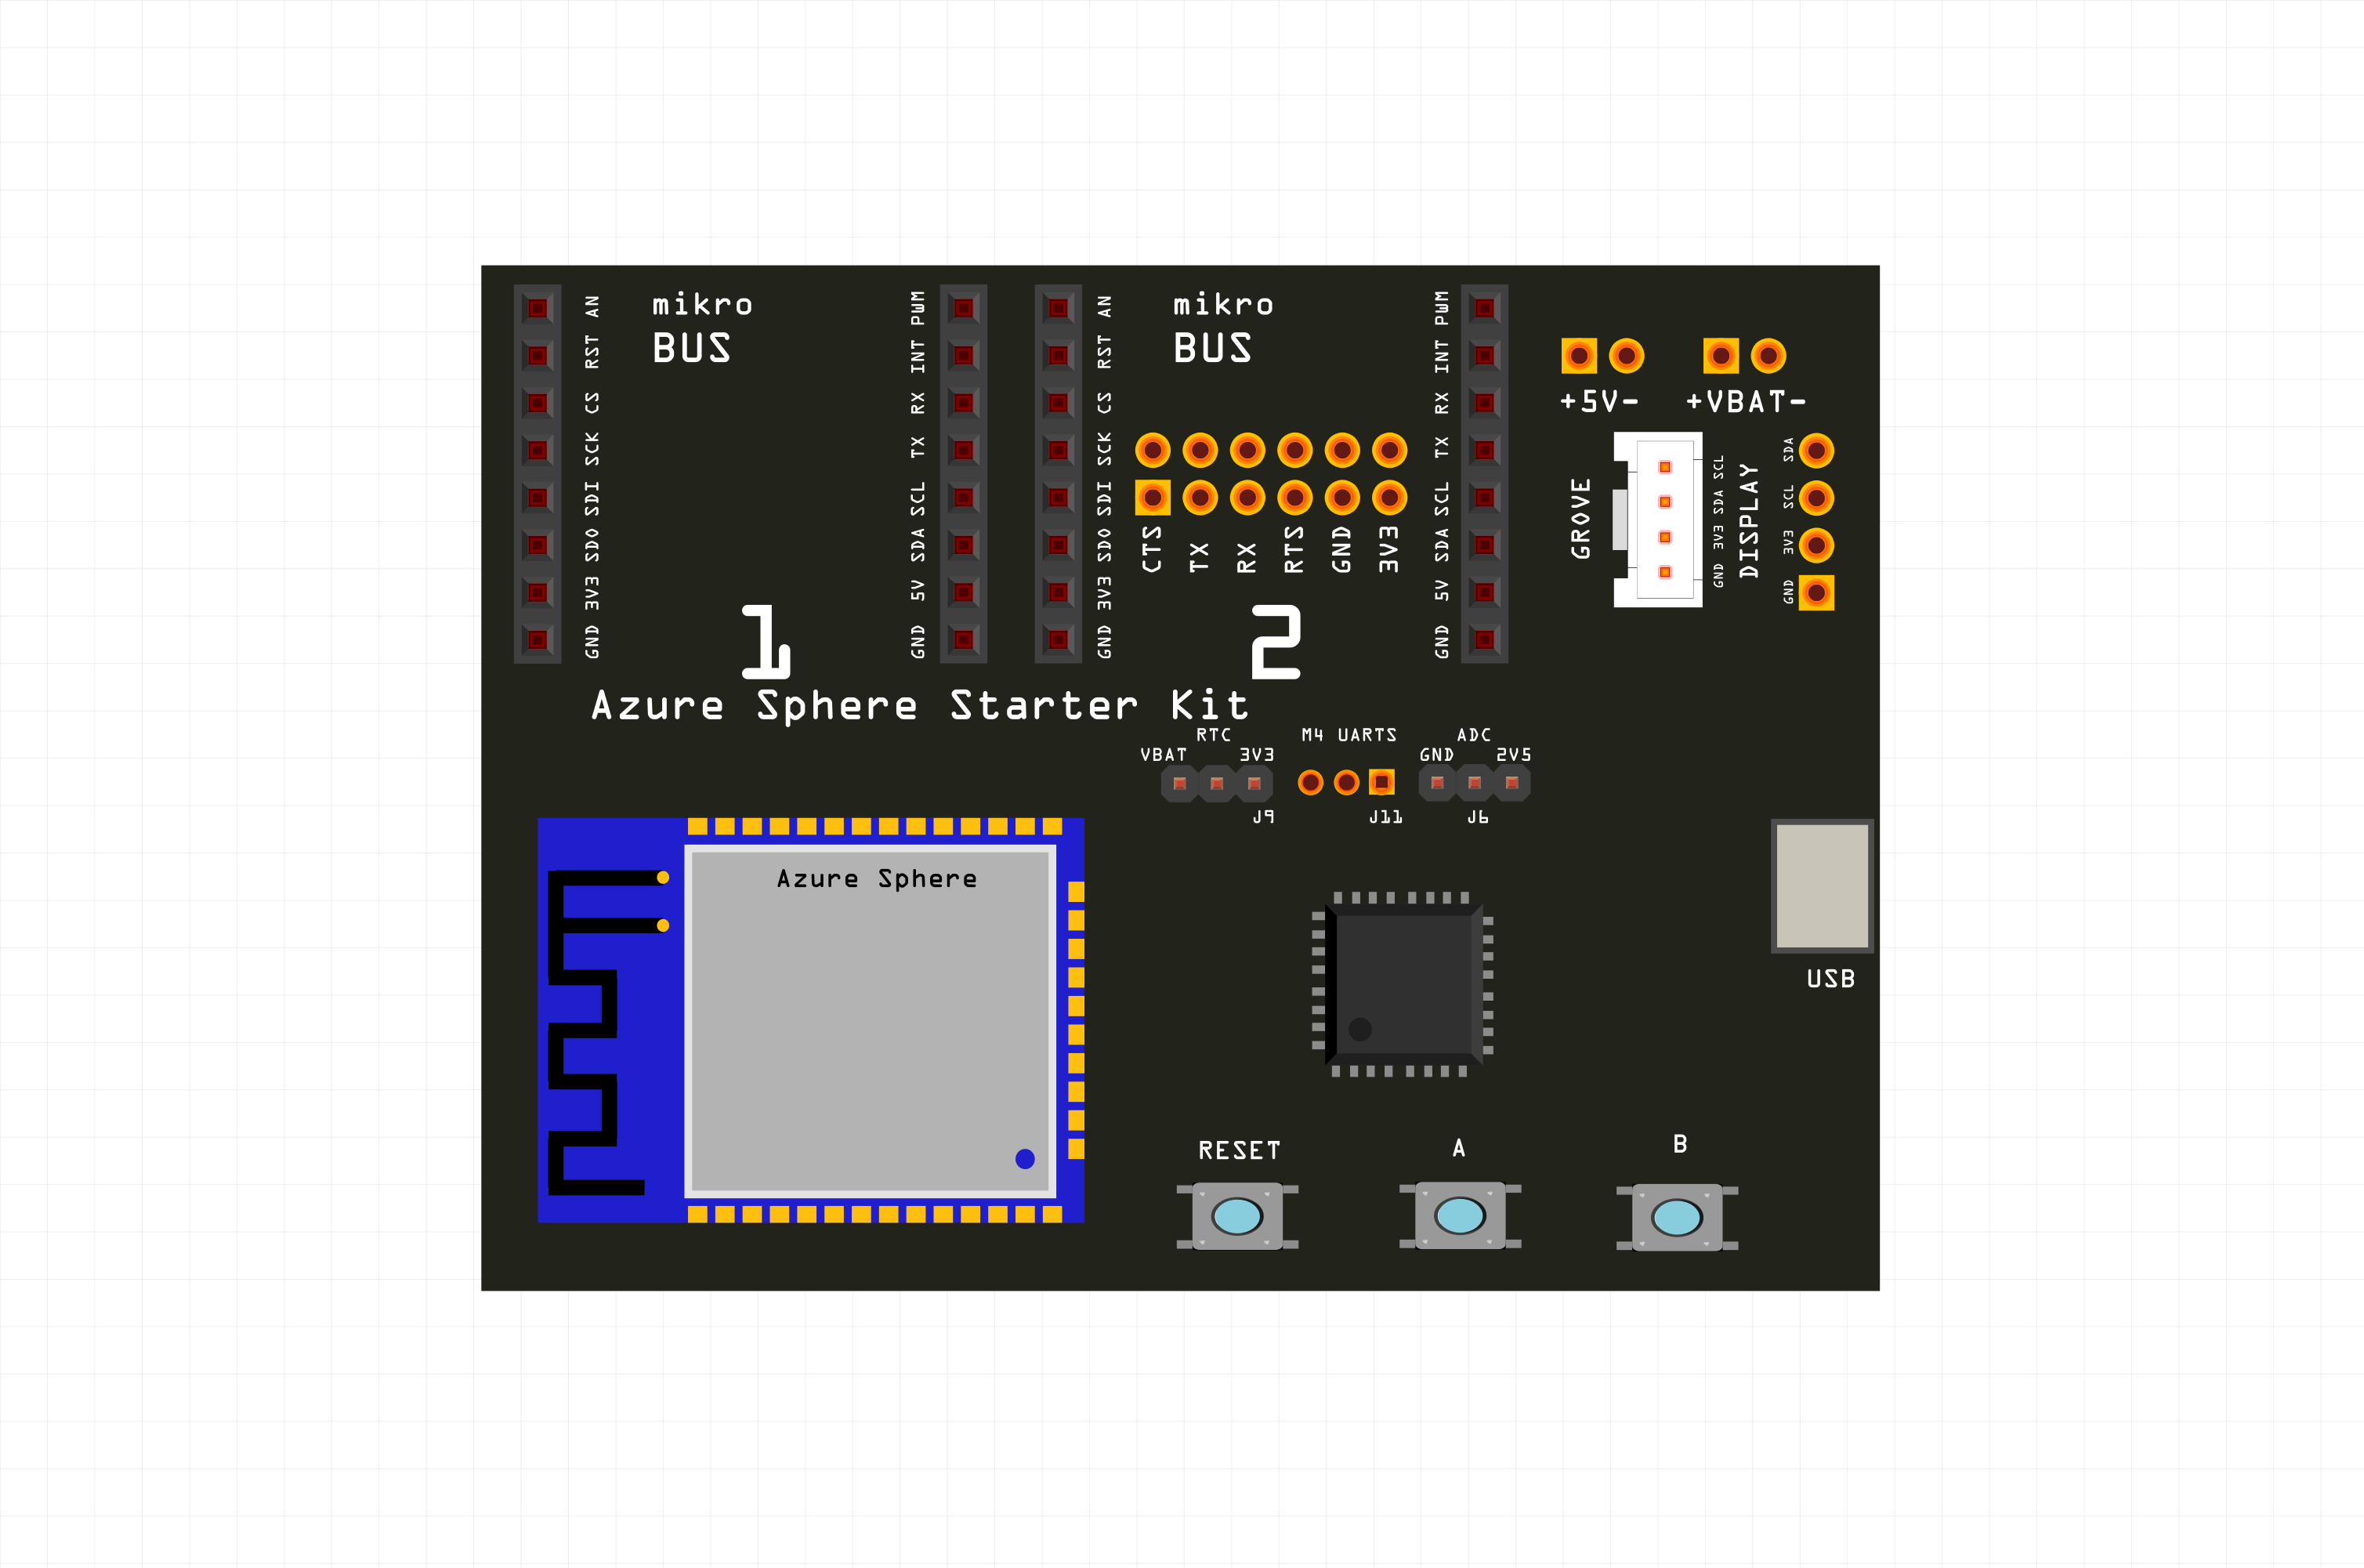
Figure 8: The schematics of the Azure Sphere device
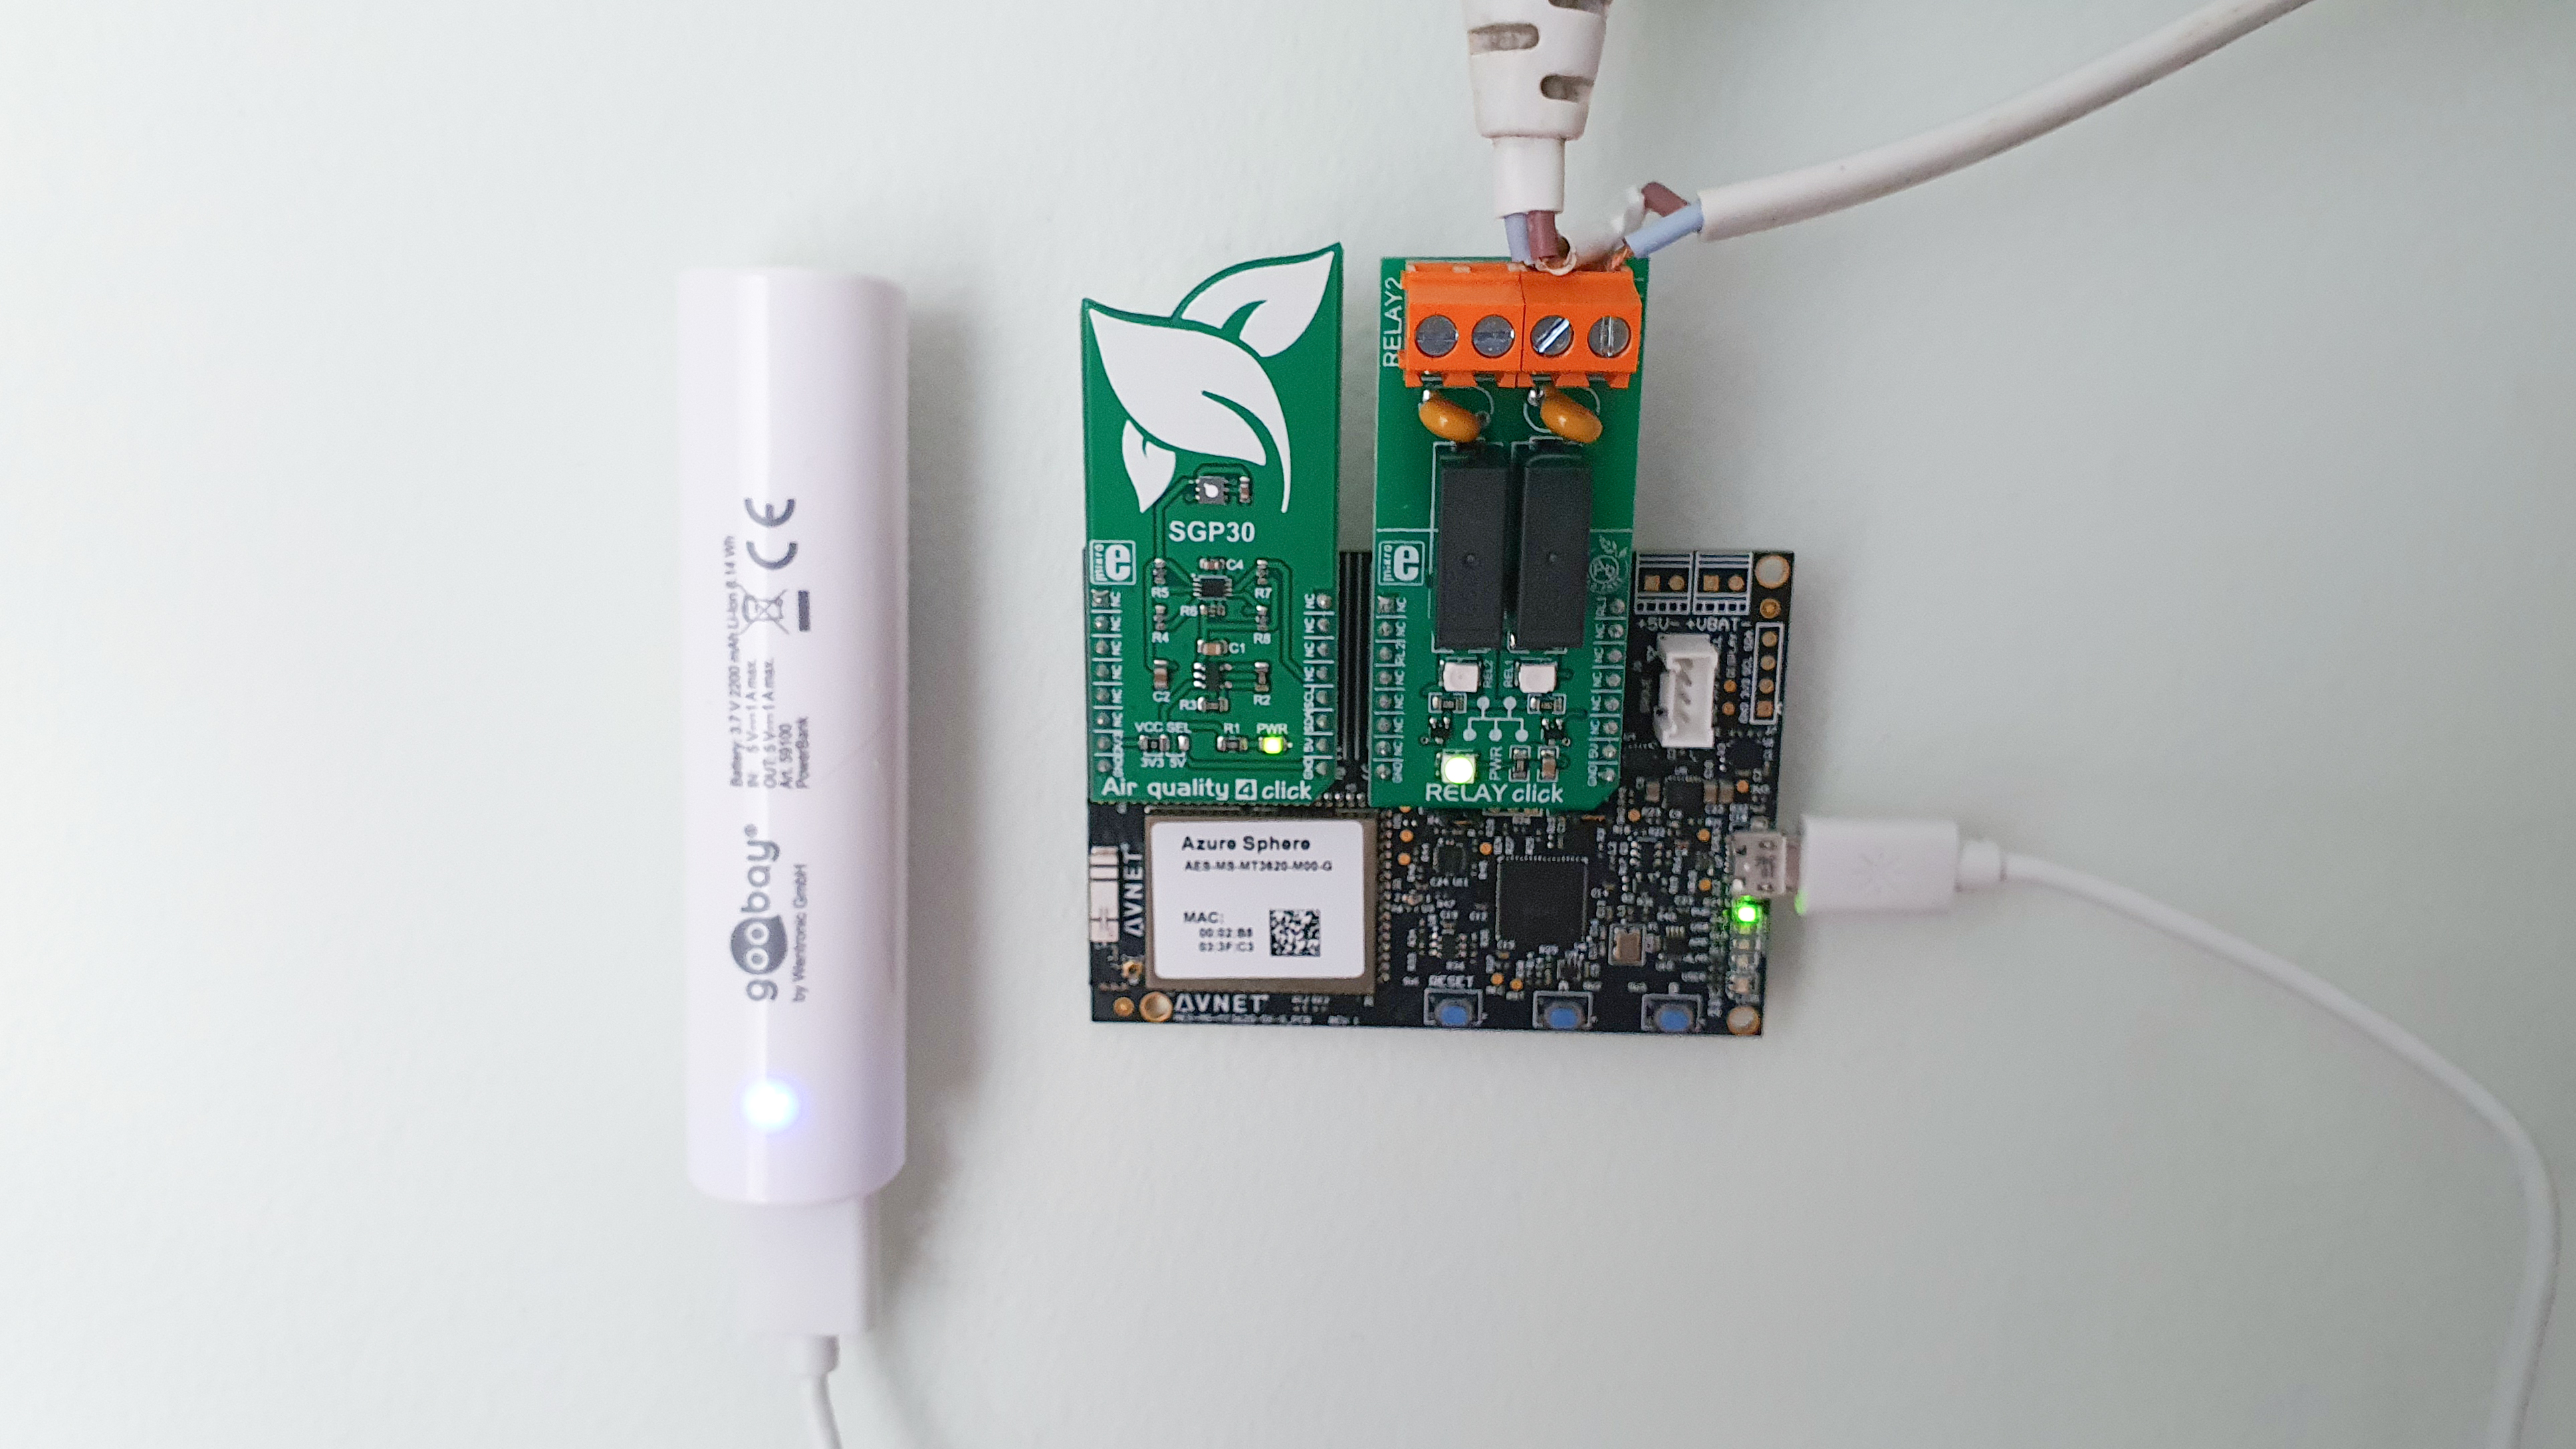
Ok, so the next thing we need to do is get the MikroE clickboards mounted on the device. Well, you just have to attach them on the pins. Make sure that you connect the first socket to the Air Quality click and the second socket to the Relay Click.
Moving on with the Relay
Now that we have the components ready, we must attach our fan and purifier to the relay to be able to control them. Now there is a small caveat; the devices have to be able to turn on automatically when they are plugged in, the purifier I had used a switch so if I would set it to on, it would automatically start running if I plugged it in. Something like this is needed for the project to work. Please look at the table below to see which devices must be connected to each relay.
Relay 1 – Terminals 1, 2 | Air Purifier |
|---|
Relay 2 – Terminals 3, 4 | Fan |
Ok, so we have to cut the power cable running from the plug to the device to reveal the wiring to get started.
Now we will need to connect the ground wires together again but keep the power ones separated. We now need to take the relay click and connect the ends of the power wire to the terminals of the device.
Make sure to insulate the wires after you do this to ensure the safety of the device. Repeat the same process for the fan ensuring that the wires are in the correct place. Once that is done, you are ready to move on.
Working in the backend, getting the IoT Hub Ready
For this section, you will need to have a free Microsoft Azure Account. You can get your account for free here and also get $200 credits to get you started.
Please follow the tutorials below to get your IoT Hub, Device Provisioning Service and Certificates ready. It is very important to note that although the tutorial uses the S1 tier IoT Hub, you can use the F1 tier which is free of cost and achieves the same thing in our case.
- Use this link to set up your IoT Hub and DPS. Do not do the Cleaning up section at the end.
- Finally, follow the tutorial at this link to get your Azure Sphere connected to your hub
Moving on with the Streaming Job
We will be using a streaming job to extract the data from our IoT Hub as it is sent and relay it on to the Power Bi dataset we will be using later. Please note that this can also be done by using an Azure Function which is cheaper. The first section will walk through using Azure Functions and the second will use a Streaming Job.
Using Azure Functions
I personally used Stream Analytics for this project because it is easier to use. I did find two tutorials that show you how to get up and running and then how to connect the IoT Hub and then Power Bi. Note that you will have to adapt the code yourself to run.
- Set up the function and connect the IoT Hub by following this tutorial.
- Connect Power Bi by adapting the code to include some from this tutorial.
Using Stream Analytics Job
Ok, so if we are going to use the Stream Analytics job, the first thing to do is open our Azure Portal and then navigate to the “create a resource” button in the menu on the left of the screen.
- Search for Stream Analytics job and click enter. Now set it up using the following variables. Make sure you select the resource group used in the IoT Hub. Ensure you reduce the units to 1 to reduce the cost.
- Now wait for it to deploy and then navigate over to it (pin it to your dashboard if you wish). In the resource’s menu, find Inputs from the item list and click on it.
- Now select the IoT Hub option and from the menu, choose the IoT Hub you used. Set the resource name to “universum-intlair-iothub” to prevent having to change the script. Do not change any other parameter. Click save and wait for the connection to test out. Now select the Outputs option from the menu (below inputs).
- Select the Power Bi option. It will now prompt you to sign in. Sign in with the Microsoft account you have with a Power Bi subscription. If you do not own a Microsoft Business Account, use this tutorial to create one based on your existing account for free to use this service. After that is done, ensure that all your fields match the ones shown in the image below. Make sure you name the output “universum-intlair-together”.
Figure 9: Setting up the fields in the Stream job to connect to Power Bi
5. We are nearly there, now navigate to the Query option (above Outputs) and select it. Now we will have to include the script that will pull the data out of the IoT Hub and push it into the Power Bi dataset. Copy and paste the script below in the field and then click Save Query. Note that if you named your input and/or output something else, you would have to edit the names in the query.
SELECT
    co2 as co2,
    tvoc as tvoc,
    pressure as pressure,
    purifier as isPurifierOn,
    fan as isFanOn,
    time as time
INTO
    [universum-intlair-together]
FROM
    [universum-intlair-iothub]
6. Great! The last thing we need to do now is start running the job. To do this, go back to the resource’s home page and click the run button at the top of the page. Then select run from now and you are ready to go.
Setting up the Variables
Now that we looked at the code, we will need to edit some variables to enable the device to connect to our IoT Hub. Before we get started, make sure the app_manifest.json file is open in Visual Studio.
- The first thing we must do is open the Azure Sphere command prompt. This is done by pressing the Windows button and typing azsphere. Make sure you are signed in with your account and the correct tenant is selected. Type the command below to get your tenant ID.
- You should see something like this in your window. Copy the tenant ID that is displayed and go to your code. Paste it in the DeviceAuthentication field.
- Now navigate to your Azure Portal and open the IoT hub the device is connected to. Copy and paste the hostname field on the main page into the AllowedConnections filed in the application manifest.
- Finally, navigate to your DPS and copy and paste the ID Scope field displayed on the main page into the CmdArgs field in the application manifest. You are now ready to go!
Azsphere tenant show selected
Flashing the Code
Now that all of that is done. We must flash the application to the device. Connect the Azure Sphere device to your PC and then select the HighLevelCore from the flash options and click the run application button in the Visual Studio IDE.
Now before you use the product for distribution, please follow this tutorial to get the application running on the device in release mode.
Mounting Everything
For the sake of this prototype, I did not create a case or enclosure for the device. In most cases, the device can be hidden away somewhere, I decided to put it behind the air purifier But you could put it somewhere on the wall if that’s better, probably if you do enclose it.
Figure 10: An image of the device stuck to a wall
Finally, let’s work on the dashboard!
The last thing we need to do is get the dashboard ready to go. The first thing we need to do is open the Power Bi app (get it on the Windows store if you do not already have it, you can also use the web app). Create a new report and click on the Get Data button.
- Navigate over to the Power Platform and then select Power Bi datasets. Now simply select the dataset we have (make sure you ran the code for a while before, so we have data available). The data should now be ready to go.
- Ok, on to the frustrating part, we now have to create a dozen measures or so for the project. I will guide you through making one and you will have to repeat the process for the rest. To get started, make sure you have the expressions folder open (from the GitHub repo you downloaded earlier). You will see a dozen or so expressions there, we need to create new measures based on those scripts.
- In Power Bi, navigate to the menu bar at the top of the screen and select the New Measure button. This should create a new measure and give you a text box. Now open any one of the files (you can open them in VS code or a lightweight editor) and copy and paste the content into the box.
- Ok, so now repeat this process for all the values, do not worry if errors appear, once you do not edit the scripts, everything should be fine at the end.
- Now we can get to the fun stuff, this link from Power Bi will show you how to get started with creating stunning visuals on the platform. My product can be seen below.
- Now click on the View option from the top nav bar and select mobile layout. Drag and drop the graphs and text onto the phone frame to create a mobile version of the dashboard.
- Ok, so finally go back to the home page on the app and click on the Publish Report button from the options. This will publish your dashboard to the web allowing you to access it from anywhere. Just log into Power Bi and you should see it there. That is it, we are done!
Make sure to get the Power Bi app, it is available on Google Play and the App Store.
Figure 11: A screenshot of the final version of the project's dashboard
Conclusion
IntlAir helps you to monitor and purify the air in your home. It also allows you to observe the air quality on an online dashboard no matter where you are. This is done through the use of Azure Sphere, Power Bi and various other tools.
Most people do not even know if the air in their homes is clean or not, let alone purify it. I developed IntlAir to empower people with this data at a low cost and allow them to live in a clean, safe environment.
Figure 12: The IntlAir device on the air purifier