This project enhances mobility of visually impaired individuals by embedding a microcontroller in a white cane. The microcontroller uses machine learning to process IMU data and recognize gestures, sending commands to a smartphone via Bluetooth, enabling hands-free control of smartphone functions like opening apps and setting GPS locations, etc.
Steps:
1 Microcontroller Selection: I have used NXP FRDM-MCXA15x for its Dual Arm® Cortex® -M33 cores
2 IMU Integration: Integrate an Inertial Measurement Unit (IMU) with the microcontroller to collect motion data.
- IMU Selection: I chose LSM6DSOX 9 DOF IMU sensor for this project.
- Wiring: Connect the IMU to the microcontroller, ensuring correct pin connections for power, ground, and communication (I2C/SPI).
3 Data Collection: Collect motion data from the IMU to train your machine learning model.
- Setup: Prepare a setup where you can perform various gestures with the cane while recording data. Set appropriate polling rate of sensor.
- Recording: Collect IMU data for each type of gesture you want to recognize. Ensure you collect a sufficient amount of data for each gesture.
- Labeling: Label the collected data with the corresponding gesture names for supervised learning.
4 Data Preprocessing: Preprocess the raw IMU data to extract meaningful features.
- Filtering: Apply noise reduction techniques (e.g., low-pass filter) to the raw data.
- Segmentation: Divide the continuous data into smaller segments representing individual gestures.
- Feature Extraction: Calculate features such as mean, standard deviation, and Fast Fourier Transform (FFT) for each segment.
- Normalization: Normalize the features to ensure consistent data scaling.
5 Machine Learning Model Development: Develop and train a machine learning model to recognize gestures based on the preprocessed IMU data.
- Model Selection: Choose a suitable machine learning algorithm (e.g., Decision Trees, k-NN, SVM, Neural Networks).
- Training: Train the model using the labeled and preprocessed data.
- Evaluation: Evaluate the model's performance using metrics such as accuracy, precision, and recall.
- Optimization: Optimize the model by tuning hyperparameters and addressing any overfitting/underfitting issues.
6 Model Deployment on Microcontroller: Deploy the trained machine learning model on the microcontroller.
- Library Selection: Use TensorFlow Lite for Microcontrollers or Edge Impulse to convert and deploy the model.
- Conversion: Convert the trained model to a quantized .tflite format and we can also convert it into .hex file later to be included in the microcontroller's C code.
- Programming: Write a program to load the model onto the microcontroller and process real-time IMU data to predict gestures.
7 Bluetooth Low Energy (BLE) Integration: Integrate BLE communication to send recognized gestures to a smartphone.
- BLE Setup: Configure the BM71 BLE module for communication.
- Pairing: Write a program to pair the microcontroller with a smartphone for testing.
- Data Transmission: Implement functionality to send recognized gesture data to the smartphone via BLE.
8 Smartphone Application Development: Develop a smartphone application to receive and process the gesture data for navigation and control.
- App Design: Design the app interface and functionality (e.g., opening apps, setting GPS locations, marking locations, setting directions), using MIT app inventor.
- BLE Communication: Implement BLE communication in the app to receive data from the microcontroller.
- Gesture Handling: Write code to handle received gestures and trigger appropriate actions on the smartphone, such as marking a location with a double tap or setting directions to home with a specific gesture.
9 Testing and Validation: Test the entire system to ensure it works as expected and validate its performance.
- Unit Testing: Test individual components (IMU, BLE, model predictions) separately.
- Integration Testing: Test the integrated system (microcontroller, IMU, BLE, and smartphone app) to ensure seamless operation.
- User Testing: Conduct user testing with visually impaired individuals to gather feedback and make necessary adjustments.
Logic flow
1. Initialize System: Power on and initialize the microcontroller, IMU, and BLE modules.
2. Monitor IMU Data for Threshold Movement: Continuously monitor IMU data to detect if movement exceeds a predefined threshold.
3. Has Threshold Been Reached?
- No: If the threshold is not reached, continue monitoring IMU data.
- Yes: If the threshold is reached, proceed to the next step.
4. Record IMU Data for 1.5 Seconds: Start recording IMU data for a duration of 1.5 seconds.
5. Preprocess Data: Filter the recorded data and extract relevant features to prepare it for inference.
6. Run Inference on ML Model: Run the machine learning model on the preprocessed data to classify the gesture.
7. Is a Gesture Recognized?
- No: If no gesture is recognized, return to monitoring IMU data.
- Yes: If a gesture is recognized, proceed to send the classification result.
8. Send Classification via BLE to Smartphone: Transmit the recognized gesture classification to the connected smartphone via BLE.
9. Perform Action on Smartphone: The smartphone executes the corresponding action based on the received classification (e.g., open an app, set GPS location).
10. Put Cane to Low power mode: After sending the classification and performing the action, put the cane into a low-power sleep mode. While in sleep mode, continue monitoring for any new movement that exceeds the threshold.
12. Repeat from step 2
Deployment Uses:
- Marking Locations: Users can mark their current location with a double tap on the cane, which will save the GPS coordinates in their smartphone.
- Setting Directions: Users can set directions to pre-saved locations, such as home, by performing a specific gesture with the cane.
- Hands-Free Navigation: The system allows users to navigate their smartphone and use apps without needing to use their hands, enhancing convenience and safety.
Model Architecture
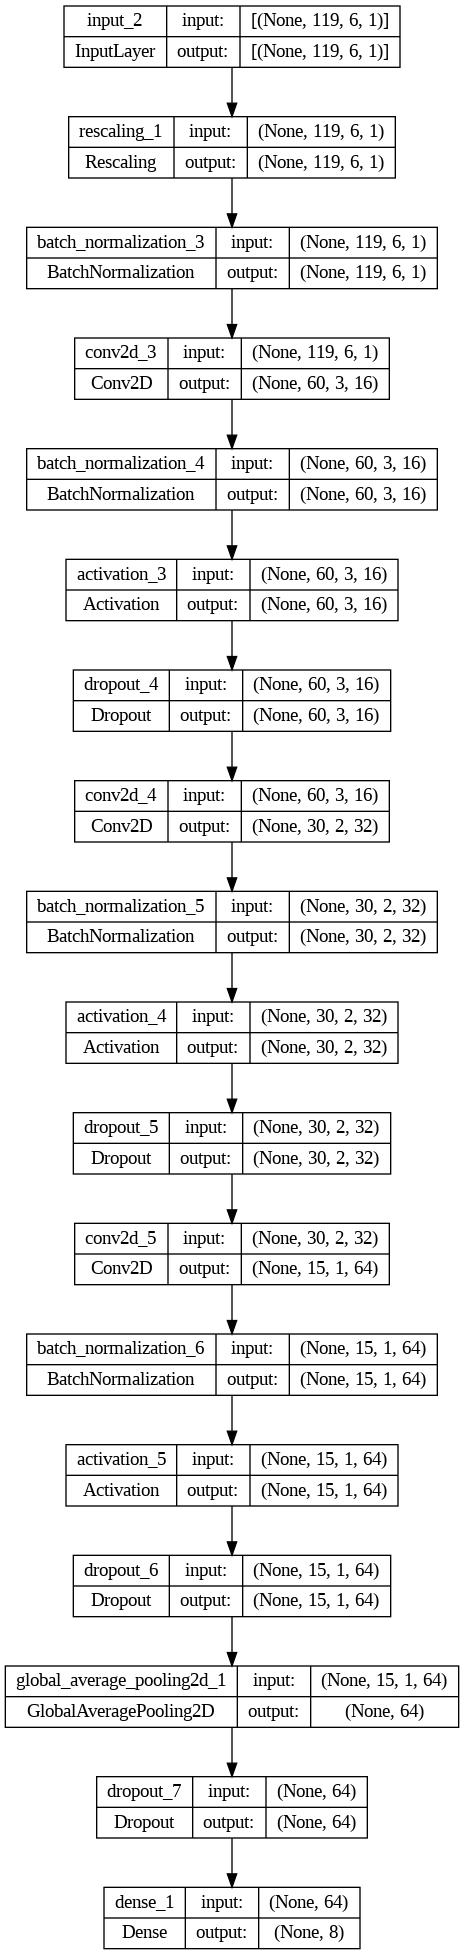
Neural Network Model Architecture
This is the architecture of the neural network model that I trained on my data.
1. Input Layer
This is the input layer that accepts input data with the shape (119, 6, 1). Here, 'None' indicates that the batch size can vary. The input shape (119, 6, 1) suggests a 119x6 feature map with 1 channel.
2. Rescaling Layer
This layer rescales the input data. Rescaling typically normalizes the input values, for example, by dividing by 255 to scale pixel values to the [0, 1] range.
3. Batch Normalization Layer
This layer normalizes the activations of the previous layer at each batch, i.e., it maintains the mean output close to 0 and the output standard deviation close to 1.
4. First Convolutional Layer
This layer applies 2D convolution with 16 filters, each of size 3x3, followed by down-sampling (likely with strides or padding that halves the spatial dimensions).
5. Batch Normalization Layer
This layer normalizes the activations after the first convolutional layer.
6. Activation Layer
This layer applies an activation function (e.g., ReLU) to introduce non-linearity into the model.
7. Dropout Layer
This layer randomly sets a fraction of input units to 0 at each update during training time, which helps prevent overfitting.
8. Second Convolutional Layer
This layer applies 2D convolution with 32 filters, each of size 3x3, followed by down-sampling.
9. Global Average Pooling Layer
This layer is used to reduce the spatial dimensions of the input feature map to a single value per channel, effectively converting a 2D feature map into a 1D vector.
10. Dense Layer
This layer categorizes our input data in one of our motion gestures using softmax activation function.
from keras import layers

def make_model(input_shape, num_classes):
    inputs = keras.Input(shape=input_shape)

    x = layers.Rescaling(1.0 / 16)(inputs) #rescaling imu data
    x = layers.BatchNormalization()(x)	   #normalising imu data
    x = layers.Conv2D(16, 3, strides=2, padding="same")(x)
    x = layers.BatchNormalization()(x)
    x = layers.Activation("relu")(x)
    x = layers.Dropout(0.2)(x)

    x = layers.Conv2D(32, 3, strides=2, padding="same")(x)
    x = layers.BatchNormalization()(x)
    x = layers.Activation("relu")(x)
    x = layers.Dropout(0.2)(x)

    x = layers.Conv2D(64, 3, strides=2, padding="same")(x)
    x = layers.BatchNormalization()(x)
    x = layers.Activation("relu")(x)
    x = layers.Dropout(0.2)(x)

    x = layers.GlobalAveragePooling2D()(x)
    activation = "softmax"
    units = num_classes

    x = layers.Dropout(0.2)(x)
    outputs = layers.Dense(units, activation=activation)(x)
    return keras.Model(inputs, outputs)


model = make_model(input_shape=(119, 6, 1), num_classes=8) # i have 8 different motion gestures
keras.utils.plot_model(model, show_shapes=True)


model.compile(
    optimizer=keras.optimizers.Adam(1e-3),
    loss="binary_crossentropy",
    metrics=["accuracy"],
)
Convert the model to .tflite format
converter = tf.lite.TFLiteConverter.from_keras_model(model)
tflite_model = converter.convert()

# Save the model to disk
open("gesture_model.tflite", "wb").write(tflite_model)

import os
basic_model_size = os.path.getsize("gesture_model.tflite")
print("Model is %d bytes" % basic_model_size)
Convert TFLite model to .hex format
TFL_MODEL_FILENAME = "gesture_model.tfl"

# Install xxd if it is not available
!apt-get update && apt-get -qq install xxd
# Convert to a C source file, i.e, a TensorFlow Lite for Microcontrollers model
!xxd -i {TFL_MODEL_FILENAME} > {TFL_CC_MODEL_FILENAME}
# Update variable names
REPLACE_TEXT = TFL_MODEL_FILENAME.replace('/', '_').replace('.', '_')
!sed -i 's/'{REPLACE_TEXT}'/gesture_model/g' {TFL_CC_MODEL_FILENAME}
To deploy a TFLite Model on NXP MCX A15x
Ensure you have the MCUXpresso IDE installed.
Install TensorFlow Lite for Microcontrollers.
Set Up Your Project in MCUXpresso:
- Create a new project in the MCUXpresso IDE.
- Configure your project to use the MCX A15x board support package.
Integrate TensorFlow Lite for Microcontrollers:
Include the Model in Your Project:
- Add the generated
model.cc file to your project. - Include the model header in your main application code.
#include "model.cc"
Initialize TensorFlow Lite Micro:
- Initialize the TensorFlow Lite interpreter in your main application.
#include "tensorflow/lite/micro/all_ops_resolver.h"
#include "tensorflow/lite/micro/kernels/micro_ops.h"
#include "tensorflow/lite/micro/micro_error_reporter.h"
#include "tensorflow/lite/micro/micro_interpreter.h"
#include "tensorflow/lite/schema/schema_generated.h"
#include "tensorflow/lite/version.h"
// Create an area of memory to use for input, output, and intermediate arrays.
constexpr int kTensorArenaSize = 10 * 1024;
uint8_t tensor_arena[kTensorArenaSize];
// Create a static memory error reporter for logging.
tflite::MicroErrorReporter micro_error_reporter;
tflite::ErrorReporter* error_reporter = µ_error_reporter;
// Define the model and interpreter.
const tflite::Model* model = ::tflite::GetModel(model_tflite);
static tflite::MicroOpResolver<10> micro_op_resolver;
tflite::MicroInterpreter interpreter(
model, micro_op_resolver, tensor_arena, kTensorArenaSize, error_reporter);
// Allocate memory from the tensor_arena for the model's tensors.
interpreter.AllocateTensors();
To wrap up this project:
- Testing and Calibration: Ensure all components are properly calibrated and thoroughly test the system in real-world scenarios to confirm accurate gesture recognition and reliable BLE communication.
- User Feedback: Engage with visually impaired users to gather feedback, which will be invaluable for refining the system and tailoring it to their specific needs.
- Documentation: Compile comprehensive documentation, including the circuit diagram, code, and user guide, to make it easier for others to understand, replicate, or further develop the project.
- Deployment: Consider deploying the system in a real-world setting, and observe how it performs over time. Make adjustments as necessary to improve performance and user experience.
- Future Developments: Reflect on potential future enhancements, such as more complex gesture recognition, improved power management, or additional smartphone functionalities.