Make a mood lamp
If you are a newbie to using a PCB and have a passion for making electronic gadgets, then you could start with a simple PCB project like a cute portal-themed mood lamp. It adds some color to your living space. It’s really easy to make using a few parts and minimal wiring.
Things needed
• 1 RGB LED
• 1 Arduino and USB cable
• 1 small breadboard
• 4 330 ohm resistors
• 1 square glass bottle or jar as you like
• 4 long jumper wires, better if they are in different colors
• 1 white candle
• Hard drying clear glue
• Some gray and red modeling clay
You can easily buy the electronic parts like the PCB assembly from online stores like pcbgogo. If you are lucky, you may find a glass jar lying around the house. If not, you can always buy one.
The first thing to do is frost the cube by first removing the plain white candle’s wick and metal tab. Place it in a ceramic mug in the microwave for one to three minutes so that it melts into a clear fluid.
Get your glass ready
Wear work gloves to pour the wax onto the jar or bottle while swirling it gently till the wax cools down. There should be a layer of solid wax on all surfaces to give the glass a white and uneven, marbled texture from the outside for better looks and effects.
Don’t worry. If all this seems to be too messy for you, you can always just give the glass a coat of white paint!
Decorations
Now it’s time to decorate the cube using the clay to make it look like a cube. Use it to cover the corners, the middle of edges between them and also make cute circles in the middle of each face with red or pink hearts on them.
After spending so much time decorating the glass, you can protect your work of art by applying a few layers of clear glue to the clay surface.
It works as a hard shell and prevents the clay from getting disturbed or rubbing off on something else. Don’t try baking it because the glass may explode due to the oven’s heat.
Wiring
With your cube ready, you are now ready to do the wiring. You first have to take a look at your RGB LED legs. You’ll notice a long one which is the negative prong while the other three are differently colored positive prongs, usually red, green and blue.
Now bend the negative prong and stick it into the breadboard’s top black, negative row. Then bend the other three legs into three columns in the middle of the board, so that no two prongs share a column.
The prongs should be bent so that the LED lies flush against the board. This is when you insert the resistors to attenuate the current flow and prevent the LED from burning out.
PCB assembly
Now it’s time to connect the long wires to the Arduino’s 10, 11 and 12 pins, which lie on its edge. Then use the breadboard to link them to the resistors, which are in turn linked to the LED. Then run the Arduino’s GND pin (ground pin) to anywhere on the breadboard’s black row.
It’s left to you to decide if you prefer the aesthetical look of exposed wires and circuit boards while stacking the breadboard and Arduino in a small box so that they remain hidden, or if you prefer using a soldering iron and getting rid of the breadboard.
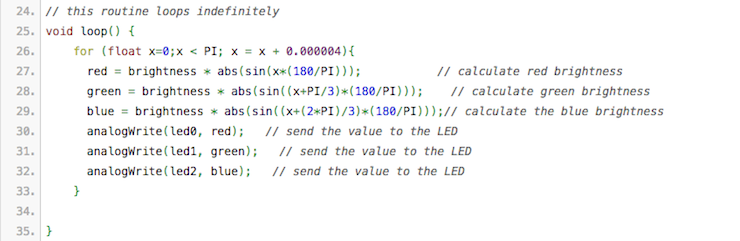
Simple code
Now that everything’s connected, the only thing remaining is your software. You can use this simple color swirl code that tells the computer the pins you’ll be using.