Build and learn to fly a foam-board remote-controlled plane.
Aeromodelling is the art of designing, building, and flying model airplanes, helicopters, and multicopters. These models may be powered or unpowered. Powered aeromodels use electric motors, IC engines, or jet engines to generate thrust to make them fly.
Flying models borrow construction techniques from full-size aircraft. Model aircrafts are built using a variety of materials including paper, foam board, depron, balsa wood, coroplast sheets, or composite materials like fiberglass or carbon fiber.
In this tutorial, we will be building a radio-controlled model airplane using foam board. This RC plane is easy to build and fly. It is also a good platform for beginners to learn about flying. You can also skip to check the build video tutorial of the RC plane by scrolling down this page.
RC Plane Specifications
Wingspan: 20 inches
Length: 22 inches
All Up Weight: 425 grams
Center of Gravity: 5 inches from the Leading Edge of wing
How Does the RC Plane Work?
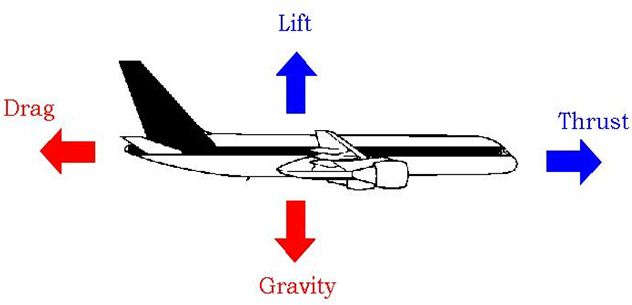
Gravity, lift, thrust, and drag are the forces acting on an airplane in flight (Fig. 1). Maintaining a steady flight requires a balance, often described as equilibrium of all the forces acting upon an airplane. By varying this equilibrium, we can make the plane accelerate forward, upward, downward, etc.
Fig.2 Bernoulli’s Principle
The thrust for our aircraft is provided by an electric motor, and the wings generate the lift. The shape of the wings and the aerofoil decides the lift generation. The lifting force is provided by the difference in the pressure of air flowing above and below the wing and is governed by Bernoulli’s principle (Fig. 2). Here, we are using a flat bottom, Kline–Fogleman airfoil.
Printing the RC Plane Plans and Getting the Parts Ready
In this step, we lay out the plan that we printed before and tape the sheets together as shown in Fig. 1.1.
We then take the full plan and lay it out on the foam board and cut the foam board accordingly to get the required parts as shown below Fig. 1.2.
Also, cut the motor mount out of Lite Ply and drill holes as required by your motor (Fig. 1.3).
Building the Power Pod and the Wing
To build the power pod (fuselage), start by cutting the foam on the red line and remove the foam in between the lines as shown in Fig. 2.2. Fold the sides of the pod together and run a bead of hot glue to keep them firmly in place. Glue the motor mount that we have cut, to the front end of the fuselage with epoxy (Fig 2.3). Bolt on the motor to this mount using the 3.5mm nuts and bolts (Fig 2.4).
The next step is to build the wing of the aircraft. Cut halfway through the foam on the red line so the foam can easily bend on the line. Cut a bevel edge on the elevator so that it can move freely. Cut all the necessary notches (marked in black) for the servos, tail fin, and power pod to fit into the wing. Fold the sides of the wing so its tips are pointed upward at 1.5 inches (Fig. 2.6, 2.7). This provides stability during flight.
We will next cut a bevel edge on the tail fin so the rudder can move freely (Fig. 2.8). Then, we glue the tail fin into place on the wing.
We use glass fiber tape and hinge the tail fin and rudder together. We then install the servos in place, which are necessary for controlling the elevator and rudder of the plane.
At the end of this step we will have four parts:
- Wing
- Power Pod
- Tail Fin
- Motor Mount
Assembling the Airplane
Once we have the wing and power pod ready, we go ahead and glue them together as in Fig. 3.1. Then, we install the control horn on the elevator and run a control rod from the servo to the elevator’s control horn as in Fig. 3.2. We follow the same step for the rudder (Fig. 3.3).
Installing the Electronics
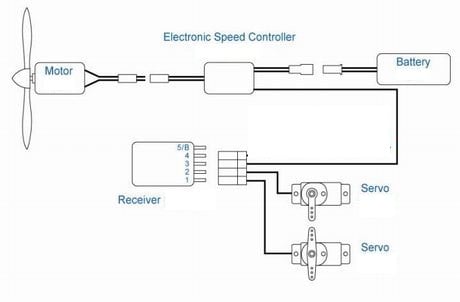
We now install the RC receiver, battery and ESC into the Power Pod as shown in Fig below. And connect your servos to the receiver as in the below wiring diagram. Note the channels you use for each servo and control them correspondingly from the transmitter. Now your RC Plane is all set for flying. :)
Flying Your New RC Plane
We will use a radio controlled transmitter working on 2.4 GHz frequency to fly this airplane. I highly advise beginners to learn flying on a simulator before actually flying the airplane. There are a lot of simulators available in the market to start
learning how to fly airplanes.
Flight Video: