Use a Raspberry Pi to build a Python-based, obstacle-avoiding robot that uses IR modules to detect objects.
If you are a beginner to Raspberry Pi and are looking for a simple hardware project, look no further. This tutorial will show you to develop a Python-based robot that avoids obstacles and navigates freely.
Obstacle-avoiding robots are fairly common and easy to make. Here, you can use this project to add object avoidance functionality to your robot. Or simply use it to start messing around with Python and the hardware peripherals on Raspberry Pi. This system uses IR modules to detect objects, but we will get to the technical side later. So, if you have a Raspberry Pi and want to build something based on hardware using it, just scroll down and have fun.
Check out the video at the bottom to see how the Raspberry Pi robot works. And if you are a true beginner, you can always use our free eBook on Raspberry Pi and Arduino to get started from step 0. You can also read this tutorial on Basic Linux Commands to familiarize yourself with the Raspberry Pi terminal.
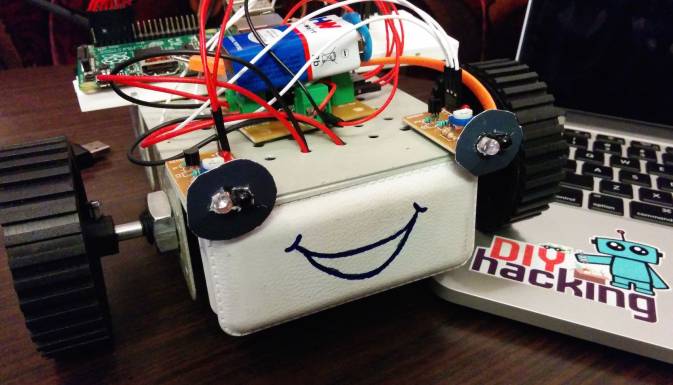
Raspberry Pi robot components
How Does the Robot Work?
The workings of this robot are really simple. The whole system avoids colliding into obstacles, thanks to its onboard sensors. This robot uses two IR sensor modules, which can detect objects within a range of 5–6cm. This sensor outputs a digital LOW (0V) signal when there is an object within its range, and outputs a digital HIGH (5V) signal otherwise.
So how do these IR sensors work? IR stands for infrared, which is a wavelength of light not visible to the human eye. (But it can be seen through our smartphone cameras!) These modules consist of a pair of receiver and transmitter IR LEDs. When an object gets in front of the IR sensor, the surface of the object reflects a part of the IR light back to the receiver. Thus, the receiver then outputs a LOW signal notifying that an object is in front of the sensor.
These sensors are wired to the GPIO input pins of the raspberry pi. The pi then using a python script checks whether the GPIO pins connected to the IR sensor modules goes low. If it does go low, then it commands the DC motors to move in the reverse direction first and then turn. Moreover, this robot is initially activated when we push the button on the breadboard, after which the raspberry pi commands the DC motors to move forward via the L293D driver board. You can check out the demo video at the bottom of this page to see how this robot works.
Connecting the IR Sensors for the Raspberry Pi Robot
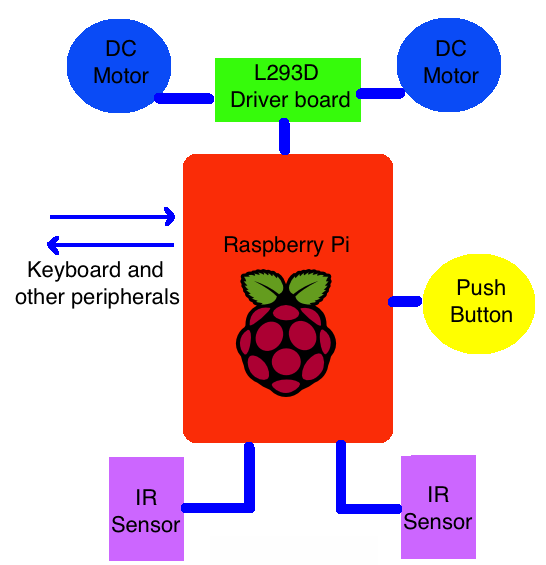
First, you need to turn ON your Raspberry Pi after connecting it to the monitor, keyboard, etc. Then we need to check the IR sensor modules. To do this, connect the IR modules to your Raspberry Pi as shown in the following diagram. Power the sensor by providing 5V (+ pin), GND (- pin) from the Raspberry Pi. And connect the B pin on the sensors to Raspberry Pi's GPIO pins 3 and 16. You can check out the Raspberry Pi GPIO pinout as per the pin diagram here. We are using the GPIO.BOARD configuration, which means the pins are numbered based on their normal order on the board (1,2,3, ...). Read the pin configuration on the sensor module and connect correspondingly.
Connection diagram — Raspberry Pi IR sensor
Next, you need to copy and paste the following code and save it as a Python file- irtest.py:
import RPi.GPIO as GPIO
import time
GPIO.setwarnings(False)
GPIO.setmode(GPIO.BOARD)
GPIO.setup(3, GPIO.IN)                            #Right sensor connection
GPIO.setup(16, GPIO.IN, pull_up_down=GPIO.PUD_UP) #Left sensor connection
while True:
i=GPIO.input(3)                         #Reading output of right IR sensor
j=GPIO.input(16)                        #Reading output of left IR sensor
if i==0:                                #Right IR sensor detects an object
print "Obstacle detected on Left",i
time.sleep(0.1)
elif j==0:                              #Left IR sensor detects an object
print "Obstacle detected on Right",j
time.sleep(0.1)
After saving and running this file, "sudo python irtest.py", you will notice that when you block the sensor with your hand, the following output prints on the screen:
IR sensor output from python
Connecting the Motors With L293D
After testing the IR sensor modules, you need to connect and test the L293D module and the motors. Power the L293D module by connecting the + and - pins of the board to the 9V battery. Also, connect the "-" of the board to the GND of Raspberry Pi. You can refer to the connection diagram here for completing the connections:
Raspberry Pi robot connection diagram
Next, you have to provide the inputs to the board. Four output GPIO pins from the Raspberry Pi control the direction of rotation of the two motors. The two terminals of the motors are then connected to the four output terminals of the board. The motors, based on the command from the Raspberry Pi, are powered by the 9V battery. The logic for controlling the motors from the Raspberry Pi is as given below:
L293D Raspberry Pi control logic
Here, HIGH means a 5V signal or digital 1, and LOW is a 0V signal or digital 0. For example, GPIO.output(5,1) — this command sends a HIGH signal (digital 1) to pin no 5 on the Raspberry Pi. Thus, each motor's direction can be controlled by writing HIGH/LOW signals through two GPIO pins from the Raspberry Pi.
Next, you need to wire a push button to the Raspberry Pi as shown in the above connection diagram. This button is used to activate and deactivate the robot. After wiring the robot, attach the wheels. Use double-sided tape to fix the parts together on the robot chassis. You will have a setup that almost looks like this:
Raspberry Pi robot assembly
After connecting the motors, you need to check them. Use the code below to check the motors and the L293D. Make sure you have powered the driver board (L293D) and given the connections as per the above diagram. After that, copy the code below and save it as a Python file, motor.py, on your Raspberry Pi. Then run it using the command sudo python motor.py. You will notice that both the motors rotate in one direction first, then after a second rotate in the opposite direction. This process repeats until you interrupt it.
import RPi.GPIO as GPIO
import time
GPIO.setmode(GPIO.BOARD)
GPIO.setup(5,GPIO.OUT)   #Left motor input A
GPIO.setup(7,GPIO.OUT)   #Left motor input B
GPIO.setup(11,GPIO.OUT)  #Right motor input A
GPIO.setup(13,GPIO.OUT)  #Right motor input B
GPIO.setwarnings(False)

while True:
print "Rotating both motors in clockwise direction"
GPIO.output(5,1)
GPIO.output(7,0)
GPIO.output(11,1)
GPIO.output(13,0)
time.sleep(1)     #One second delay

print "Rotating both motors in anticlockwise direction"
GPIO.output(5,0)
GPIO.output(7,1)
GPIO.output(11,0)
GPIO.output(13,1)
time.sleep(1)     #One second delay
Uploading the Code for the Raspberry Pi Robot
After completing all the hardware setup, you need to download and copy this
Python program to your Raspberry Pi. This program is called robot.py, and when executed using the command
sudo python robot.py, will bring your robot to life. The robot will begin moving when you press the push button. You'll notice how it avoids objects in front of its sensors and navigates freely.
This program is very simple. The robot is activated when the user presses the push button, and after that, the robot moves forward and checks whether any obstacles show up in front of it. Whenever your IR modules detect an object within 5cm in front of it, it tells the Raspberry Pi that an object is near it (sending digital LOW signals). Then the Pi sends commands to the motor, making it move in the reverse direction and then turning right or left, and again the robot moves forward by dodging the object. The robot is deactivated when you press the push button again.
After copying the code to your Raspberry Pi, you can make it truly wireless by using a smartphone battery bank to power it and a USB Wi-Fi dongle to communicate with it. You can extend the display of your laptop via VNC server and a LAN cable. Or use SSH to connect remotely to your Pi from the terminal wirelessly.
Check out the video showing the Raspberry Pi robot in action: