Create an alarm that sounds off anytime something crosses through the laser.
This Launchpad-based laser tripwire alarm will turn your next security system into a secret agent's dream. It can also be expanded for other home automation projects. The laser tripwire alarm utilizes basic components to create an alarm that sounds off anytime something crosses through the laser. Guard your precious valuables or learn how to make it control just about anything!
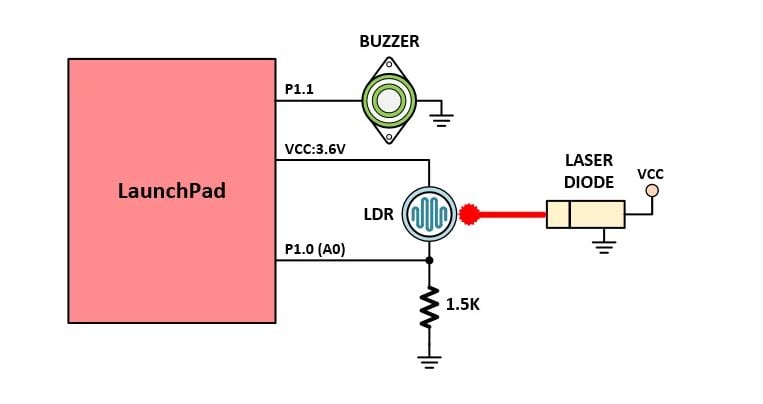
Schematic
Why?
I was fed up with my laboratory's lack of security, so I created a laser tripwire alarm that would alert me anytime somebody was trying to break in and steal my super secret scientific plans. To compliment my high-tech security system, I also created the confetti-cannon so that my intruder would be covered in confetti and caught red-handed! If these systems don't fit your security needs, have fun and get creative with it!
Disclaimer: does not work well as a legitimate home security system.
How Does the Tripwire Alarm Work?
If you'd like to learn more about laser tripwire systems, see the original article: l
aser tripwire alarm.
The design is focused on the analog input reading, which will fluctuate because it is dependent on the resistance of the LDR (light-dependent resistor). An LDR changes its resistance based on light intensity. The beam emitted from the laser diode is directed onto our LDR. Anytime something crosses between the two components, the laser is blocked and will not illuminate the LDR; this causes the LDR's resistance to increase, which results in a lower voltage at the ADC input pin.
I used a threshold of 3V. The Launchpad sends pulses of 3.6V out to our buzzer whenever the analog input is below the threshold, creating an audible alarm. The buzzer module I used does not require a typical AC audio signal or audio frequency square wave. You just need to apply a steady voltage for as long as you want it to make sound. The buzzer I used is described as a 5V device, but it worked for me at 3.6V just fine.
You can also use a relay for other tripwire activated control tasks.
The Code
Essentially, your code will do the following:
- Calculate the analog input voltage
- Compare the analog input voltage with the threshold value
- If under the threshold, send a pulsing signal out to buzzer (i.e., on for 150 ms, off for 100 ms)
void setup()
{ analogRefrence(DEFAULT);
pinMode(3,OUTPUT);
}
void loop() {
int sensorValue = analogRead(A0);
float voltage = sensorValue * (3.6 / 1023);
if (voltage < 3.0) {
digitalWrite(3,HIGH);
delay(150);
digitalWrite(3,LOW);
delay(100);
}
else {
digitalWrite(3,LOW);
}
}
Remember, home security is not the only use for the laser tripwire. You can control your lighting like I did, automate the rest of your home, or get creative and invent the next best security robot! Happy making!
Related Projects
Using an LDR Sensor with Arduino
DIY Music Keyboard (We'd love to see somebody replace the keys with LDRs!)